
Your Pi Update Succeeded. You Are Still Running the Old Pi.
Every route for installing the Pi coding agent works on its own; the one failure that ruins day one is using two, and the cure is to pick one route, prove which copy runs, and prove the model key with a real read-only prompt.
How to install the Pi coding agent by one route, prove which copy runs, and connect a model in a first session that reads your code and changes nothing.
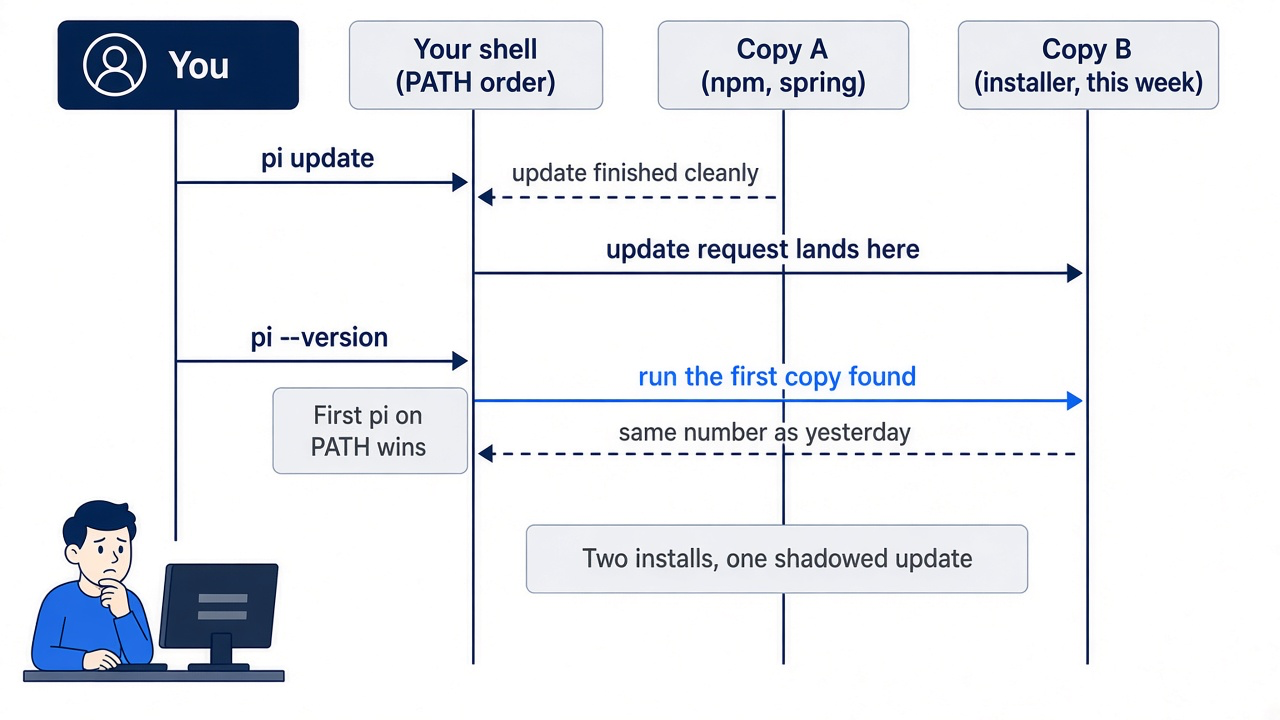
You ran pi update, it finished cleanly, and pi --version still prints yesterday's number. Nothing failed; you have two copies of Pi, and the update landed on the one your shell never runs.
In this article: Day 1 of a day-by-day guide to Pi. Start here: build the Ticket Triage repository, install Pi by one route, save an Anthropic API key, and run a read-only first session that leaves
git status --shortempty. Going deeper: why two install routes produce two copies and how to prove which one runs, the npm, Nix, Linux, and Windows routes, and where Pi finds a credential, plus updating and uninstalling.
Tested on Pi 1.5.2.
This is Day 1 of a 12-day guide to Pi, the terminal coding agent, for developers who already use Claude Code. Each day is one part. Each part opens with a Start here section of 20 to 40 minutes that ends in a result you can check. A Going deeper section follows with the details, the alternatives, and the edge cases. You can skip it until you want it.
The roadmap, one part per day:
- Build Ticket Triage, install Pi, connect one model, and run a read-only first session.
- Start Pi in the right folder, name a session, and come back to it.
- Steer a run: correct it, queue a follow-up, and stop it.
- Run tests with
!!and!, and name one file with@. - Commit, branch two approaches in the session tree, and keep the winner with
/clone. - See what Pi sends on every request, and prove what a new session does not know.
- Compact on purpose, and keep the rule in a three-line
AGENTS.md. - Add a
/reviewprompt template and ashipskill. - Add a
guard.tsextension that blocks one command. - Run Pi inside Docker Sandboxes and prove the boundary.
- Put the habits together into one working day.
- Look up any Claude Code habit in the rename map, and the glossary.
It is easy to get stuck using Pi the way you first learned it. Pi keeps adding features, and some of them are a big step up in productivity. This guide keeps you current, in bite-sized daily chunks, so you pick up a few new techniques every day, do not get left behind, and use Pi the way it is meant to be used.
Start here
By the end of today you have the Ticket Triage repository on disk, Pi installed, an Anthropic API key saved, and a first Pi session that read your code and changed nothing.
These steps are for macOS and Linux. On Windows, read "Windows: native or WSL" in Going deeper first. You need git, a terminal, and Node.js 22 or later. You also need an Anthropic API key. An API key is a secret that lets a program use your account at a model provider, the company that runs the models. Anthropic bills API use by the token, the unit of text a model reads and writes, so an API key is separate from a Claude Pro or Max plan. Create a key in the Claude Console before you start.
Check where you start
Start by confirming you have no old copy of Pi.
command -v pi
node --version
No output means no pi on your PATH, and you can install. A printed path means a copy already exists. Run pi --version. If it prints 1.5.2 or later, keep that copy: build Ticket Triage, then skip Install Pi and continue at Save your API key. If it prints an older version or fails, do not keep it as it is. Skip ahead to "Which Pi am I running" in Going deeper, find out which route put it there, and either update it or remove it with that route's uninstall command before you go further. If you are not sure, remove it. The second command should print v22 or a later major version.
Build Ticket Triage
Building Ticket Triage by hand is the recommended route on a first read. Restarting on a new machine? Skip to Install Pi, then use the shortcut in Get Ticket Triage.
One repository carries all twelve parts. Ticket Triage is a small Node.js support-ticket service at ~/code/ticket-triage. It reads a ticket and classifies it as refund, shipping, or other. If you followed the OpenCode or Claude Code guides, you have met it before, but this series stands alone and assumes nothing from those. It is plain JavaScript with ES modules and the built-in test runner, so npm test needs no install.
Three files matter:
package.jsondeclares ES modules and one script,npm test.src/classify.jsreturns the category.test/classify.test.jsholds the classifier tests.
Create the folder and start a git repository in it, so you can always see what changed. The -b main flag names the first branch main, the name this guide uses for it.
mkdir -p ~/code/ticket-triage/src ~/code/ticket-triage/test
cd ~/code/ticket-triage
git init -b main
Create package.json. It declares ES modules and points npm test at the built-in runner.
{
  "name": "ticket-triage",
  "version": "0.1.0",
  "type": "module",
  "scripts": { "test": "node --test" }
}
Save the classifier as src/classify.js. Every later part changes it.
// src/classify.js
// Classifies a support ticket as refund, shipping, or other.
export function classify(text) {
  const t = text.toLowerCase()
  if (t.includes("refund") || t.includes("money back")) return "refund"
  if (t.includes("shipping") || t.includes("delivery") || t.includes("package")) return "shipping"
  return "other"
}
The refund check runs first, then the shipping check, and anything else falls through to other. Save the tests as test/classify.test.js.
// test/classify.test.js
import { test } from "node:test"
import assert from "node:assert/strict"
import { classify } from "../src/classify.js"

test("refund", () => assert.equal(classify("I want my money back"), "refund"))
test("shipping", () => assert.equal(classify("Where is my package?"), "shipping"))
test("other", () => assert.equal(classify("Hello"), "other"))
The repository has one check, and you run it the same way whether a person or an agent made the change.
npm test
It should pass on a clean checkout. The summary at the end is the part to compare.
ℹ tests 3
ℹ suites 0
ℹ pass 3
ℹ fail 0
In later parts, "done" means this command actually ran, not that the model said it would pass. The change that runs through the series starts with one ticket:
The box showed up crushed and the mug inside is in pieces.
Call classify() on it directly. node --input-type=module -e runs the quoted JavaScript as an ES module.
node --input-type=module -e "import { classify } from './src/classify.js'; console.log(classify('The box showed up crushed and the mug inside is in pieces'))"
Today that ticket lands in other, and the script prints exactly that. You want the classifier to spot the damage phrase ("crushed," "in pieces") so that the classifier returns shipping, and refund when the customer also asks for money back. Commit the starting point.
git add -A
git commit -m "Start Ticket Triage"
Install Pi
With a clean slate, run the installer. Stay in ~/code/ticket-triage for this step. The installer ends by offering to start Pi, and Pi starts in the folder you ran the installer from.
curl -fsSL https://pi.dev/install.sh | sh
curl downloads the install script, and | sh runs it. The installer prints the path it will use, such as Pi will install to /opt/homebrew/bin/pi, and a choice:
Choose an action:
  y    Install Pi (default)
  n    Do nothing
Type y and press Enter. When it prints Pi was installed successfully., it asks Start pi now? [Y/n].
- If you are in
~/code/ticket-triage, pressEnter. Pi starts. On the first start it downloads a search tool,fd, and then showsWarning: No models available, because you have not saved a key yet. Type/quitand pressEnterto exit. A command that starts with/inside Pi is a slash command. - If you are anywhere else, type
nand pressEnter.
Open a new terminal window when the script finishes, so your shell picks up any change to PATH, and verify.
cd ~/code/ticket-triage
pi --version
The command prints the version, for example 1.5.2. The installer always installs the latest release. If your number is higher than the "Tested on" line at the top of this part, the steps should still work, and a screen that looks different is the first thing to check against Pi's changelog.
Save your API key
A model is the AI system that writes the answers, and Pi sends each request to a model at a provider. This guide's tested runs use Anthropic's models with an API key. Going deeper shows the same steps with a Google Gemini key, which were also tested.
pi auth login anthropic --api-key
pi auth login saves a credential for one provider and exits, and --api-key asks for a key instead of an account sign-in. Paste the key at the Enter Anthropic API key: prompt and press Enter. The key does not appear as you paste it. Pi prints Saved API key for Anthropic. and the path of the file that holds it, ~/.pi/agent/auth.json. Check the result.
pi auth check --provider anthropic
--provider anthropic names the provider to check. The command prints ready. ready means a key is saved. The next step proves that Anthropic accepts it.
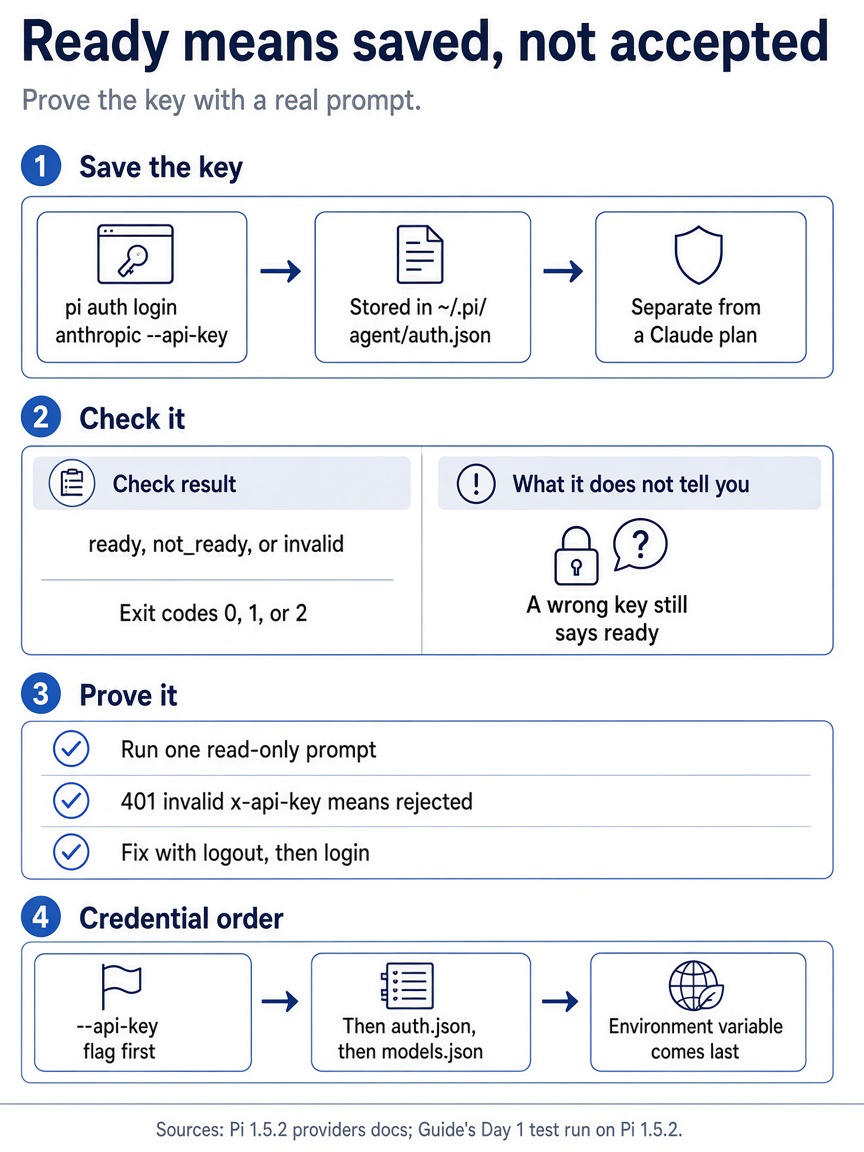
Saving, checking, and proving a key look like one step, but they are three. Saving a key and checking it both happen on your machine, and neither one talks to Anthropic. Only a prompt does, which is why the read-only session below doubles as your key test.
Get Ticket Triage
Ticket Triage is a small Node.js ticket classifier with no dependencies, tested with Node's built-in test runner. The code for every day is in the ticket-triage-day-by-day repository on the pi branch, with one tag per day from pi/day-00 to pi/day-12. A tag is a fixed name for one commit, and each later day opens with a catch-up line that names one.
If you built Ticket Triage by hand above, run these two commands once in ~/code/ticket-triage, so the catch-up lines work. A remote is git's name for another copy of the repository. The commands add the Spillwave copy as upstream and download its tags without changing your files.
git remote add upstream https://github.com/SpillwaveSolutions/ticket-triage-day-by-day.git
git fetch upstream --tags
If you are restarting the guide on a new machine and skipped the build, let Pi set up the Day 0 starter. Pi shows no approval prompt, so it runs the clone, git, and npm test commands without asking. Read the prompt before you run it. -p runs one prompt and exits. In the prompt, git switch -C main pi/day-00 makes your main branch point at the Day 0 tag's code, replacing what main held, and git branch --unset-upstream main stops your main from following the Spillwave copy.
mkdir -p ~/code && cd ~/code
pi -p "Clone https://github.com/SpillwaveSolutions/ticket-triage-day-by-day into ~/code/ticket-triage. In that folder, check out the pi branch, run git switch -C main pi/day-00 and git branch --unset-upstream main, rename the remote origin to upstream, then run npm test and show the summary."
(written from the docs, not yet run)
Check the result with your own commands, not only Pi's summary.
cd ~/code/ticket-triage
npm test
git status -sb
npm test ends with ℹ pass 3 and ℹ fail 0, and git status -sb prints ## main with nothing after it. Continue at Run a first read-only session.
Run a first read-only session
A session is one conversation with Pi. A tool is an action the model can take, such as reading a file or running a command. Pi does not ask before a tool call, so for a first look at a repository, limit the tools. Run one prompt from the project folder.
pi --tools read,grep,find,ls -p "Read package.json, src/classify.js, and test/classify.test.js. Explain how classify() picks a category, which test covers each branch, and why 'The box showed up crushed and the mug inside is in pieces' returns other. Do not edit any file."
Two flags shape this run. -p is print mode: Pi runs one prompt, prints the final answer, and exits. --tools read,grep,find,ls gives the model only tools that read and search, so it cannot run commands or edit files. The answer takes a few seconds, and only the final answer appears.
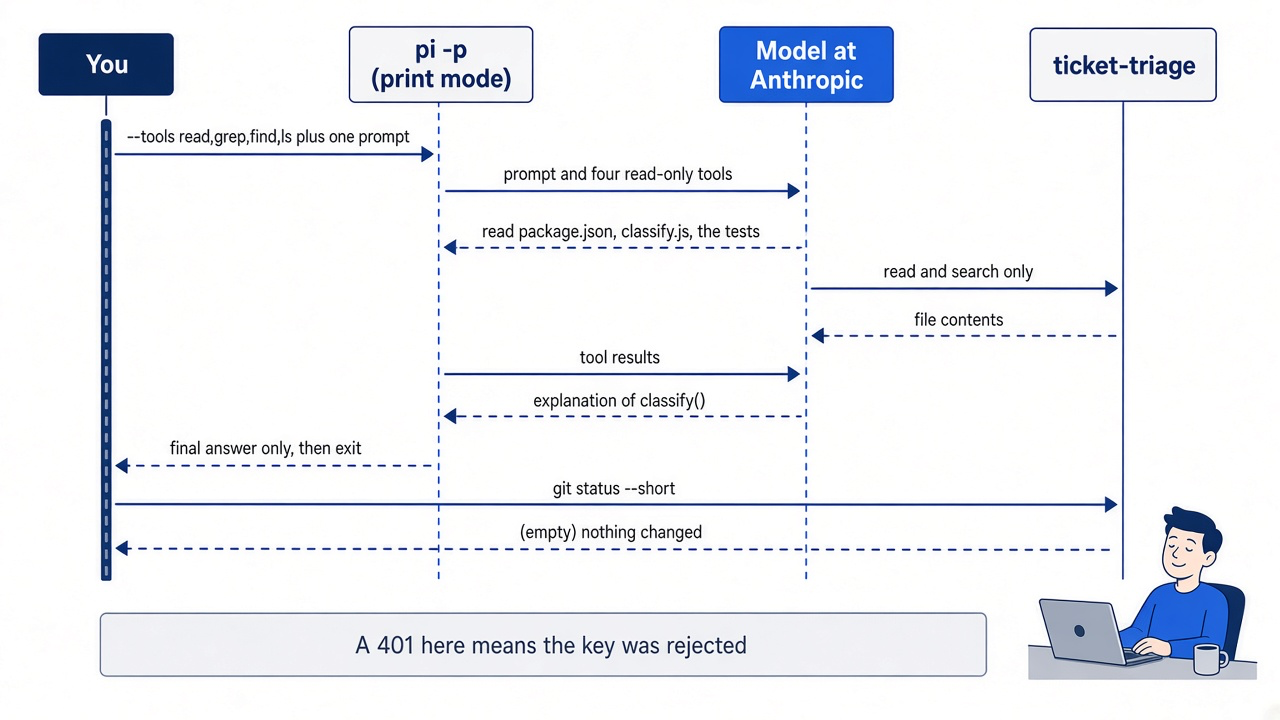
A good answer says that the refund check runs first and matches "refund" or "money back," that the shipping check matches "shipping," "delivery," or "package," that everything else falls through to other, and that the crushed-mug sentence matches none of those words. If the answer claims a keyword the code does not contain, the model is guessing, and you learned that before it edited anything.
If the answer is a line that starts with 401 and says invalid x-api-key, Anthropic rejected the key. Run pi auth logout anthropic, which removes the saved key, then pi auth login anthropic --api-key again with the right key.
Now check that nothing changed.
git status --short
The command prints nothing. This empty result is today's win: Pi is installed, Anthropic accepted your key, and the first session read Ticket Triage without changing it. The crushed-mug ticket still lands in other, which is correct, because nobody has asked for a fix yet.
You can stop here. Going deeper explains why this works and where it breaks.
Going deeper
This section is for readers who want the other install routes, the other ways to connect a model, and the first-day failures. It assumes you finished Start here.
Why one install
In the spring you tried Pi for an afternoon. Node.js was already on your MacBook Pro, so you installed it with npm, poked at a repository, and forgot about it. This week you came back and followed the quickstart, which starts with the curl installer. Both commands succeeded. Today you run pi update, it finishes cleanly, and pi --version prints the same number it printed yesterday.

The scene is the whole problem in one moment. The update worked, the version check worked, and the two results disagree because each command reached a different copy of Pi.
Nothing is broken, exactly. You have two copies of Pi, your shell runs whichever one it finds first on your PATH, and the update landed on a copy your shell does not reach first. A fix the changelog promised is missing, and a bug report you file names a version you are not running.
This section is three doors and one rule. The doors are the official installer, npm, and Nix. The rule is that you pick one, and you can prove which one you picked. By the end you have one copy of Pi on your machine, a check that tells you which copy runs, and Ticket Triage clean and ready for the first interactive session in Part 2.
Three doors and one rule
Choose the route by what already manages software on your machine, not by which command you saw first. On a MacBook Pro without a managed Node.js, that is the installer.
Pi's quickstart offers three ways in, and each one owns Pi's files and Pi's updates in its own way. The table maps your situation to a route and to the two commands you will need later.
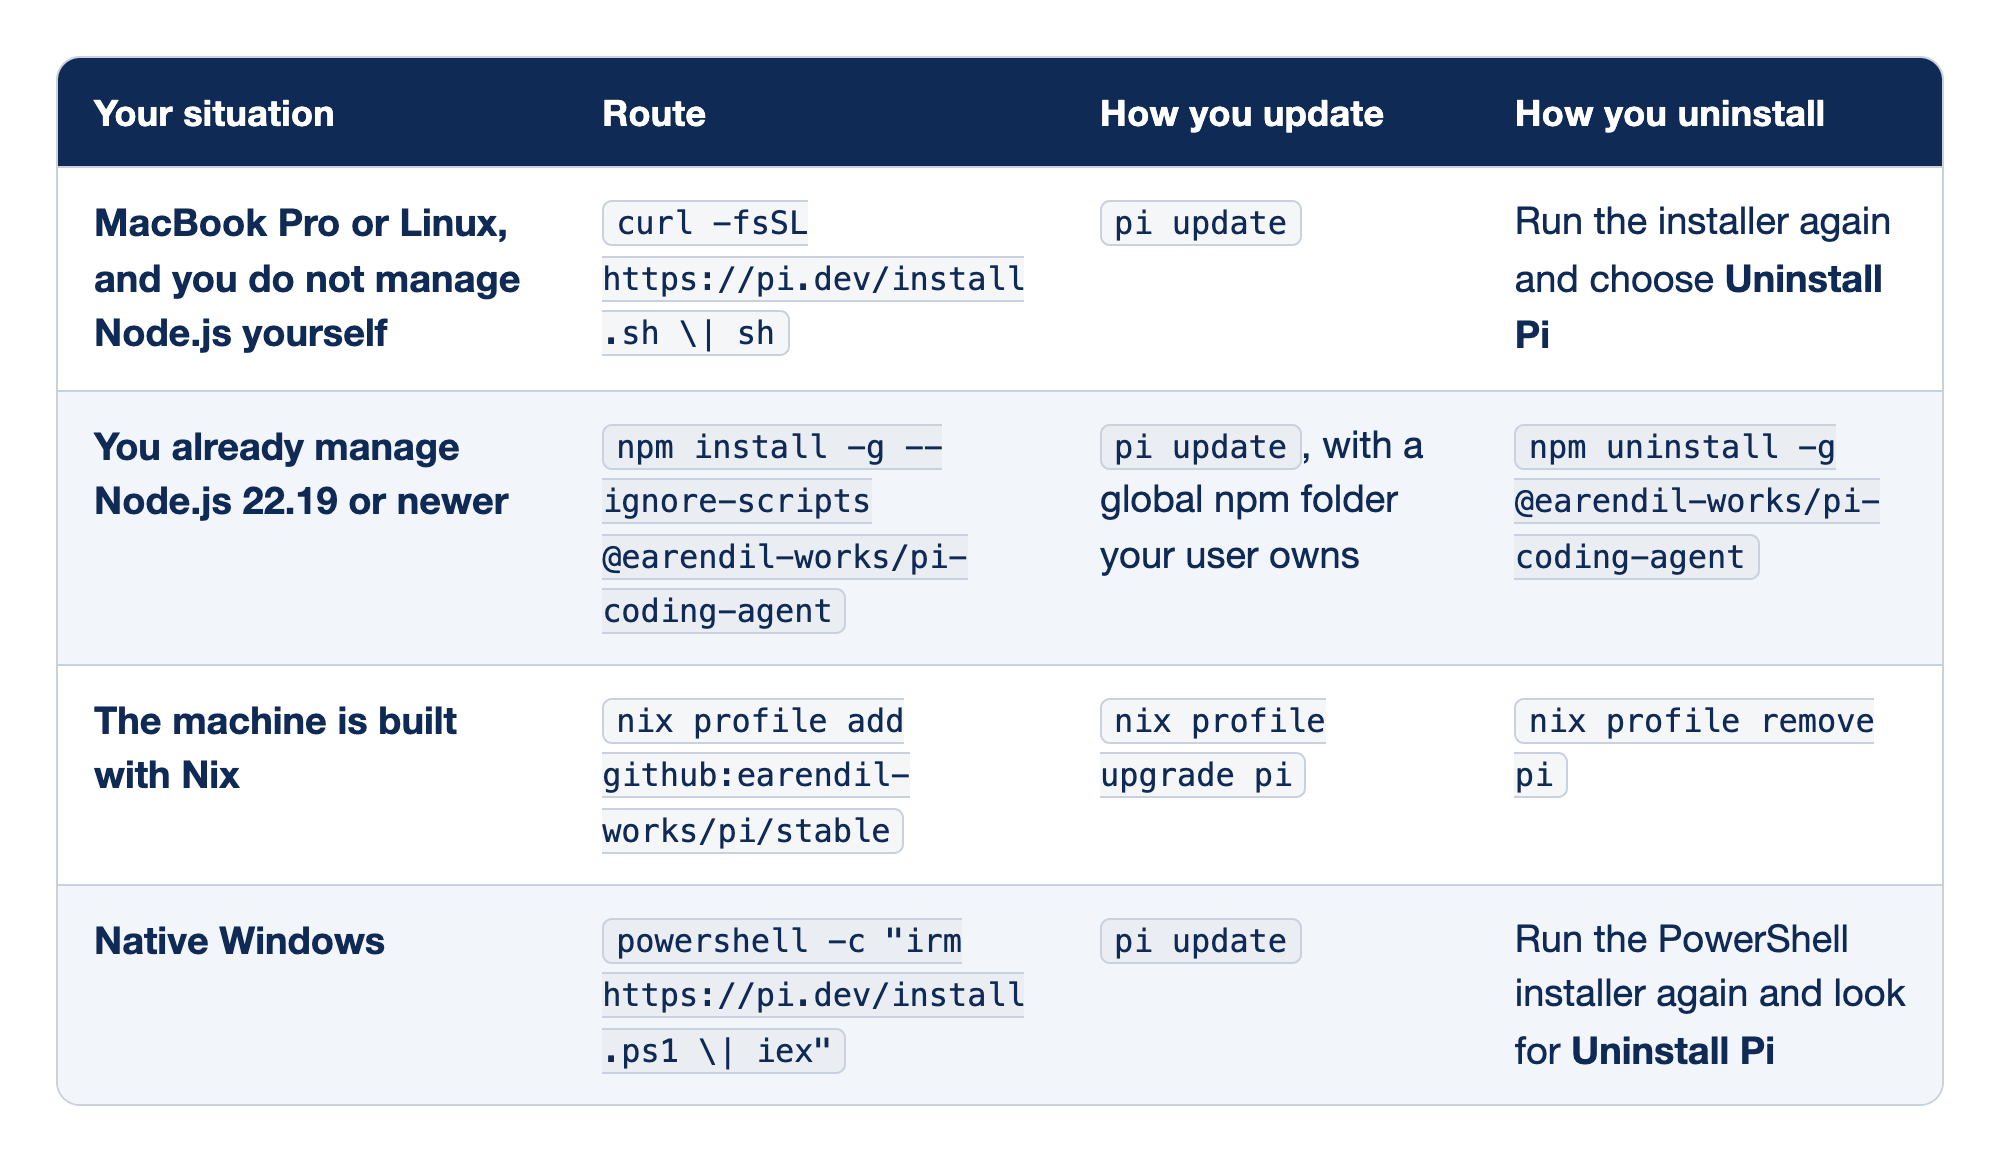
This comparison maps each machine situation to the Pi install route that fits it, with the command that keeps that copy current and the command that removes it.
- MacBook Pro or Linux without a self-managed Node.js: the curl installer installs Pi,
pi updatekeeps it current, and running the installer again and choosing Uninstall Pi removes it. - Node.js 22.19 or newer that you already manage:
npm install -g --ignore-scripts @earendil-works/pi-coding-agentinstalls Pi,pi updatekeeps it current when your user owns the global npm folder, andnpm uninstall -g @earendil-works/pi-coding-agentremoves it. - A machine built with Nix:
nix profile add github:earendil-works/pi/stableinstalls Pi,nix profile upgrade pikeeps it current, andnix profile remove piremoves it. - Native Windows: the PowerShell installer installs Pi,
pi updatekeeps it current, and running the PowerShell installer again and choosing Uninstall Pi removes it.
Read the table as a commitment, not a menu. The row you pick decides who owns Pi's files, and every later update or removal goes through that owner. A second route does not replace the first; it adds a second copy beside it.
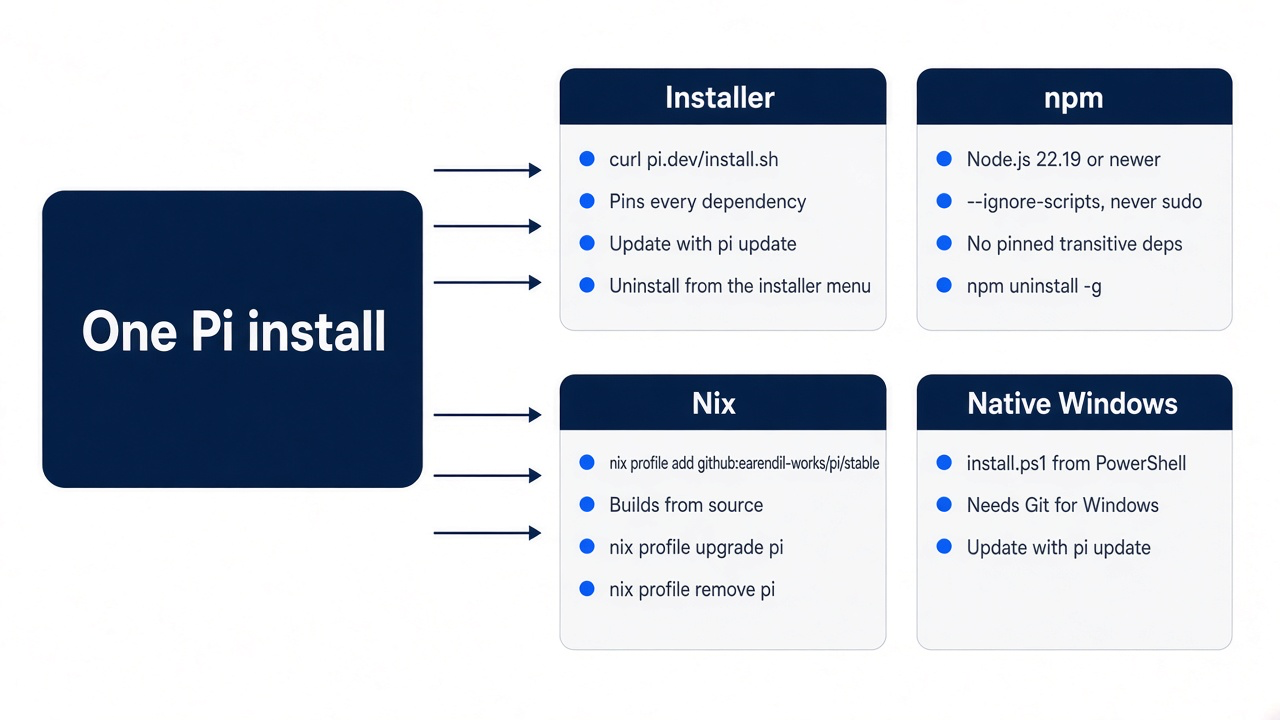
- The installer. Pi's quickstart leads with it on macOS and Linux. The installer pins all of Pi's dependencies, so every install gets the same dependency versions, and later updates are one command. Choose it unless you have a reason not to.
- npm. This route fits readers who already keep Node.js current with a version manager and want npm to own their global tools. It requires Node.js 22.19 or newer, and unlike the installer it does not pin transitive dependencies.
- Nix. Nix builds Pi from source out of Pi's flake. It is the right door if Nix already manages your machine, and the wrong one otherwise, because
pi updatecannot update a Nix install. - Native Windows. The PowerShell installer is the Windows twin of the curl installer: it pins dependencies and updates with
pi update. If your code lives in WSL instead, you skip this row and use the first one inside your distribution, which the Windows section below covers.
Gotcha: "just to be sure" is how a second copy arrives. If one route seems to have failed, check with command -v pi before you try another. An install that only looked like it failed is an easy way to end up with two.
Door one: the installer, in more detail
The installer is one command, and it is the route this series assumes.
curl -fsSL https://pi.dev/install.sh | sh
The curl flags fail on an HTTP error instead of piping an error page into sh (-f), stay quiet except for real errors (-sS), and follow redirects (-L). The script installs Pi with all its dependencies pinned.
What the script does on a Mac, from the November 16, 2026 version of install.sh and a test run on 1.5.2:
- It installs the latest release, and only the latest. It asks
https://pi.dev/api/installer/releases/latestwhich version to fetch, and it has no option to pick another. "Pinned" means that one release's dependency tree comes from that release's lock file. - It is a managed install. The release files go to
~/.pi/agent/install, with amanaged-install.jsonthat records where thepicommand points. - It picks a folder on your
PATHfor thepicommand. It uses the first folder on yourPATHthat is one of~/.pi/agent/bin,~/.local/bin,~/bin,~/.bin, or~/local/binand that it can write to. If none qualifies, it uses a folder on yourPATHthat holds Homebrew'sbrew, and otherwise~/.pi/agent/bin. On a Mac with Homebrew and no~/.local/binonPATH, that is/opt/homebrew/bin/pi. - It offers to start Pi, and the default is yes.
Start pi now? [Y/n]starts Pi in the current folder when you pressEnter. In a test, the extraEnterstarted Pi in an unrelated repository, which is why Start here puts you in~/code/ticket-triagefirst. - The first start downloads
fd. Pi uses it for file search and saves it in~/.pi/agent/bin.
The command prints the Pi version and exits. Do not compare the number against a screenshot or a blog post, including this one. The number you have is whatever was current when you ran the script. What matters is that the command runs at all, and that it keeps reporting the same copy after every update.
If you already use Claude Code: Claude Code's native installer updates itself in the background. Pi's docs describe updating as a command you run, pi update, not a background job. A Pi you installed in March is still the March Pi until you update it.
Door two: npm, for readers who already manage Node.js
The npm route is fine when Node.js is already yours to manage; it is a trap when it is not.
Check the Node.js version before anything else. Pi requires 22.19 or newer for an npm install.
node --version
The output should read v22.19.0 or a later version. An older number means you upgrade Node.js first, through whatever already manages it on this machine, and only then install Pi. Do not reach for the curl installer as a shortcut; that is door one, and you are choosing door two.
With a current Node.js, install Pi.
npm install -g --ignore-scripts @earendil-works/pi-coding-agent
pi --version
Two details in that command are deliberate. The package is @earendil-works/pi-coding-agent, under the Earendil Works scope. The --ignore-scripts flag tells npm to skip lifecycle scripts, the install-time hooks that any package in the dependency tree can use to run code on your machine. Pi's docs state that a normal npm install of Pi needs no dependency lifecycle scripts, so the flag costs you nothing and removes a whole class of install-time surprises. Keep it on every time, including when you reinstall.
The trade you accept on this door is pinning. The installers pin every dependency; npm does not pin transitive dependencies, the packages that Pi's own dependencies pull in. Two npm installs a week apart can resolve different versions of those packages. Most days that does not matter. On the day it does, you are debugging a combination the pinned installer would never have given you, which is why the installer is the default.
The npm route is also how this guide pins a version for its own tests: npm install --prefix <folder> --ignore-scripts @earendil-works/pi-coding-agent@1.5.2 installs exactly 1.5.2 into one folder, so every test matches the "Tested on" line.
Gotcha: never put sudo in front of npm install -g. A root-owned install leaves Pi's files in a folder your user cannot write, and the next pi update, which runs as you, has nowhere to put the new version. The Pi kit for Docker Sandboxes makes the same point from the other side: its image works with pi update --self precisely because the global npm folder belongs to the user that runs Pi. Check who owns yours.
npm config get prefix
ls -ld "$(npm config get prefix)/lib/node_modules"
The first line prints npm's global prefix; the second shows the owner of lib/node_modules under it, the folder global packages install into. If the folder sits outside your home directory and belongs to root, fix Node.js rather than Pi: install Node.js through a version manager such as mise, fnm, or nvm, which keeps the global folder under your home directory, then run the npm install again without sudo.
Door three: Nix, briefly
Nix is the right door only if Nix already builds your machine.
nix profile add github:earendil-works/pi/stable
pi --version
The stable reference tracks the latest release, and Nix builds Pi from source. Older Nix versions spell the first command nix profile install. To pin a release, use a tag such as github:earendil-works/pi/v1.0.0 in place of stable.
Updates go through Nix, never through Pi. pi update cannot update Pi when another package manager provides it; run nix profile upgrade pi instead. Package and model-catalog updates through pi update still work.
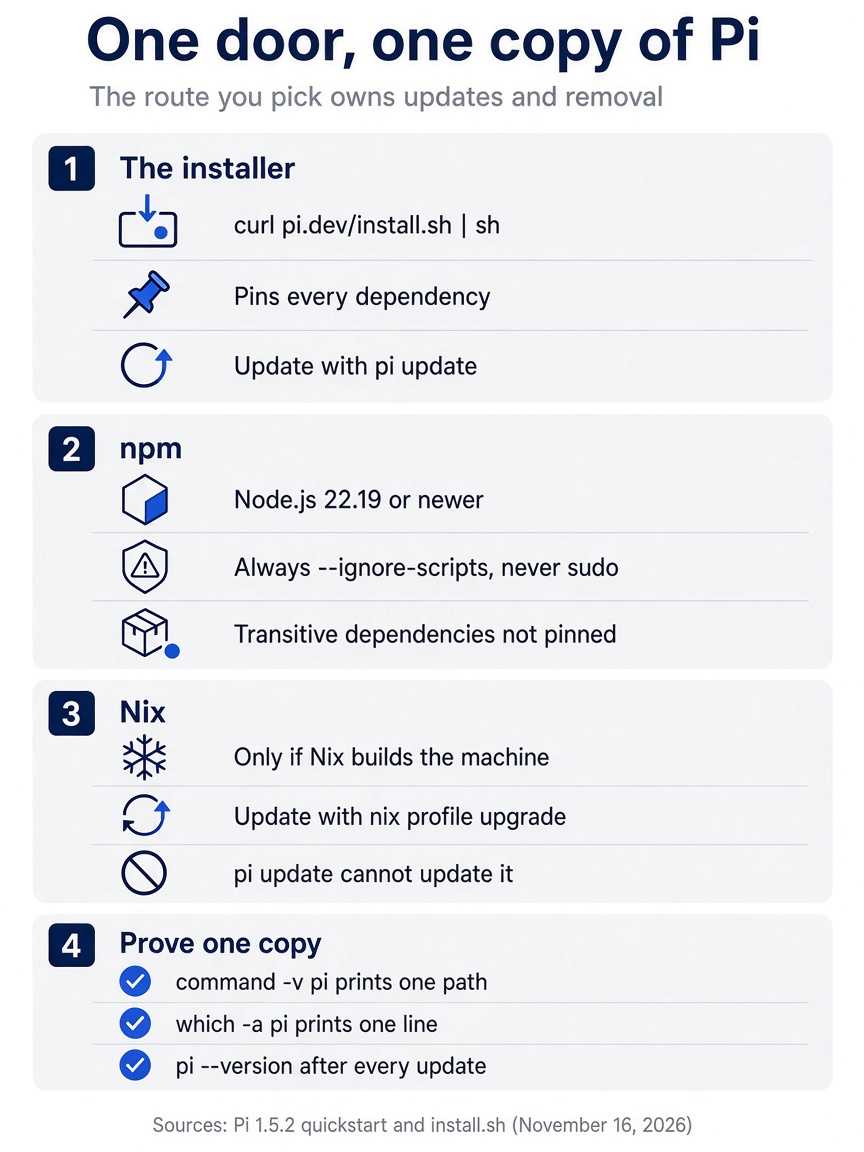
The decision has two halves. First, pick one of three doors, each ruled in or out by one fact: the installer pins every dependency, npm needs Node.js 22.19 or newer, --ignore-scripts, and no sudo, and Nix only fits machines Nix already builds. Second, no matter which door you chose, prove you have one copy with command -v pi, which -a pi, and pi --version.
Which Pi am I running
One command tells you which copy runs, a second tells you whether there is more than one, and a third tells you which version it is.
Run all three after any install, update, or uninstall.
command -v pi
which -a pi
pi --version
command -v pi prints the path your shell will execute when you type pi. which -a pi prints every pi on your PATH, in the order the shell searches them. pi --version asks the first one for its version. One line from which -a pi is the goal. Two lines mean two copies, and the first line is the one that runs. A path of /opt/homebrew/bin/pi after the installer is normal on a Mac with Homebrew; it does not mean Homebrew installed Pi.
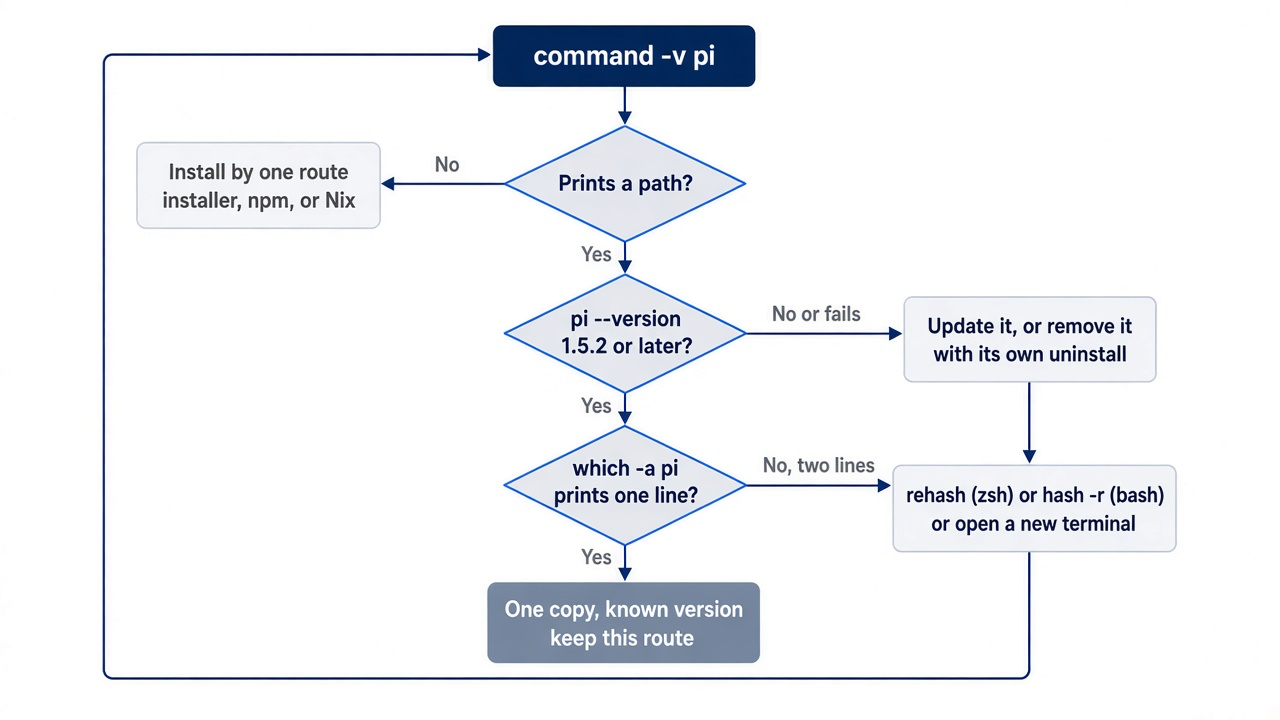
When you find two, keep the one that matches your chosen door and remove the other with its own uninstall command from the decision table. Then clear your shell's command cache so it stops remembering the old path, or simply open a new terminal.
hash -r      # bash
rehash       # zsh, the default shell on a MacBook Pro
After that, which -a pi should print one line, and pi update followed by pi --version should show the update land on the copy you actually run.
If you already use Claude Code: this is the same check as which -a claude, for the same reason: two installs. Conflicting installs are the first thing to rule out when a tool behaves like an older version of itself.
Linux: the same script
Linux gets the same installer as the Mac, and the same rule.
curl -fsSL https://pi.dev/install.sh | sh
pi --version
Run the script as yourself, not with sudo, so the copy belongs to the account that will run pi update later. The npm route works the same way it does on a Mac: check node --version for 22.19 or newer, install with --ignore-scripts, and keep the global npm folder under your home directory. Nix on Linux uses the same three commands as on macOS.
Windows: native or WSL
On Windows, the first decision is not the installer; it is where your files and tools live.
Pi runs either as a native Windows process or inside Windows Subsystem for Linux (WSL), and the two behave like different machines. Pi's Windows page frames the choice as three command environments.
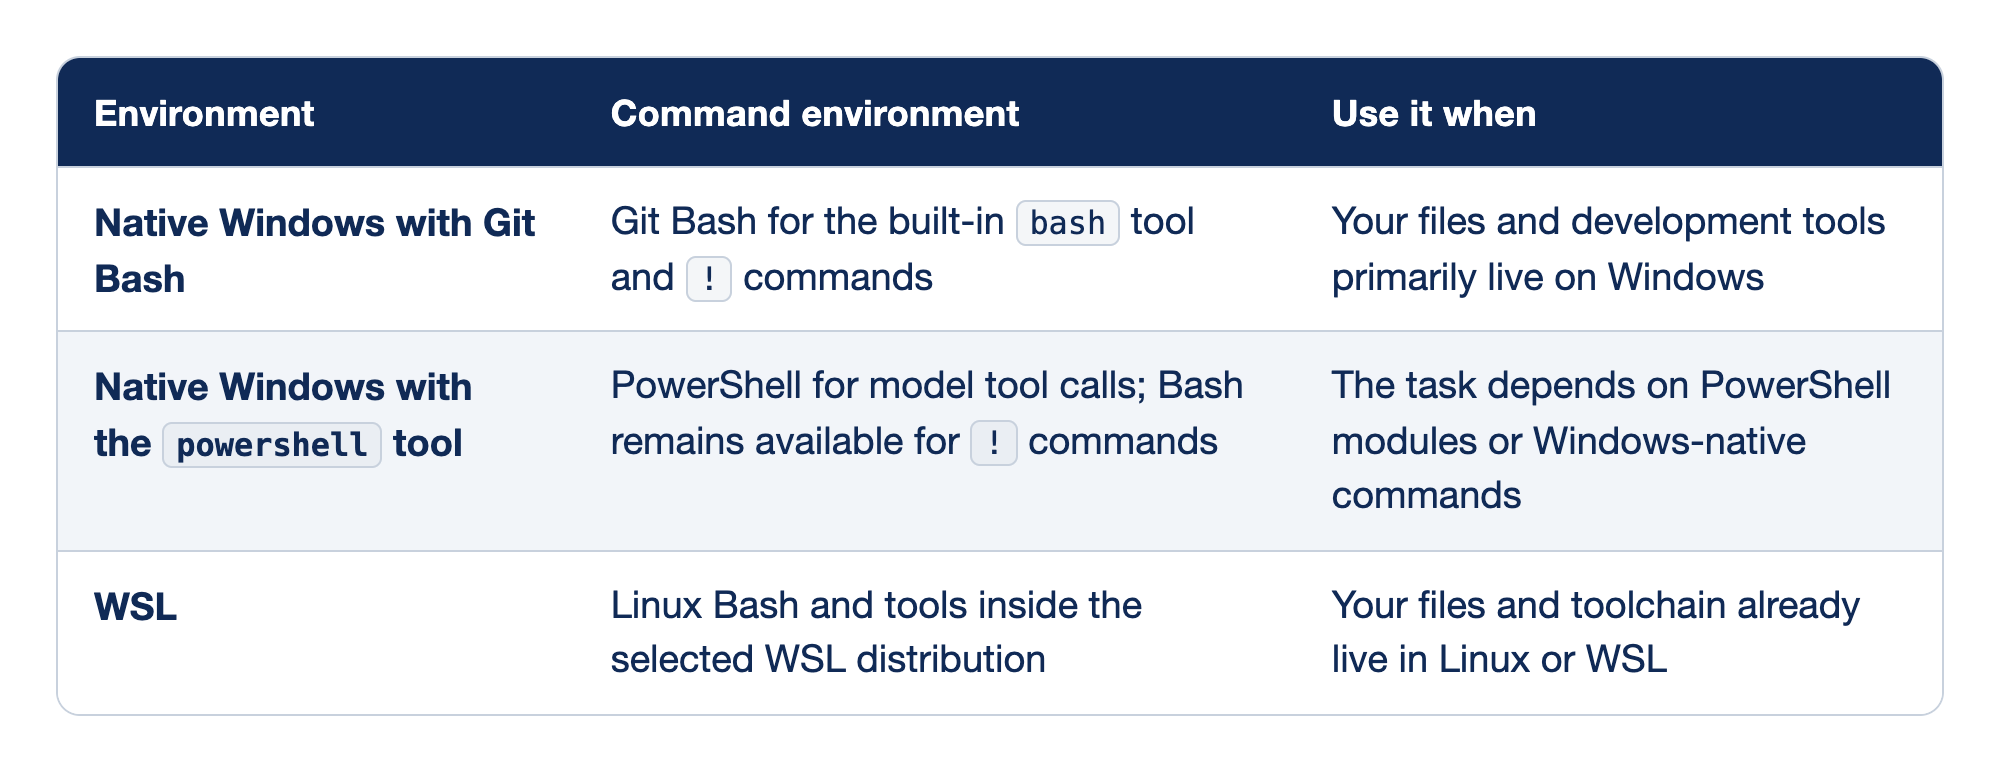
This comparison lists the three command environments for Pi on Windows, the shell each one uses, and the situation each one fits.
- Native Windows with Git Bash: the built-in
bashtool and your!commands run in Git Bash, and it fits when your files and development tools primarily live on Windows. - Native Windows with the
powershelltool: model tool calls run in PowerShell while Bash stays available for!commands, and it fits when the task depends on PowerShell modules or Windows-native commands. - WSL: Linux Bash and tools run inside the selected WSL distribution, and it fits when your files and toolchain already live in Linux or WSL.
The table answers one question: which shell runs when the model or you run a command. Pick the row that matches where your repositories already are, and install Pi there and only there. Installing in both gives you two copies that see different files, and a session started in the wrong one works on the wrong tree.
- Native Windows with Git Bash. The default for native Windows. You install Pi with the PowerShell installer, then install Git for Windows so Pi has a Bash to run. Both the model's
bashtool and your!commands use it. - Native Windows with the
powershelltool. The same native install, plus a setting that hands the model PowerShell instead of Bash. Your own!and!!commands still run in Bash. Thepowershelltool exists only when Pi runs as a native Windows process. - WSL. Pi runs inside your Linux distribution with that distribution's Bash and tools. You install it there with the Linux installer, and the Windows installer never enters the picture.
For the native route, install from PowerShell, then verify.
powershell -c "irm https://pi.dev/install.ps1 | iex"
pi --version
Next, install Git for Windows. Pi resolves Bash in a fixed order: shellPath from ~/.pi/agent/settings.json, then Git Bash at %ProgramFiles%\Git\bin\bash.exe, then Git Bash under %ProgramFiles(x86)%, then any bash.exe on PATH. Start Pi and type this in its editor, the input box, to confirm the shell.
!printf 'Bash is working\n'
The line Bash is working should come back. If Pi cannot find Bash, it reports the locations it checked, and the fix is to install Git for Windows, put another Bash on PATH, or set shellPath. A custom path in JSON needs each backslash written twice.
{
  "shellPath": "C:\\cygwin64\\bin\\bash.exe"
}
If your work depends on PowerShell modules, you can swap the model's shell tool. Add this to ~/.pi/agent/settings.json and restart Pi.
{
  "defaultTools": ["read", "powershell", "edit", "write"]
}
The list replaces the defaults, putting powershell where bash was. If you already customized your default tools, ["-bash", "+powershell"] makes the same swap while keeping everything else. The powershell tool runs pwsh.exe when it is available and falls back to Windows PowerShell.
Gotcha: the defaultTools change switches only the model's shell tool. Your ! and !! commands keep using Bash, so !Get-ChildItem fails while the model's Get-ChildItem works. Keep Git for Windows installed even after the swap, because your own commands still need it.
For the WSL route, open your distribution and follow the Linux section exactly.
curl -fsSL https://pi.dev/install.sh | sh
pi --version
Gotcha: keep WSL projects under your Linux home directory, such as ~/code/ticket-triage, or under a standard /mnt/<drive> path. Pi's WSL path conversion and its extra Git branch polling recognize /mnt/<drive>, not custom mount roots, so on a custom mount root, Pi skips that path conversion and branch polling.
Pi's Windows page also recommends Windows Terminal, because it ships an up-to-date console host and Pi is best tested with it. Part 3 returns to Windows Terminal, because it changes which keys queue a follow-up.
If you use Claude Code on Windows: the native Windows story is close. Claude Code also uses Git for Windows for its Bash tool, but it falls back to a PowerShell tool when Git for Windows is missing. Pi does not fall back; it reports where it looked, and PowerShell is a choice you opt into with defaultTools.
None of the Windows or WSL steps were run for this guide; they come from Pi's Windows page.
Other ways to connect a model
Credentials belong to your user account on this machine, not to the folder.
A Google Gemini key (tested). The same two commands work with any provider that takes an API key. For Gemini, the provider name is google. Create a key in Google AI Studio, then save and check it.
pi auth login google --api-key
pi auth check --provider google
Pi printed Saved API key for Google. and ready, and the read-only prompt from Start here gave a correct answer with Gemini and left git status --short empty (this guide's Day 1 test run). With only a Gemini key, the default model is gemini-4-argon. With only an Anthropic key, it is claude-opus-5-5, per the 1.5.1 changelog and the tested session file.
/login inside Pi. In the editor, Pi's input box, run /login, choose a provider, and follow its prompts. For Anthropic, Pi 1.5.2 offers two methods: Sign in with an account and Sign in with an API key. Pi saves the result in ~/.pi/agent/auth.json.
/login
Once you are logged in, open the model picker. It lists models whose providers have usable authentication, so a provider you never logged in to stays out of the way.
/model
Press Ctrl+S on a model in the picker to make it the default for new sessions (models), and Ctrl+L opens the same picker from the editor. A session records model changes, so a resumed session brings back the model you chose today without changing the default for new sessions. In this guide's test run, /model listed 18 Anthropic models and the line Only showing models from configured providers. Ctrl+S on claude-haiku-5-5 printed Default model: anthropic/claude-haiku-5-5 and wrote defaultModel to ~/.pi/agent/settings.json. It also switched the open session. A session switched back to claude-opus-5-5 with Ctrl+L and Enter (no Ctrl+S) reopened with claude-opus-5-5 under pi --continue, which reopens the most recent session. A new session started with claude-haiku-5-5. The test then set claude-opus-5-5 back as the default with Ctrl+S.
A Claude subscription (not run). Sign in with an account, or pi auth login anthropic without --api-key, signs in with a Claude account in the browser. This guide did not run it. Read Anthropic's policy before you use it. Anthropic's legal and compliance page says that OAuth authentication "is intended exclusively for purchasers of Claude Free, Pro, Max, Ultra, Team, and Enterprise subscription plans and is designed to support ordinary use of Claude Code and other native Anthropic applications," and that "Anthropic does not permit third-party developers to offer Claude.ai login into their own applications." The same page says the policy does not prevent "an end user from signing in to the unmodified Claude Code binary with their own Claude subscription." Pi is not that binary. Pi's 1.5.2 changelog lists a fix for "Anthropic OAuth requests reporting an outdated Claude Code version." If you sign in with a Claude plan, read Anthropic's current terms first, and prefer an API key for anything you would not want interrupted.
An environment variable. Pi also reads a key from the provider's variable, such as ANTHROPIC_API_KEY or GEMINI_API_KEY (providers). It is useful in CI and anywhere Pi should not store the key.
Pi can find a credential in four places, and it uses the first one it finds: a --api-key on the command line, then a credential stored in auth.json, then an apiKey in models.json, then the provider's environment variable, such as ANTHROPIC_API_KEY.
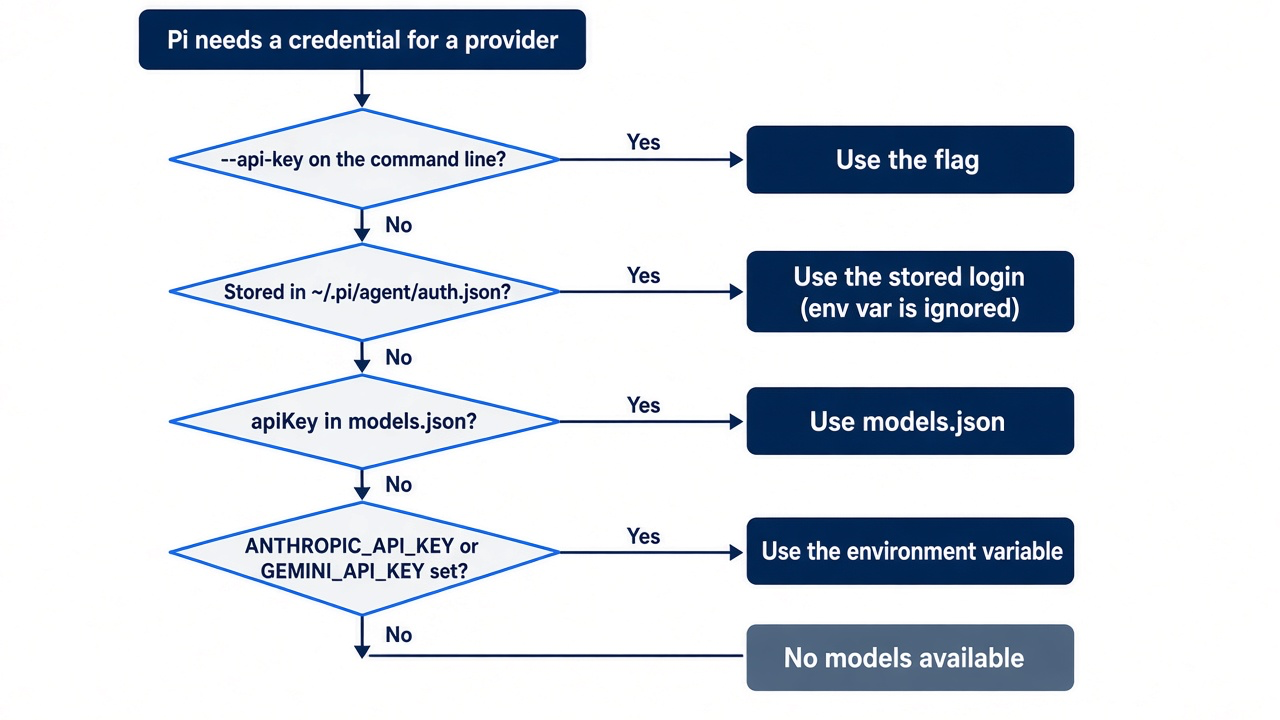
Gotcha: the order bites when you have both. If your ~/.zshrc exports ANTHROPIC_API_KEY and you also signed in with /login, Pi uses the stored login and appears to ignore the key. /logout removes the stored credential, but it does not unset environment variables or revoke the credential at the provider. When you are unsure which credential is live, ask Pi from the shell.
pi auth check --provider anthropic
The command prints ready, not_ready, or invalid, and exits with 0, 1, or 2, so scripts can test it too.
Gotcha: ready does not mean the provider accepts the key. In a test, a wrong string saved with pi auth login anthropic --api-key still gave ready and exit 0, and the first prompt then failed with 401 and invalid x-api-key (this guide's Day 1 test run). A real prompt is the only proof.
auth.json holds API keys and OAuth tokens. Keep it private, never commit it, and never create one inside a container. Part 10 explains why /login inside a sandbox defeats the sandbox: it writes a real token into the environment you were trying to keep it out of.
The read-only tool list
Only your wording keeps a run read-only when the model has its default tools. Pi does not ask before a tool call, and nothing stops the model from deciding to "fix" what it finds. For a first look at a repository you do not know, limit the tools instead, as Start here did.
pi --tools read,grep,find,ls
The --tools list replaces the default read, bash, edit, and write, so this session can read and search but cannot run commands or edit files. The CLI docs call it an "allowlist of built-in, extension, or custom tools," so the same flag also limits tools that extensions add. MCP tools are kept unless an entry starts with mcp__. Use the default tools for Ticket Triage from Part 2 on; the crushed-mug change needs edit and bash.
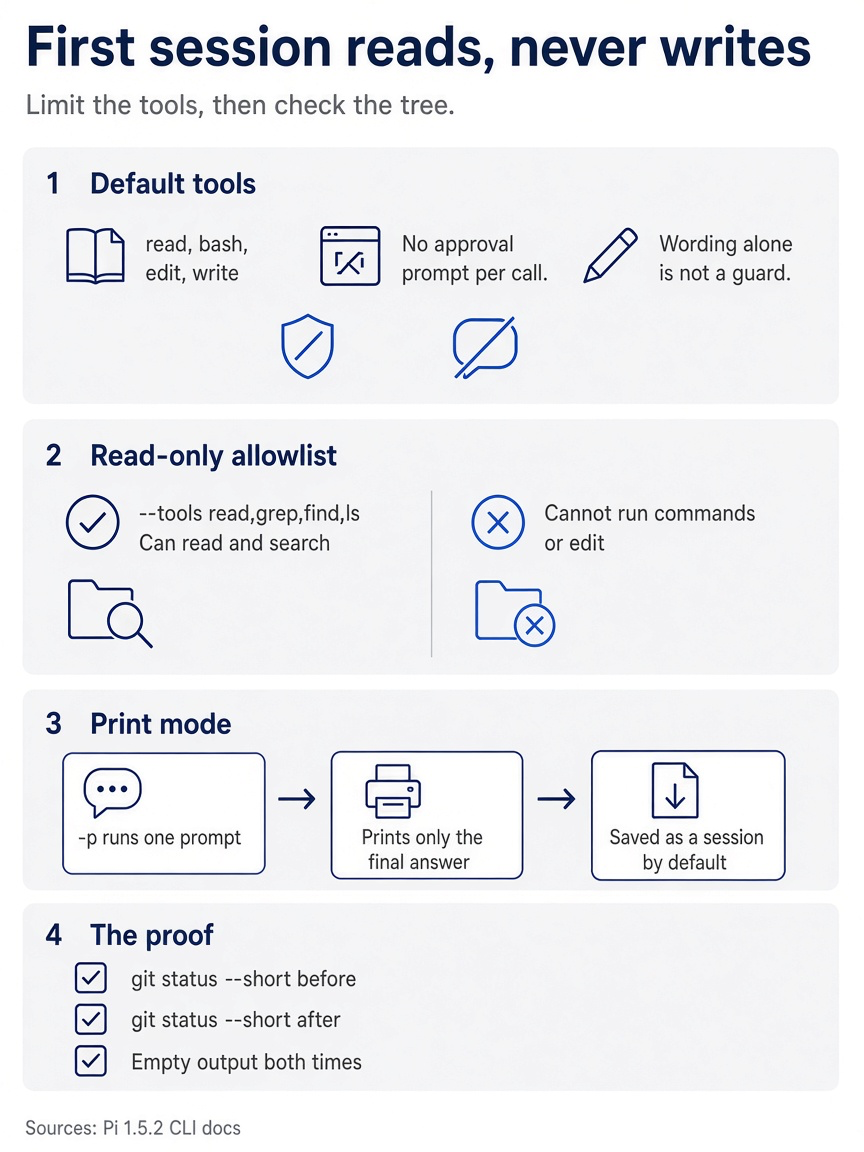
Keep one distinction in mind. Default tools plus a polite prompt is a request; an allowlist is a limit.
Print mode prints only the final answer. It does not show the files the model read, which the interactive screen does. Part 2 starts Pi interactively, where each read and command appears as it happens. Every print-mode run is also saved as a session unless you add --no-session.
Updating without surprises
An update is one command, and it should always end with the version check.
On the installer and npm routes, pi update with no target updates Pi itself. Pi also asks pi.dev for the latest release and shows an "Update Available" notice when one exists, so you rarely have to remember to look. The PI_SKIP_VERSION_CHECK environment variable turns that request off (environment variables).
pi update
pi --version
When a newer release exists, the version should move forward. If it does not, go back to "Which Pi am I running"; an update that reports success while the version stands still almost always means two copies.
Later parts install Pi packages and model catalogs, and pi update covers those as well. The table lists the targets.
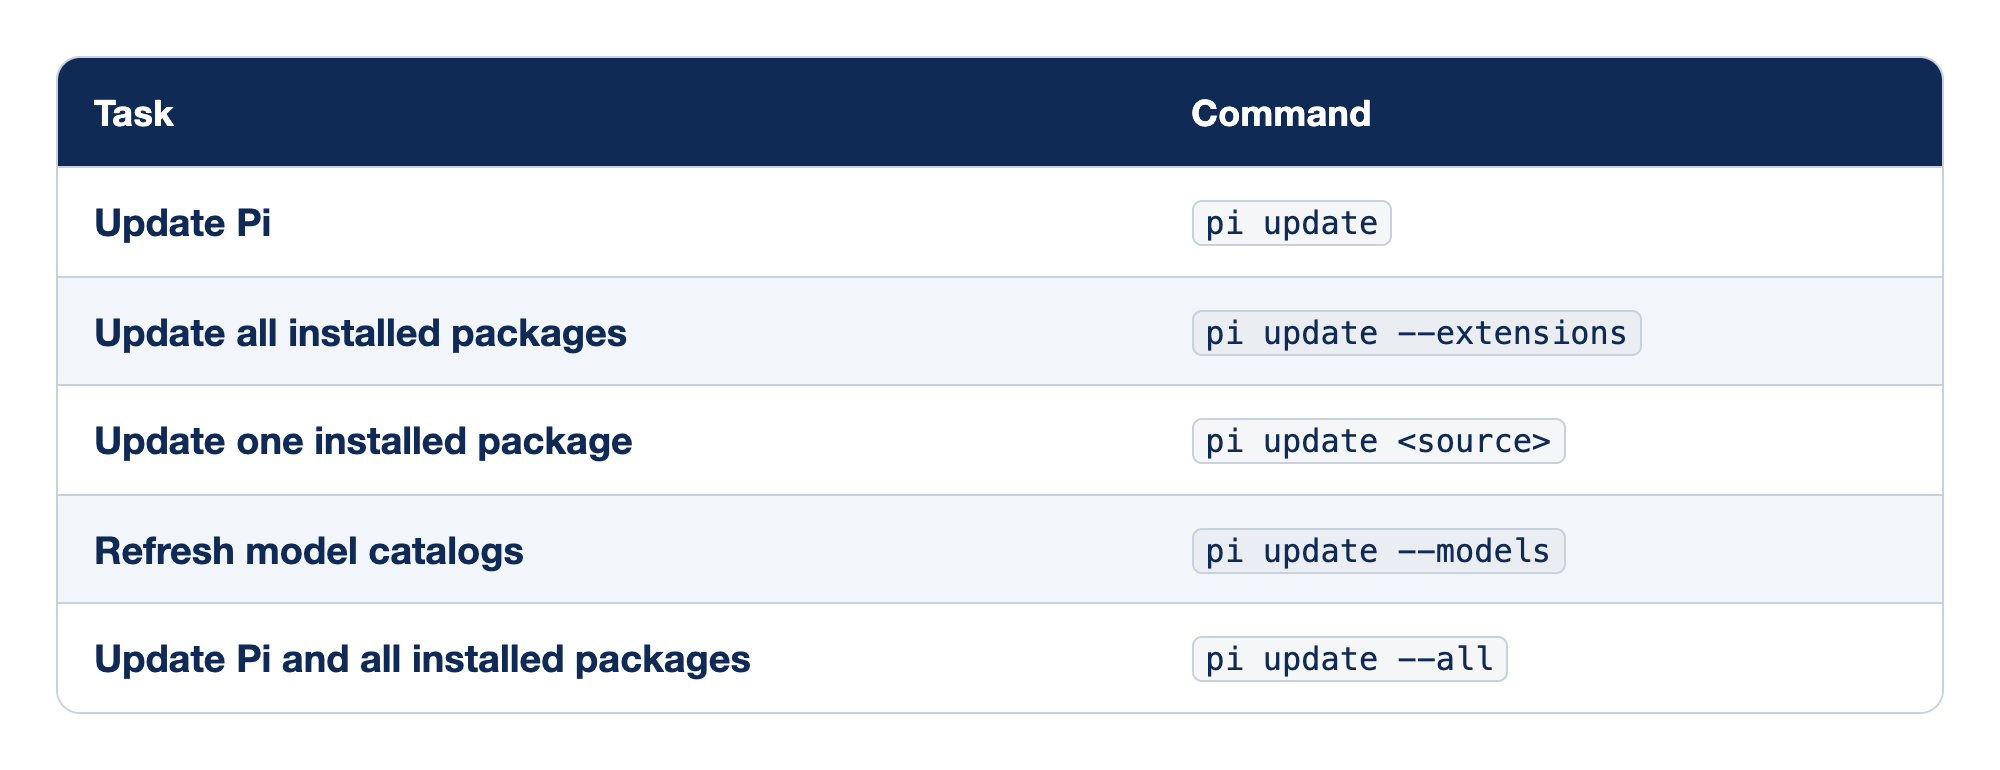
This comparison pairs each update task with the pi update command that performs it.
- Update Pi:
pi updateupdates Pi itself. - Update all installed packages:
pi update --extensionsupdates every installed Pi package. - Update one installed package:
pi update <source>updates the one package you name. - Refresh model catalogs:
pi update --modelsrefreshes the provider model lists. - Update Pi and all installed packages:
pi update --allupdates Pi and every package in one pass.
The table separates Pi itself from everything Pi has installed. Most days you want the first row or the last.
pi update. Updates Pi only.pi update --self,pi update self, andpi update piare aliases for it. Add--forceto reinstall Pi rather than only upgrade it.pi update --extensions. Updates every Pi package you have installed, without touching Pi. Since 1.5.1 it lists each package with its version change. Part 9 introduces Pi packages.pi update <source>. Updates one package, named the way you installed it.pi update --models. Refreshes the model catalogs Pi uses to list what each provider offers, without updating Pi itself.pi update --all. Updates Pi and every installed package in one pass. Use it as the weekly habit once you have packages.
If a wrapper or tool manager such as mise provides Pi, the PI_SELF_UPDATE_COMMAND environment variable, or the selfUpdateCommand setting, tells pi update which command to run, so that manager stays the single owner of Pi.
pi update was not run for this guide.
Uninstalling, and what stays behind
Each route has its own uninstall, and none of them touches your Pi history.
Use the command that matches the route you installed with.
# installer: run it again and choose "Uninstall Pi"
curl -fsSL https://pi.dev/install.sh | sh

# npm
npm uninstall -g @earendil-works/pi-coding-agent

# Nix
nix profile remove pi
The quickstart documents the installer's uninstall option with the curl command; on native Windows, run the PowerShell installer again and look for the same choice. Afterward, command -v pi should print nothing.
None of these methods removes ~/.pi/agent/. Your settings, saved credentials, sessions, and installed Pi packages stay where they were. The design helps when you switch routes: uninstall from npm, install with the curl script, and your sessions and logins are still there the next morning. It also means an uninstall is not a cleanup. The folder holds auth.json, which stores your API keys and OAuth credentials. Delete ~/.pi/agent/ yourself only when you mean to remove all of it, and check first if you set PI_CODING_AGENT_DIR to keep it somewhere else.
If you already use Claude Code: Pi's home is ~/.pi/agent/, not ~/.claude/. The two tools keep separate settings, credentials, and sessions, so installing or removing Pi never touches your Claude Code setup.
No uninstall was run for this guide.
A clean tree, every time
The last step of an install is not in Pi at all; it is a clean working tree. Change into the repository and ask Git what it sees.
cd ~/code/ticket-triage
git status
Git should report nothing to commit, working tree clean. If it lists changes, commit them or stash them now. Every Pi experiment in this series starts from a commit, because Pi can take you back to an earlier point in a conversation, but it never puts your files back. The first interactive launch is worth doing deliberately, with the startup header in front of you, and that is where the next part begins.
Do this today
Everyone
-
Build Ticket Triage and prove the starting point. Three tests pass, and the crushed-mug ticket prints
other.cd ~/code/ticket-triage npm test node --input-type=module -e "import { classify } from './src/classify.js'; console.log(classify('The box showed up crushed and the mug inside is in pieces'))" -
Prove the version. The first command prints one path, and the second prints
1.5.2or a later version.command -v pi pi --version -
Save one key and check it. The last command prints
ready.pi auth login anthropic --api-key pi auth check --provider anthropic -
Run the read-only session again, then check the tree. The last command prints nothing.
pi --tools read,grep,find,ls -p "Read package.json, src/classify.js, and test/classify.test.js. Explain how classify() picks a category, which test covers each branch, and why 'The box showed up crushed and the mug inside is in pieces' returns other. Do not edit any file." git status --short -
Start one habit:
cdinto the project before you start Pi, and check the tree before and after. Make sure Ticket Triage, or your own repository, has nothing uncommitted. An emptygit status --shortbefore a session tells you your starting point. An empty one after a read-only session tells you nothing changed.
If you read Going deeper
-
Pick your door and write it down. Choose the installer, npm, or Nix from the decision table, and note the update and uninstall commands for that route. The note names one route.
-
Prove one copy. Open a new terminal and confirm one path and a working version.
which -a piprints one line.which -a pi pi --version -
Find who owns Pi's files. On the installer route,
~/.pi/agent/install/managed-install.jsonexists. On the npm route, the globalnode_modulesfolder belongs to you, notroot.ls ~/.pi/agent/install ls -ld "$(npm config get prefix)/lib/node_modules" -
Run an update once. Watch it finish and check the version again, so the habit exists before you need it.
pi update
pi --version
Prove it, then trust it
The opening failure had nothing to do with skill. Two honest installs produced two copies, the shell picked one, and the update picked the other. No error appeared; confusion did, and confusion is the more expensive kind of failure.
The fix on day one is the same habit every time: prove what you have instead of trusting the screen. which -a pi settles which copy runs. A real prompt settles whether the provider accepts your key, because ready only settles that a key is saved. An empty git status --short settles whether the agent changed anything.
Install Pi once, prove it once, and every update after that lands where you expect.
This is Part 1 of "Pi, Day to Day," a 12-part guide to using the Pi terminal coding agent every day, for developers who already ship with Claude Code.