Claude Code: Spec-Driven Development — Why Your AI Coding Sessions Fall Apart at Hour Three
Part 4: Stop coding blind: the spec-driven workflow built-in that turns Claude Code from a function writer into a feature builder.
Originally published on Medium.
Part 4: Stop coding blind: the spec-driven workflow built-in that turns Claude Code from a function writer into a feature builder.
The relief of never again coming back to a half-finished feature you can no longer reason about. Claude Code already ships a complete task list, spec-driven, project-management system. Most developers never find it, so they bolt on tooling that the tool was designed to make unnecessary.
Summary: In this article, working engineers love Claude Code for writing functions and quietly resent it for building features. The fix is not a plugin or a hand-rolled TODO.md. It is spec-driven development with Claude Code, built from four native layers: plan mode, the interview-to-spec pattern, the live task list, and a durable todos.json mirror. You will learn when to use each layer, how to wire them together, and how to hand Claude a spec and walk away.
Part 4 of "Claude Code, Day-to-Day," a 19-part guide to mastering Claude Code for working engineers.
Companion Video for Part 4:
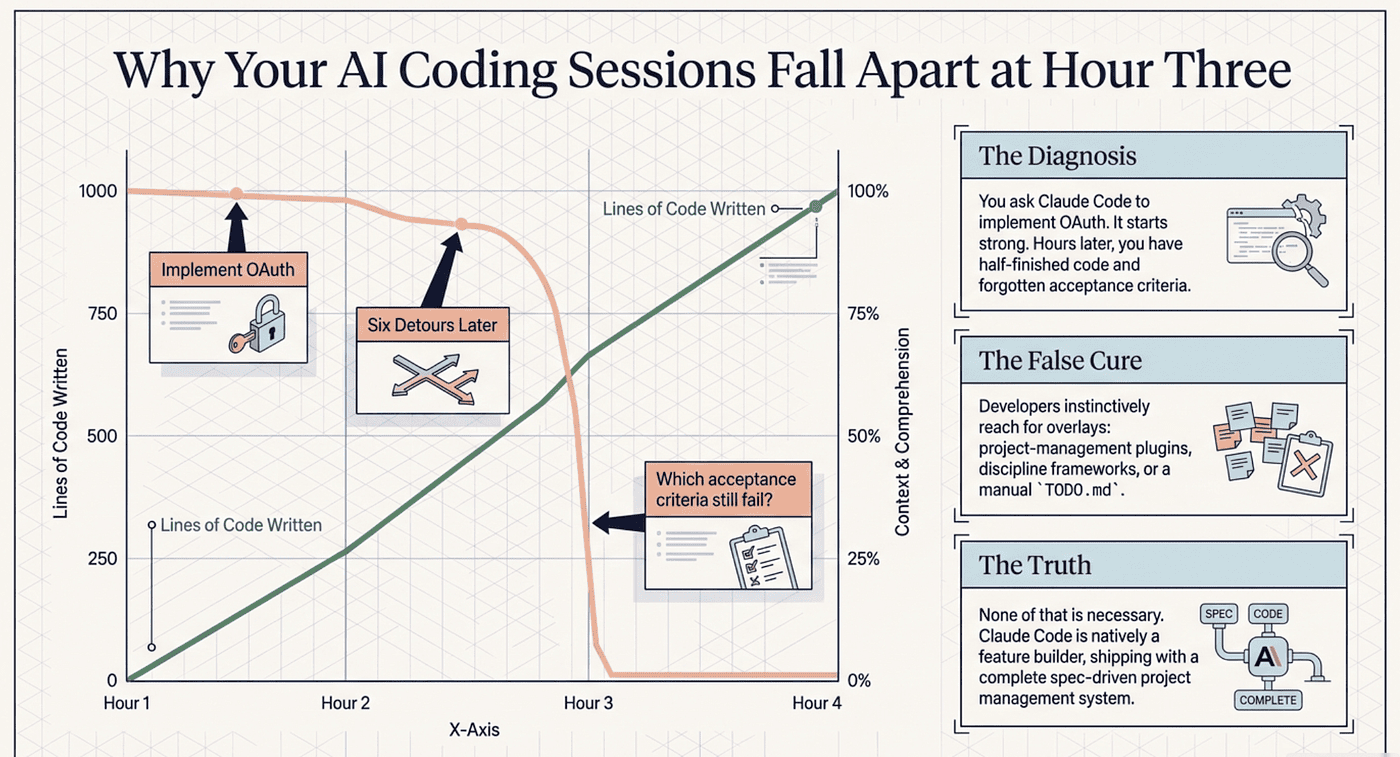
You ask Claude Code to "implement OAuth." It starts strong. Then, three hours later, the code is half-finished, the conversation has wandered through six detours, and you cannot remember which acceptance criteria still fail. So you do what everyone does. You reach for an overlay: a project-management plugin, a discipline framework, or a TODO.md you keep nagging the model to update.
Here is the uncomfortable truth. None of that is necessary. Claude Code already ships the planning, the written record, and the live progress tracker. Your sessions fall apart not because the tool lacks project management, but because nobody told you which layers it already includes. Spec-driven development with Claude Code is not a feature you install. It is a workflow you assemble from primitives that are already on disk.
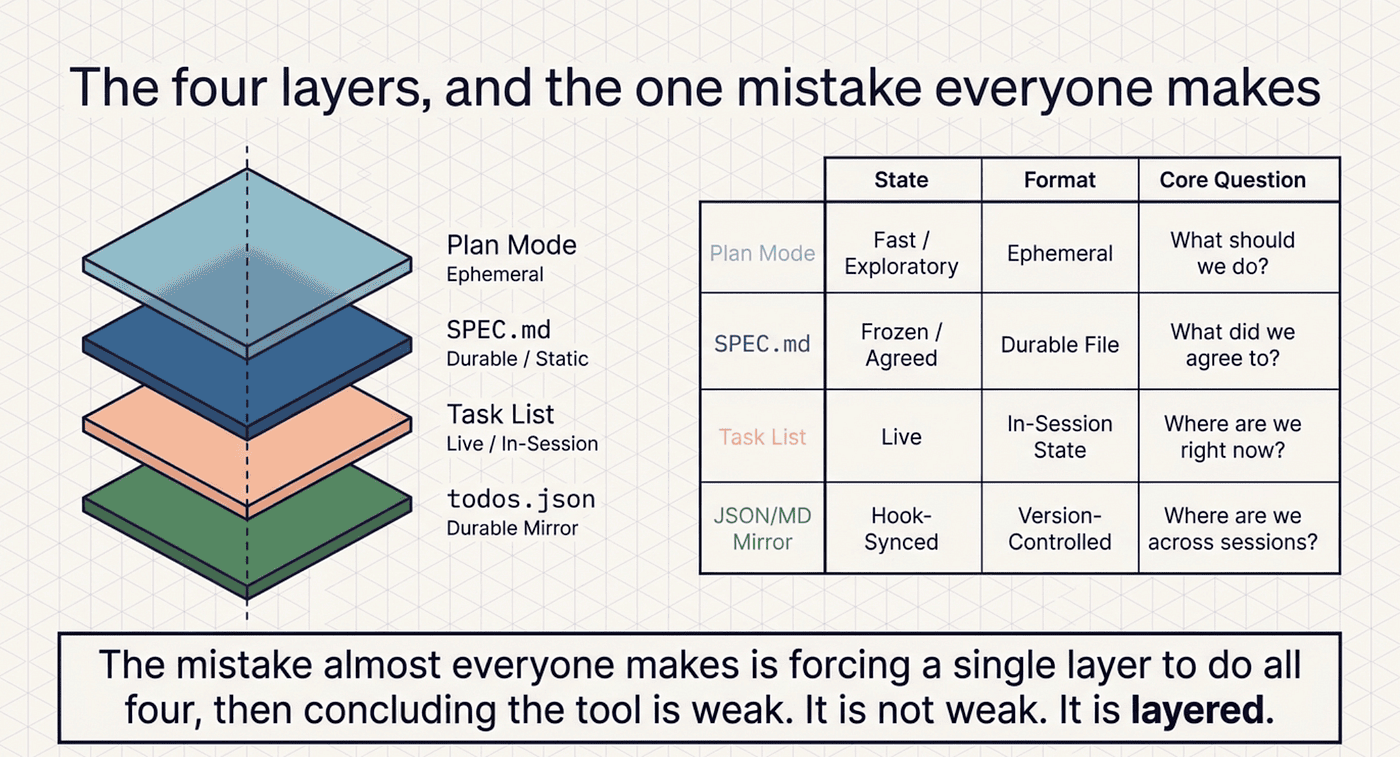
The four layers, and the one mistake everyone makes
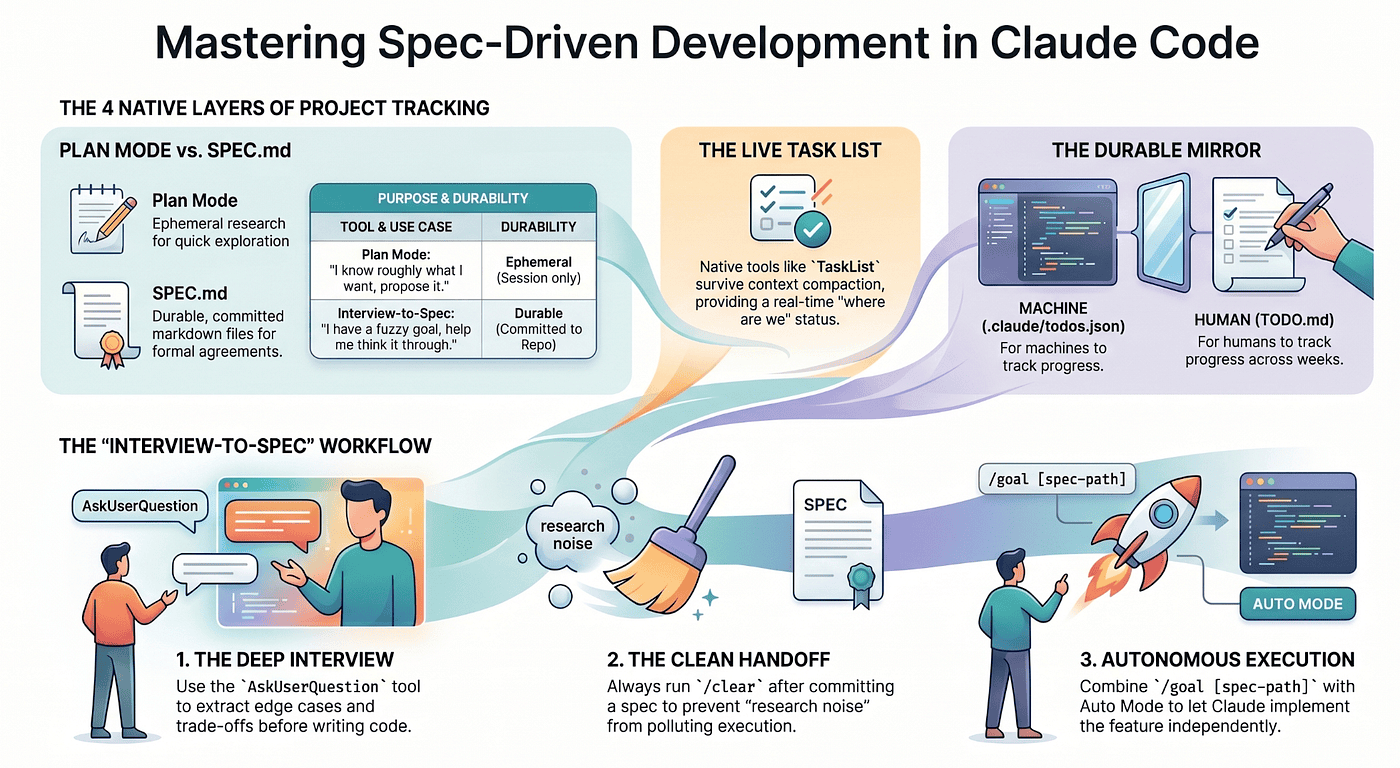
Project tracking in Claude Code has four layers. Each does exactly one job. The mistake almost everyone makes is forcing a single layer to do all four, then concluding the tool is weak. It is not weak. It is layered.
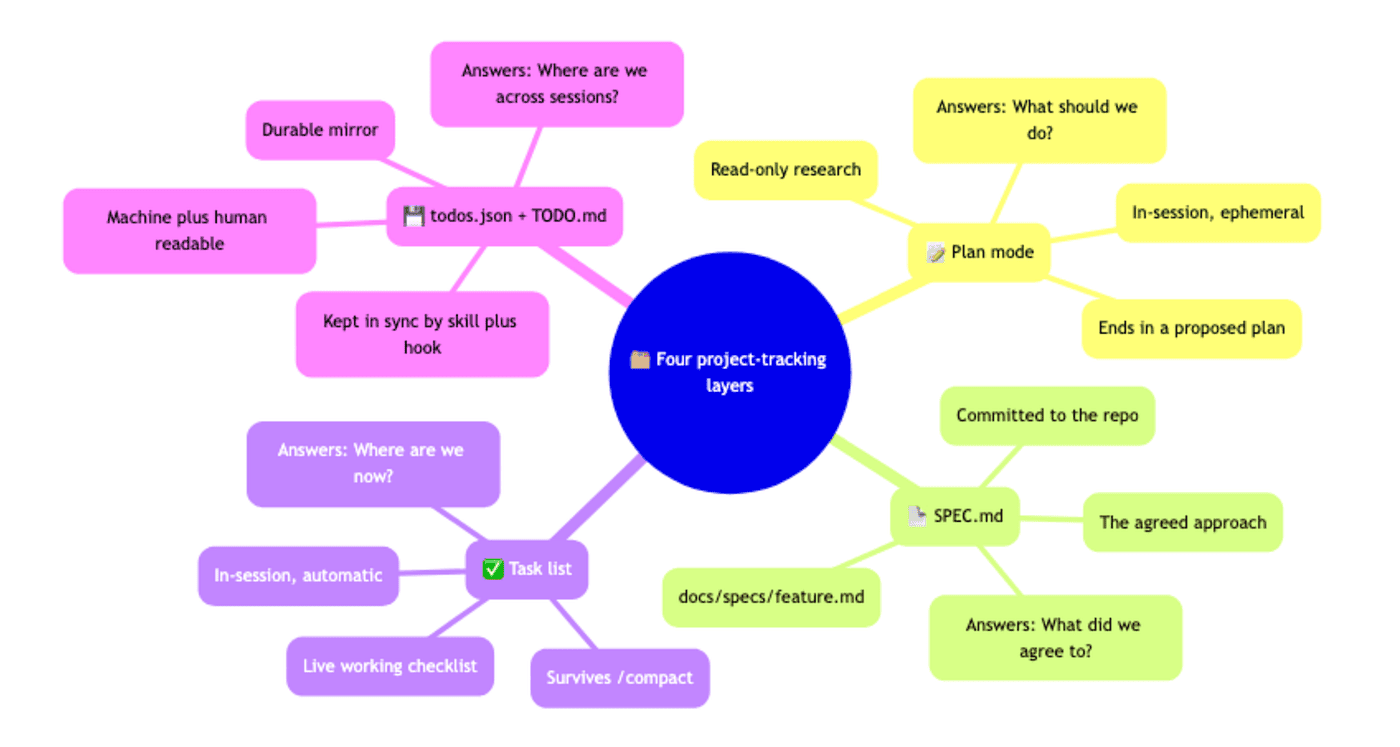
Plan mode is read-only research that ends in a proposed plan. It lives in the session and evaporates when the session ends. It answers "what should we do?"
SPEC.md is the agreed approach, committed to the repo at docs/specs/<feature>.md. It is durable but static. It answers "what did we agree to?"
The task list is the live working checklist. It runs in-session and, crucially, survives context compaction. It answers "where are we right now?"
.claude/todos.json plus TODO.md is the durable mirror, machine-readable and human-readable, kept current by a small skill and hook. It answers "where are we across sessions?"
Plan mode is fast but ephemeral. A spec is durable but frozen. The task list is live but trapped in the session. The JSON mirror outlives every session but goes stale the moment you stop syncing it. You want all four, each pulling its own weight. The discipline is refusing to ask any one of them to be the others.
You can even sync you tasks to Github Tasks for JIRA using skills and hooks.
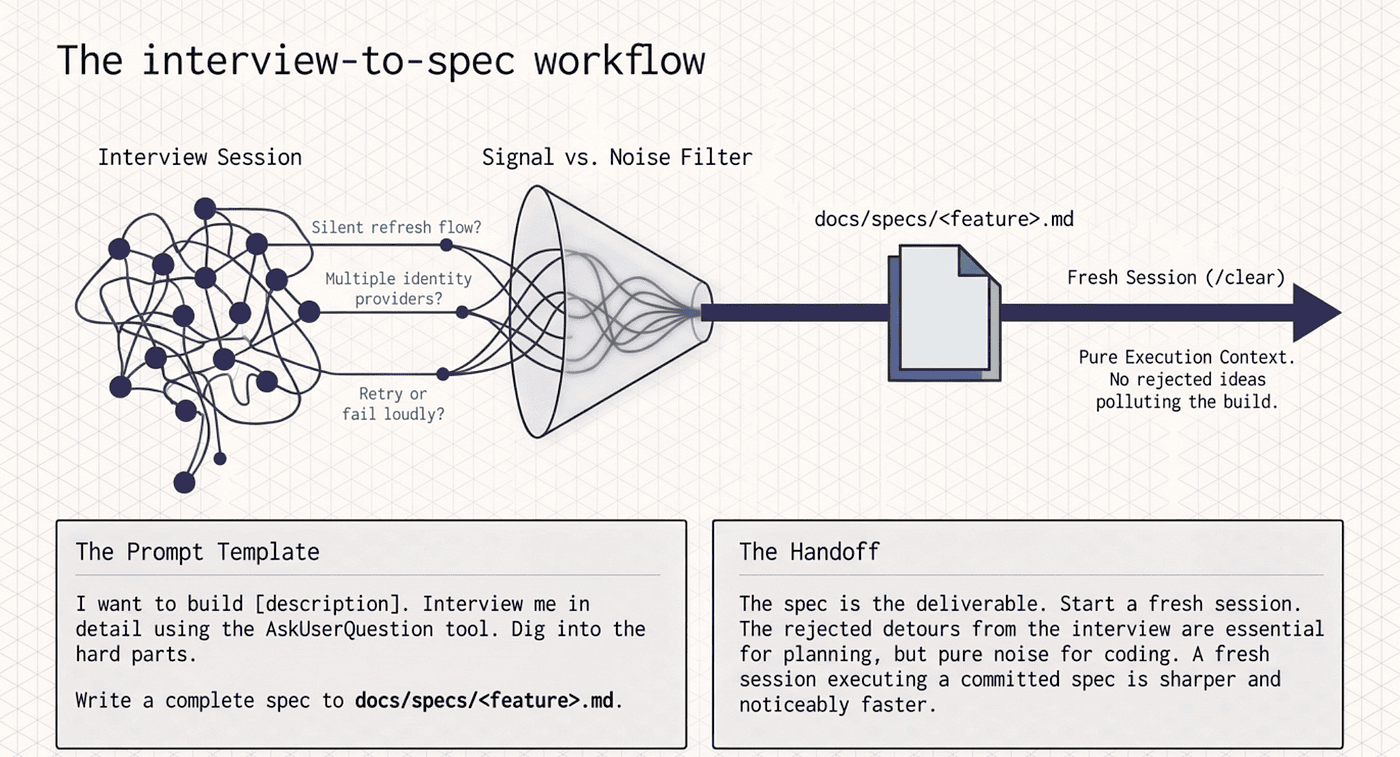
The interview-to-spec workflow
This is the highest-leverage pattern in the whole Claude Code planning toolkit, and it comes straight from Anthropic's official best-practices documentation. For any feature bigger than an afternoon, this is where you start.
The prompt template, almost verbatim:
I want to build [brief description]. Interview me in detail using the
AskUserQuestion tool.

Ask about technical implementation, UI/UX, edge cases, concerns, and tradeoffs.
Don't ask obvious questions, dig into the hard parts I might not have considered.
Keep interviewing until we've covered everything, then write a complete spec
to docs/specs/<feature-name>.md.
Paste that into a fresh session with whatever rough brief you have. The AskUserQuestion tool gives Claude a structured way to interview you. Not "what's the deadline?" but the hard questions you have not thought through. Should the OAuth refresh flow be silent or surfaced to the user? Do you need multiple identity providers per account, or just one? When the access token expires mid-request, do you retry once or fail loudly?
Those are the questions a senior engineer asks in a design review. You get them now, before the first line of code, instead of in a postmortem.
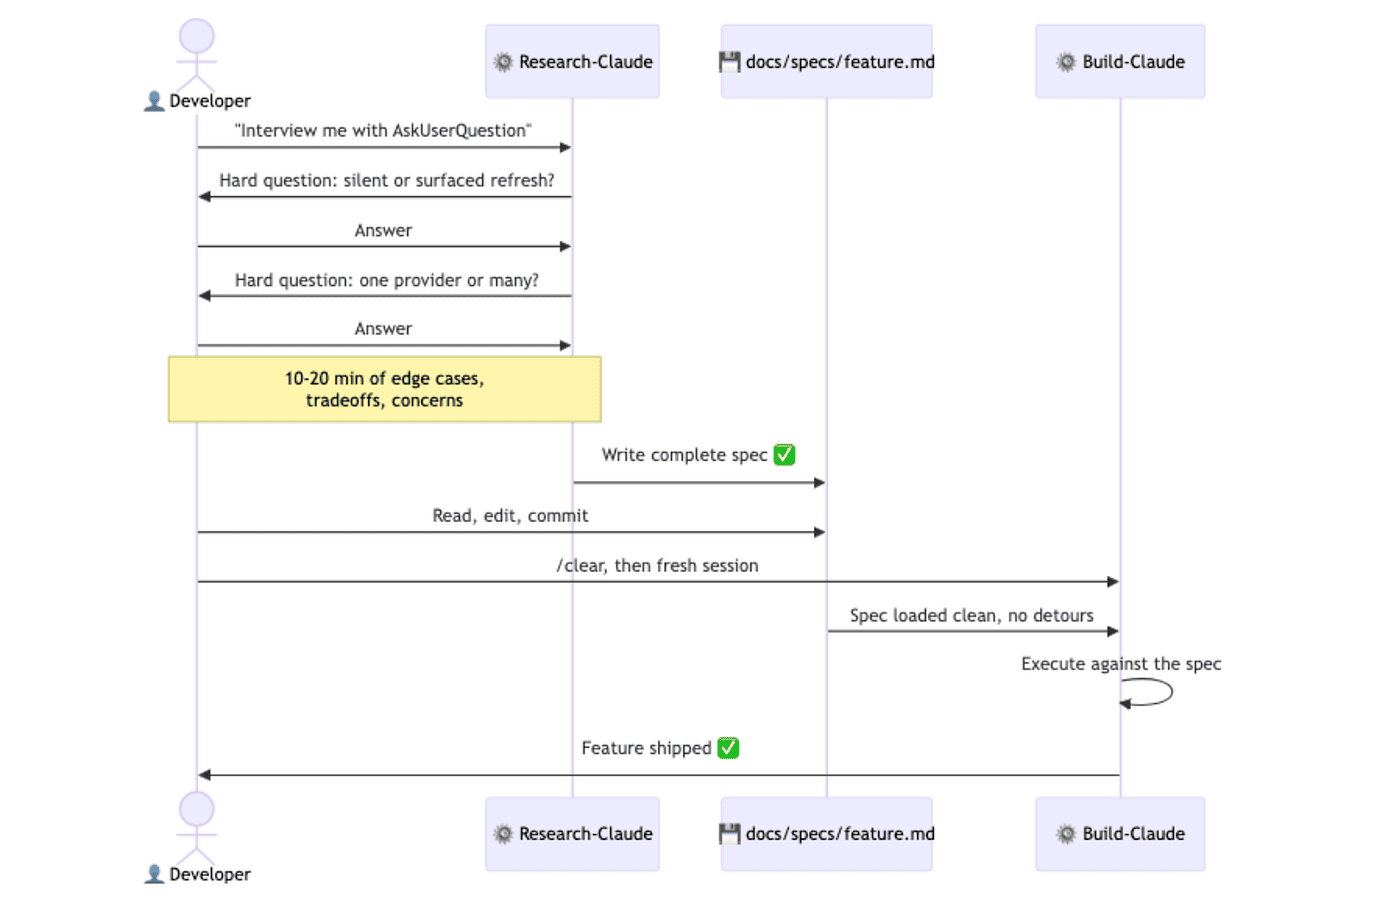
Ten to twenty minutes later, Claude writes a complete spec to disk. Open it. Read it. Fix anything wrong. Commit it. The spec is the deliverable of the planning phase, full stop.
Then comes the step most people skip, and it matters far more than it sounds. Start a fresh session to execute the spec. Use /clear, or open a new terminal. The interview session is full of "we considered X but rejected it because Y" detours. Those detours were essential for writing the spec and are pure noise for executing it. A fresh session that reads the committed spec from disk is sharper, faster, and produces noticeably better code. The spec is a clean handoff between research-Claude and build-Claude, even though both are the same model.
The interview session is full of "we considered X but rejected it because Y" detours. Those detours were essential for writing the spec but now just pollute your context. A fresh session that reads the committed spec from disk is sharper, faster, and produces noticeably better code. Don't be afraid to clear.
Where the file goes: SPEC.md at the repo root for a one-off feature, or docs/specs/<feature-name>.md once you have done this more than twice. Commit them. Six months later, the spec is the single best answer to "why does the code look like this?" For a small change, skip the spec entirely and use plan mode. Not everything needs ceremony.
A spec from this workflow typically has: problem statement, goals and non-goals, proposed approach, considered alternatives with reasons for rejection, acceptance criteria, and open questions. You do not have to request that format; Claude defaults close to it. If your team has a template, point at it.
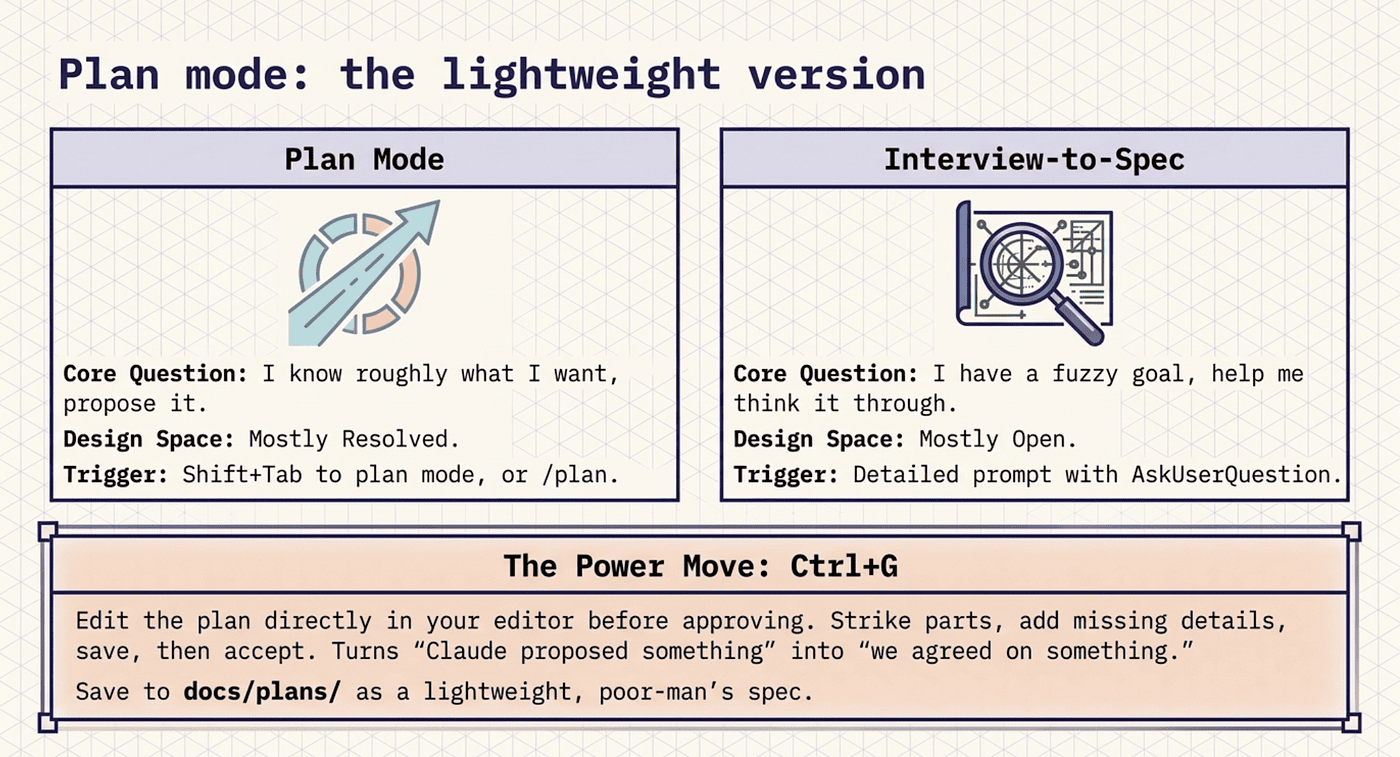
Plan mode: the lightweight version
Not every change earns a full interview round. For the rest, plan mode does the same job in miniature. There are three ways in:
Shift+Tab cycles the mode until the status bar shows plan.
Prefixing a single prompt with /plan runs one prompt in plan mode without changing the session mode.
claude --permission-mode plan starts the whole session in plan mode.
In plan mode, Claude reads files and runs exploration commands but does not touch your source. When the plan is ready, it presents the plan with explicit options: approve and start in auto mode, approve and accept edits, approve and review each edit manually, or keep planning.
Two power moves are worth memorizing.
Ctrl+G edits the plan in your editor before you approve it. The plan is plain markdown. Open it, strike the parts you disagree with, add what is missing, save, then accept. This single keystroke is what turns plan mode from "Claude proposed something" into "we agreed on something." Most people have never used it.
Saving the plan to the repo before approving makes it outlive the session: Write this plan to docs/plans/auth-migration.md, then exit plan mode and start implementing. That is the poor-man's spec. No interview, no design review, just a written record of what you decided. Plenty of features deserve nothing more.
I save the plan to docs/plans a lot! Plans are often a nice spec or design. It is easy to reload in other sessions. You can validate the plan in another terminal session with a clean context for best results.
So when do you reach for which? Plan mode is for "I know roughly what I want, propose it." Interview-to-spec is for "I have a fuzzy goal, help me think it through." The deciding question is whether the design space is mostly resolved or mostly open.

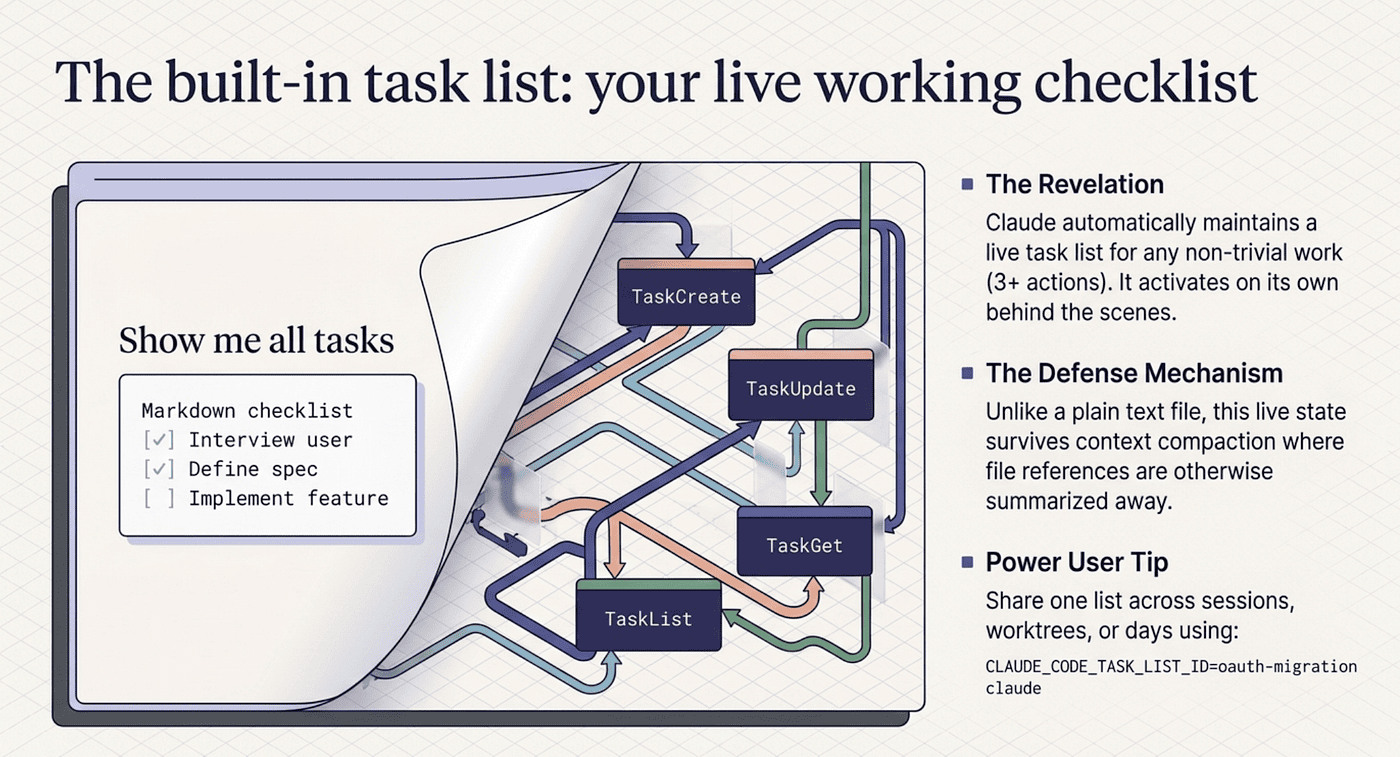
The built-in task list: your live working checklist
Here is the answer to "where is the list of todos that stays current as we work?" Claude Code has had it built in for months. Most people have never opened it.
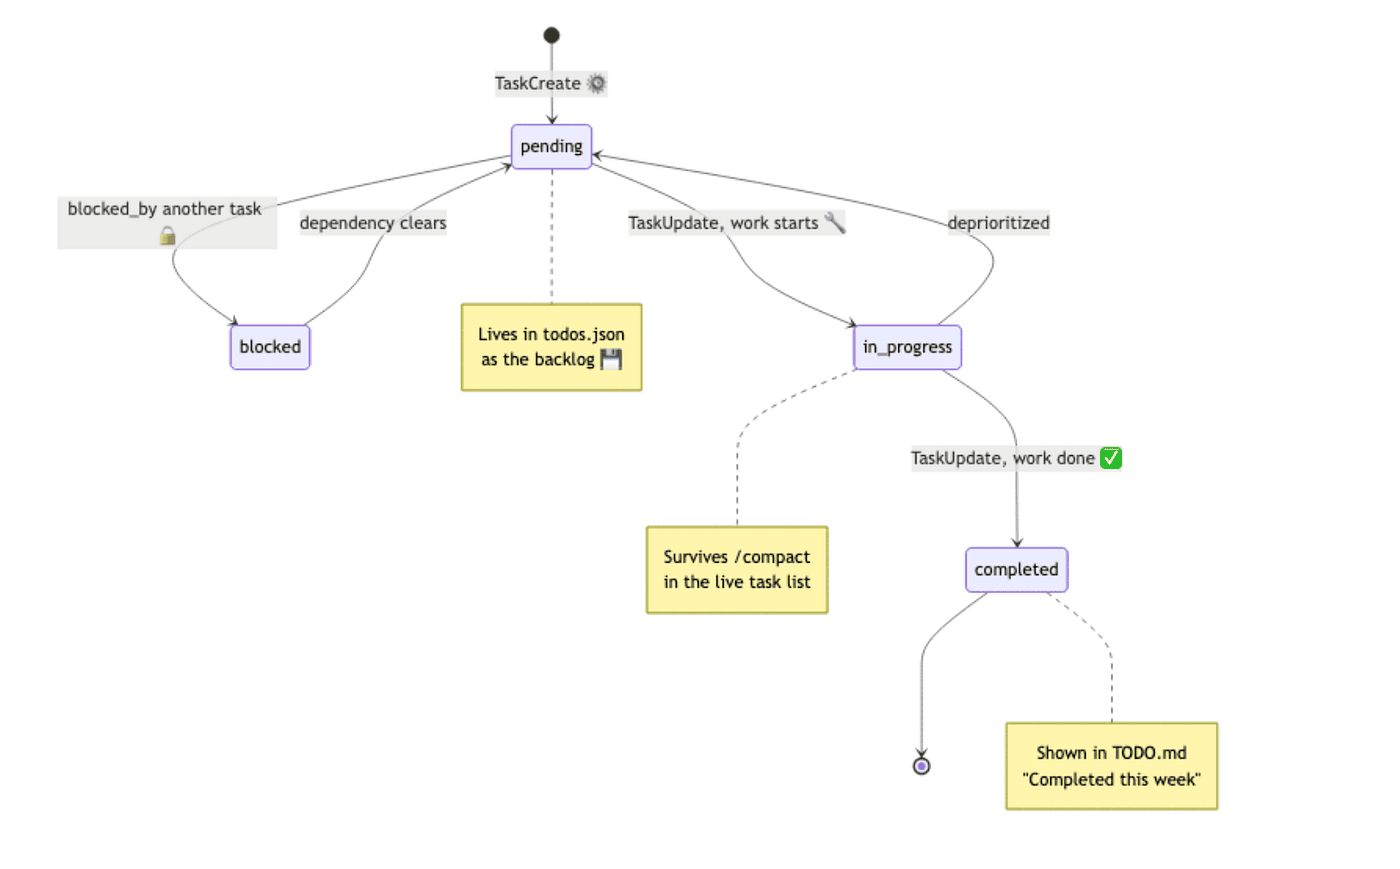
Since Claude Code v2.1.142 (TypeScript SDK 0.3.142), sessions use structured Task tools: TaskCreate, TaskUpdate, TaskGet, and TaskList. They maintain a live task list during any non-trivial work. Earlier versions used TodoWrite, which did the same job with a less flexible shape. The behavior is identical: Claude spots tasks as it works, creates them, marks them in-progress when it starts each one, and completes them as it finishes.
It activates on its own when a request needs three or more distinct actions, when you hand Claude a list of items, or when the operation is non-trivial enough to benefit from tracking. For anything bigger than a quick edit, it simply appears.
How do you see the list? The interactive-mode docs mention a Ctrl+T toggle, but in practice it is unreliable across terminals; on macOS that chord is bound to other things in iTerm2 and Apple Terminal. The reliable move is to ask Claude in plain English:
"Show me all tasks."
"What's left on the task list?"
"Mark task 3 as done."
"Add a task for updating the changelog."
Claude reads with TaskList, updates with TaskUpdate, creates with TaskCreate. You never learn the tool names. Describing what you want works fine, and the answer comes back as a clean rendered list.
Why does this beat a TODO.md for in-session work? The list survives /compact, where file references get summarized away. Claude updates it as part of doing the work, not as a separate ceremony. And asking for it gives you a current snapshot, not a stale file.
To share one list across sessions, set CLAUDE_CODE_TASK_LIST_ID when launching Claude:
CLAUDE_CODE_TASK_LIST_ID=oauth-migration claude
Same env var, same named list under ~/.claude/tasks/, different session. That is how you carry a task list across /clear boundaries, across worktrees, or across days. Without it, each session gets a fresh list.
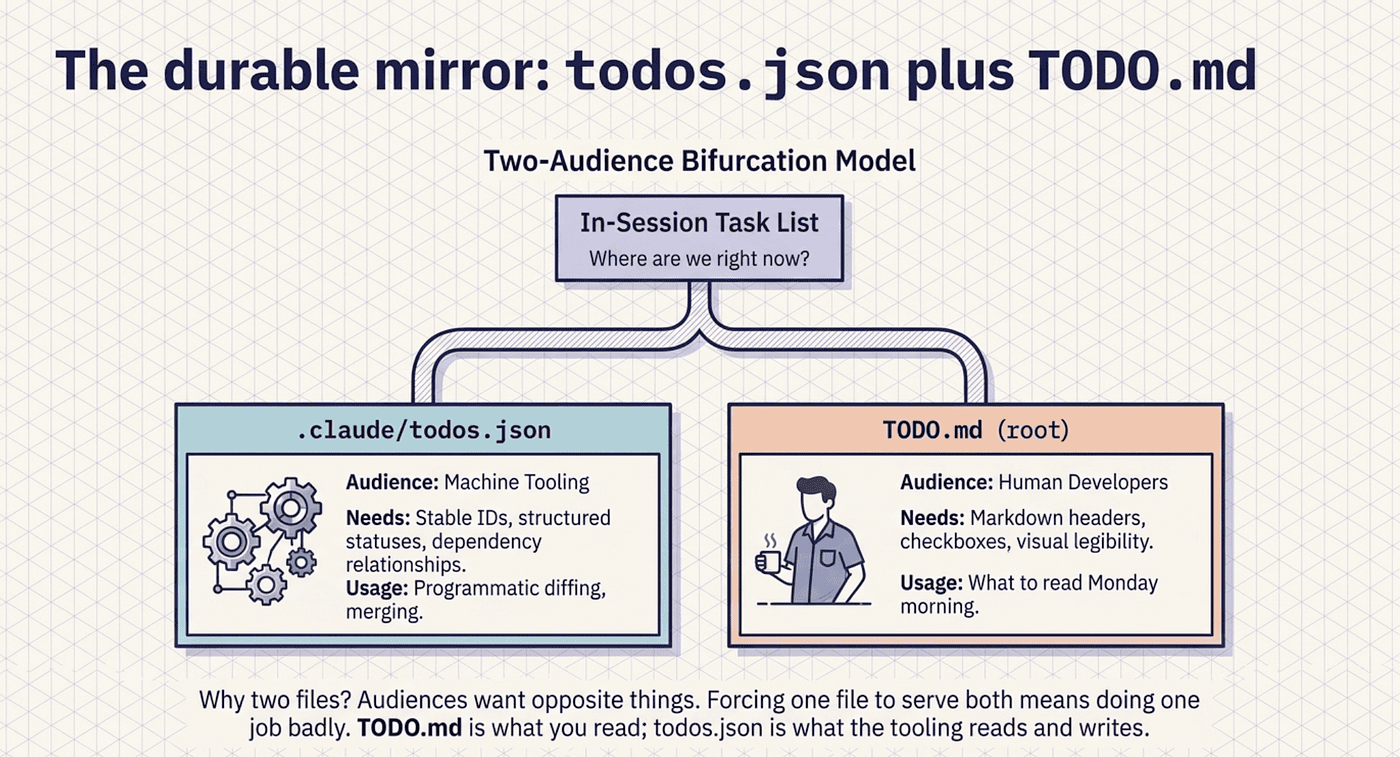
The durable mirror: todos.json plus TODO.md
The in-session task list is excellent for "where are we right now." It is useless for "what should I read Monday morning?" For that you want a durable file in the repo, and the pattern that works keeps two files, one for machines and one for humans.
.claude/todos.json is the machine-readable mirror of the task list. Same shape as the Task tools' internal state: easy to read programmatically, easy to diff, easy to merge when two collaborators touch it. It lives in .claude/ so it travels with the repo without cluttering the root.
TODO.md at the repo root is the human-readable rendering, generated from the JSON. This is what you actually cat with coffee: pretty markdown, organized by workstream, with each item's status legible at a glance.
Why two files? Because the audiences want opposite things. A machine wants stable IDs, structured statuses, and dependency relationships. A human wants headers, checkboxes, dates, and permission to ignore everything already done. One file serving both means doing one job badly.
The todos.json shape maps cleanly to the Task tools' internal state:
{
  "version": 1,
  "updated_at": "2026-05-20T14:32:00Z",
  "todos": [
    {
      "id": "task-001",
      "subject": "Implement JWT refresh endpoint",
      "description": "POST /auth/refresh accepts a refresh token,
                     returns a new access token. 401 on invalid/expired.",
      "status": "in_progress",
      "active_form": "Implementing JWT refresh endpoint",
      "workstream": "auth-migration",
      "blocks": [],
      "blocked_by": [],
      "created_at": "2026-05-20T10:14:00Z",
      "completed_at": null
    }
  ]
}
The fields are the same ones the Task tools use internally, plus a workstream tag for grouping and timestamps so you can see what moved when. Every task moves through a small, predictable lifecycle, and that lifecycle is the same whether it lives in the session or in the JSON.
The matching TODO.md rendered from that JSON is plain markdown grouped by status, with an emoji per state and the task ID in parentheses. TODO.md is what you read. todos.json is what tooling reads and writes. Neither does the other's job.
This is more for example purposes and to show that Claude Code has these features built-in. Claude Code can also store this tasks as subtasks of a JIRA ticket or Github tickets. Or, Claude Code could just look at the last active plan and compare it to what the commit log and current state of the file system is. This is just a nice way to show that Claude Code supports planning and these plans and tasks can be stored and tracked in a flexible way.

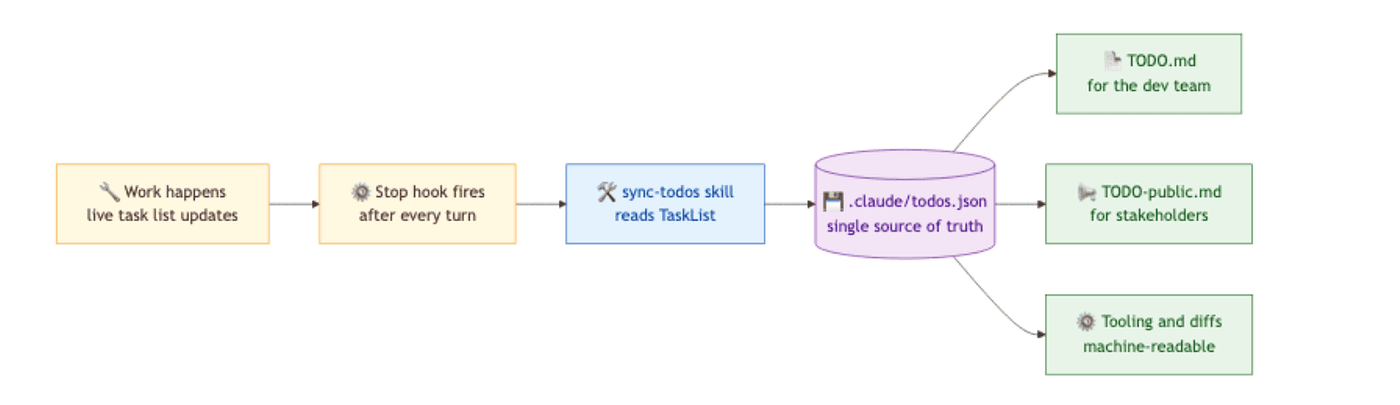
A skill plus a hook keeps everything in sync
So who keeps these two files in agreement with the live task list? The right answer is a skill that does it on demand, plus a hook that triggers the skill automatically. Build them in that order: skill first, hook second, because the skill is useful on its own before you ever wire the hook.
The skill is a regular project skill at .claude/skills/sync-todos/SKILL.md. Its job, in plain terms: call TaskList for the current in-session state, read .claude/todos.json if it exists, merge the two so in-session tasks win for anything in both and durable-only pending or blocked tasks are preserved as backlog, write the merged result back with a fresh updated_at, then regenerate TODO.md grouped by workstream and status. The skill's description field is what Claude reads to decide when to invoke it autonomously, so write it with the keywords you would naturally type.
If you do not want to hand-write the YAML, the official skill-creator does it for you. Install it with /plugin install skill-creator@claude-plugins-official, then ask it to build a sync-todos skill that reads the task list with TaskList, mirrors it to .claude/todos.json, and renders TODO.md from the JSON. You get a working skill on disk in about ninety seconds.
To make the sync automatic, wire a hook. TaskCreated and TaskCompleted are real hook events that fire on every task creation and completion, passing the task ID, subject, and description as JSON on stdin. But the simpler and usually better answer is a Stop hook that runs the sync at the end of every turn:
{
  "hooks": {
    "Stop": [
      {
        "hooks": [
          {
            "type": "prompt",
            "prompt": "Use the sync-todos skill to update .claude/todos.json and TODO.md from the current task list. Do not modify any other files."
          }
        ]
      }
    ]
  }
}
After every turn finishes, the hook fires, Claude runs sync-todos, and both files get rewritten. You never remember to sync. The Stop hook is one config block, and it catches everything that changed in the turn, including manual TaskUpdate calls that the lifecycle events would miss. The TaskCreated and TaskCompleted hooks are precise and skip turns that touch no tasks. Pick one. Do not run both, or you sync twice for nothing.
Two production notes. The skill needs Write and Edit permissions for .claude/todos.json and TODO.md; if Write sits in ask, the hook stalls waiting for approval, so pre-approve writes to those two paths. And commit both files to version control, since the whole point of a durable mirror is that the team can read it. Do not commit the in-session task list itself; that is working state, not a project deliverable.
You could take the same sort of sync logic and sync the tasks to JIRA tasks that are associated with a parent story. Or, JIRA subtasks that are associated with a JIRA task, etc. Claude Code has the flexibility to sync to your workflow.
The same skill can carry a second mode that renders TODO-public.md: no task IDs, no internal-only items, plain-language status, for stakeholders who will never read JSON. That gives you three views of one source of truth: todos.json for tooling, TODO.md for the dev team, TODO-public.md for outsiders. One skill, one hook, three views, zero manual sync.
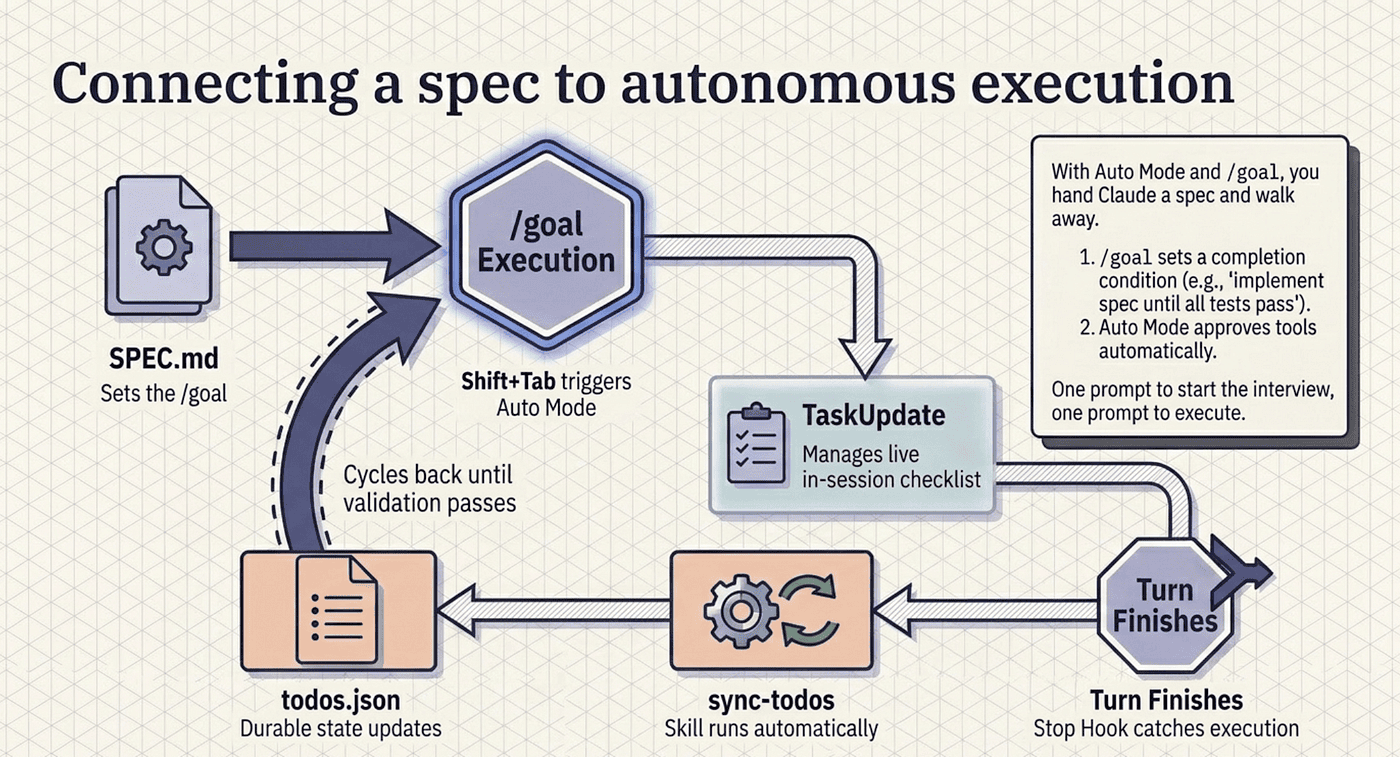
Connecting a spec to autonomous execution
This is where the spec workflow earns its keep. With Auto Mode and /goal, you hand Claude a spec and walk away. Here is the full flow for a real feature.
Interview-to-spec. Run the interview prompt. Land docs/specs/oauth-migration.md on disk. Commit it.
Fresh session. /clear or a new terminal. Reset the context.
Set the goal.
/goal implement the spec in docs/specs/oauth-migration.md until all
acceptance criteria hold and all tests pass
/goal sets a completion condition. After every turn, a small fast model checks whether the condition is met. If not, Claude starts another turn instead of returning control. If yes, the goal clears and Claude reports done.
If you use goals like this, make sure you included validation checks like run the unit tests, or run the Playwright MCP server and check the UI is correct, or use the Postgresql MCP server and the Playwright MCP server, add shopping cart items to the shopping cart then view the cart and make sure it is has the correct items, subtotals, and applicable taxes based on zip code.
Switch to Auto Mode. Press Shift+Tab until the status bar shows auto, or set defaultMode: "auto" in user settings if you have decided that is your default. Auto Mode approves tool calls within a turn using a classifier; /goal decides when to stop. The combination is the closest thing to autonomous execution without writing your own orchestration.
Walk away. Get coffee. Check on it from your phone via Remote Control. Claude works through the spec, updates the task list as it goes, and stops when the condition holds. A worked run finishes with a clear report: Goal achieved (2h 14m, 47 turns), followed by each acceptance criterion verified and the test count, 132 passing, 0 failing.
You wrote one prompt to start the interview and one to start execution. Everything else happened while you were elsewhere. This is the workflow that project-management overlays were always trying to give you, except every layer is native: the spec is a committed markdown file, the goal is a one-line command, the autonomy is built in, and the progress lives in version control.
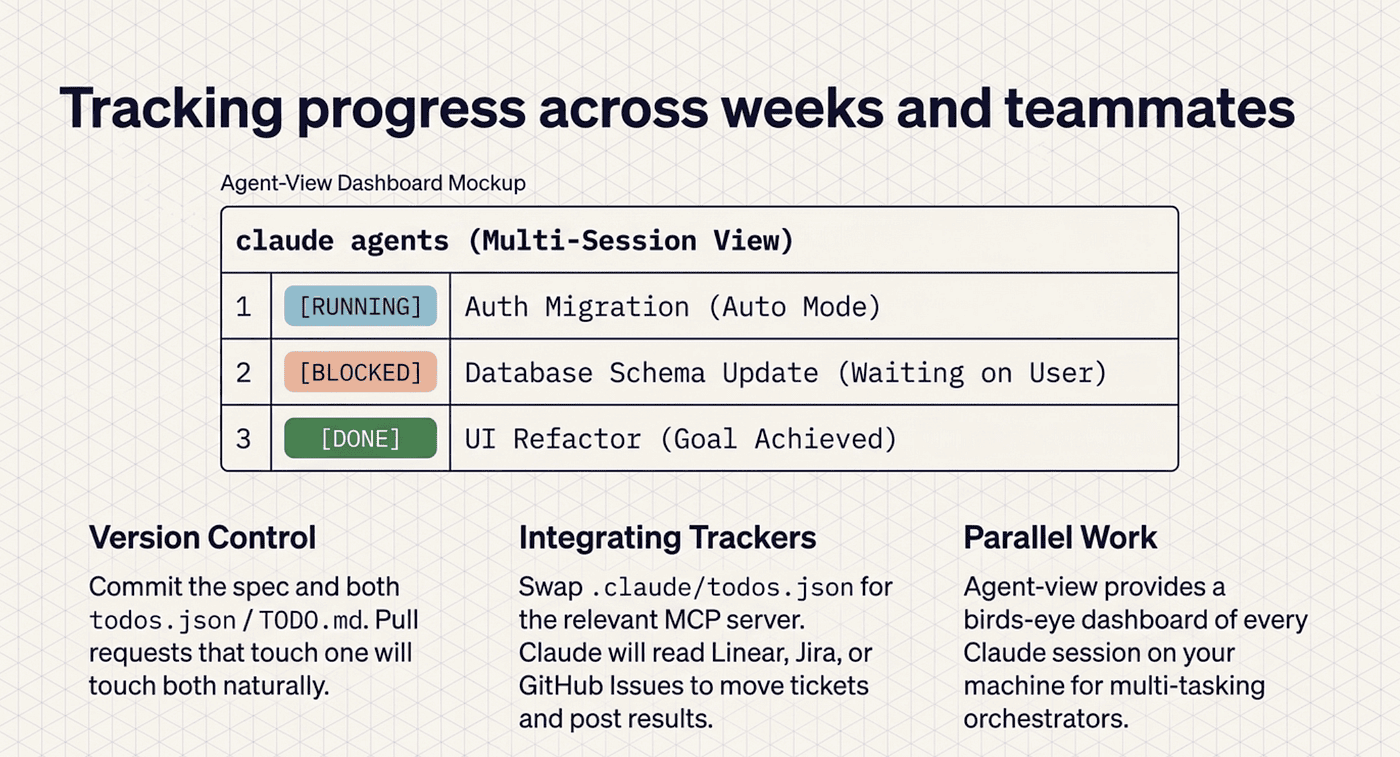
Tracking progress across weeks and teammates
For multi-week or shared work, a few habits matter. Commit the spec; it is the source of truth for "what are we building" and the answer to "why does this work the way it does" months later. Commit both .claude/todos.json and TODO.md; with the hook wired, pull requests that touch one will touch both.
If your team already lives on a tracker, Linear, GitHub Issues, or Jira, use the relevant MCP server instead of .claude/todos.json. Same idea, different storage: Claude reads the tracker, proposes work, moves issues to in-progress, and posts results back. Solo projects do fine with the JSON-plus-skill setup; multi-person teams probably want everything centralized in the tracker they already have.
For visibility across parallel work, agent-view (a research preview as of Q1 2026, run with claude agents) shows every Claude Code session on your machine: running, blocked on you, or done. It is the cross-session dashboard for anyone juggling more than one job at a time.
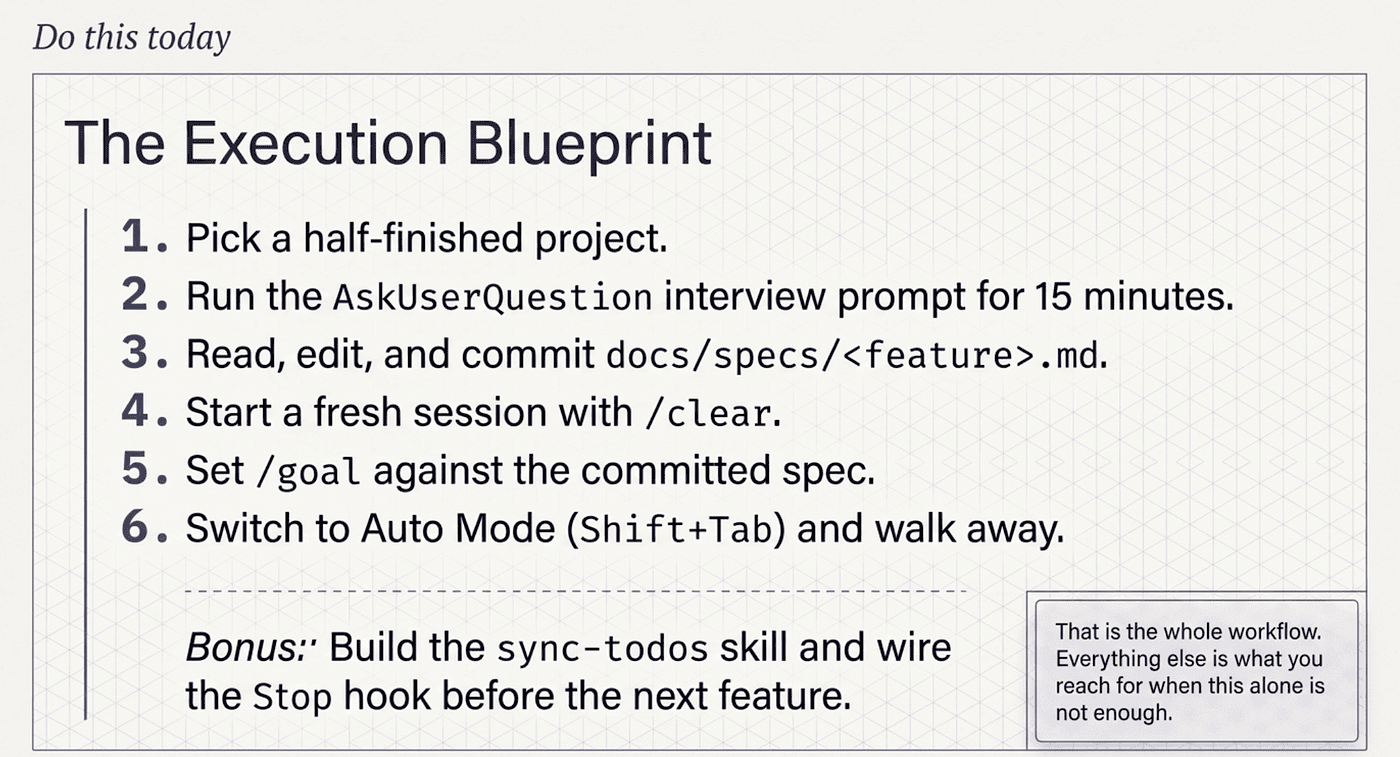
Do this today
Pick a project that has been sitting half-finished and do exactly this:
-
Run the interview prompt against the next feature on the list. Use the
AskUserQuestiontemplate verbatim. Let Claude interview you for fifteen minutes. -
Read the spec it writes to
docs/specs/<feature>.md. Edit what is wrong. Commit it. -
Start a fresh session with
/clear. Set/goalagainst the committed spec. Switch to Auto Mode withShift+Tab. Walk away. -
Before you start the next feature, not after, build the
sync-todosskill (useskill-creatorif you do not want to hand-write YAML) and wire theStophook.
That is the whole workflow. Everything else in this article is what you reach for when this alone is not enough.
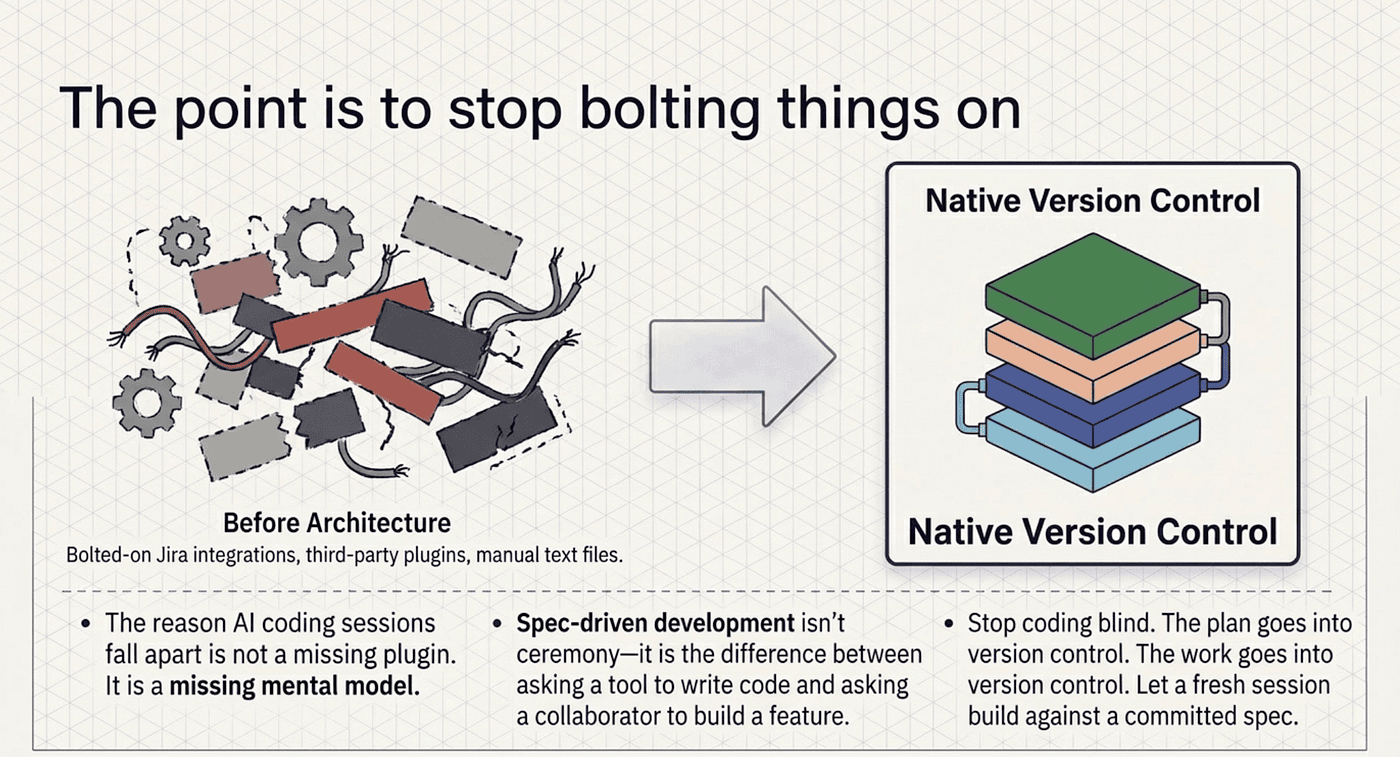
The point is to stop bolting things on
The reason your AI coding sessions fall apart at hour three is not a missing plugin. It is a missing mental model. Claude Code already gives you four layers, each doing one job well: plan mode for "what should we do," a spec for "what did we agree to," the live task list for "where are we now," and the todos.json mirror for "where are we across sessions." Wire them together and you get a written record, a live tracker, and a durable backlog without integrating anything.
Spec-driven development with Claude Code is not ceremony. It is the difference between asking a tool to write code and asking a collaborator to build a feature. The plan goes into version control. The work goes into version control. The progress tracker stays in sync on its own. The autonomy is a flag.
Stop coding blind. Write the spec, commit it, and let a fresh session build against it. The next time you come back to a project after a week away, the answer to "what was I doing?" will be sitting right there in the repo, waiting for you.
This is Part 4 of "Claude Code, Day-to-Day," a 19-part guide to mastering Claude Code for working engineers.

About the Author — Claude Certified Architect
Rick Hightower is a former Senior Distinguished Engineer at a Fortune 100 company, focusing on delivering ML / AI insights to front-line applications, and a practitioner building multi-agent production systems. Rick is a Claude Certified Architect. Follow him on Medium for more hands-on agent engineering content. You can also book him to speak and train your team: Check out Rick Hightower's SpeakerHub.
Rick created Skilz, the universal agent skill installer that supports 30+ coding agents, including Claude Code, Gemini, Copilot, and Cursor, and co-founded the world's largest agentic skill marketplace. Connect with Rick Hightower on LinkedIn or Medium. Check out SpillWave, your source for AI expertise.
Rick has been actively developing generative AI systems, agents, and agentic workflows for years. He is the author of numerous agentic frameworks and developer tools and brings deep practical expertise to teams adopting AI. He enjoys writing about himself in the 3rd person.
Rick also wrote a Claude Certified Architect (CCA) series of articles that have a lot of useful information on writing agentic AI systems. Many ideas captured in the CCA and the exam prep Rick wrote echo what you see in this article. If you want to improve your ability to create well-behaved AI agents, studying for the CCA Exam is a good place to start.
CCA Exam Prep on Agentic Development
- Claude Certified Architect: The Complete Guide to Passing the CCA Foundations Exam
- CCA Exam Prep: Mastering the Code Generation with Claude Code Scenario
- CCA Exam Prep: Mastering the Multi-Agent Research System Scenario
- CCA Exam Prep: Structured Data Extraction
- CCA: Master the Developer Productivity Scenario
- Claude Certified Architect: Master the CI/CD Scenario
- CCA Exam Prep: Mastering the Customer Support Resolution Agent Scenario
- Get the complete reading list for CCA-F exam prep articles from this Claude Certified Architect Exam Prep list.
Rick also wrote a series on harness engineering and how to improve agentic systems using harness engineering for feedback loops and adversarial agents. These articles also go hand in hand with this article.
Harness Engineering Articles
- The $9 Disaster: What Anthropic's Harness Design Paper Teaches Us About Building Autonomous AI
- Harness Engineering vs Context Engineering: The Model is the CPU, the Harness is the OS
- LangChain Deep Agents: Harness and Context Engineering: Memory, Skills, and Security
- Beyond the AI Coding Hangover: How Harness Engineering Prevents the Next Outage
- LangChain's Harness Engineering: From Top 30 to Top 5 on Terminal Bench 2.0
- Anthropic's Harness Engineering: Two Agents, One Feature List, Zero Context Overflow
- OpenAI's Harness Engineering Experiment: Zero Manually-Written Code