From 'Vibe Coding' to Spec-Driven Development: Master GitHub Spec Kit in 2025
Transform AI coding assistants from unreliable guessing tools into precise pair programmers through structured specifications
Originally published on Medium.
Transform AI coding assistants from unreliable guessing tools into precise pair programmers through structured specifications

I. Introduction: The Vibe Coding Problem
You know the feeling. You ask your AI coding assistant for a feature. Beautiful code flows onto your screen. Then you try to run it.
Compilation errors. Unhandled edge cases. Architectural mismatches with your existing codebase. Sometimes the code doesn't even address your actual request.
This frustrating pattern has earned a name: vibe coding. You give the AI a vague idea and hope it guesses correctly. Spoiler alert: it usually doesn't.
Here's the critical insight that changes everything: the problem isn't the AI's coding ability. The problem is how we communicate what we want.
We've been treating AI agents like magic search engines, throwing vague requests and forcing them to guess thousands of unstated requirements. What we need instead is to treat AI like a literal-minded pair programmer: incredibly fast, super capable, but requiring precise, unambiguous instructions. (For more on effective prompt engineering best practices, see the Prompt Engineering Guide.)
The Hidden Cost of Ambiguity
When you type "add photo sharing" into your AI assistant, you trigger an explosion of assumptions:
- What security model should it use?
- Should photos be stored locally or in the cloud?
- What file formats are supported?
- How should permissions work?
- What's the database schema?
- Which design system components should it use?
Every unstated requirement becomes a coin flip. When you're flipping dozens of coins simultaneously, the probability of getting all heads approaches zero.
This isn't philosophical; it's mathematical. Cumulative quality degradation from compounding errors across multiple phases can reduce your final code quality to just 33% accuracy, even if each individual AI response is 80% correct. We'll visualize this critical insight later.
Enter Spec-Driven Development
If vibe coding is the enemy, Spec-Driven Development (SDD) is our weapon.
SDD transforms specifications from forgotten documents into active, living blueprints that directly guide AI code generation. Instead of vague prompts, you create detailed specifications that become the central source of truth for both humans and AI.
The tool bringing this methodology to life is GitHub Spec Kit (v0.0.77, released October 2025). This open-source toolkit works with all major AI agents: Copilot, Claude Code, Gemini, Cursor, and more.
The core philosophy is elegantly simple yet incredibly powerful: formally separate the "what" you want to build from the "how" the AI builds it.
In this comprehensive guide, you'll journey from understanding the vibe coding problem through your first simple specification, to building a full application using the complete SDD workflow, and finally to navigating real-world challenges and strategic decisions for organizational adoption.
Let's transform how you work with AI.
II. What is Spec-Driven Development?
Spec-Driven Development inverts the traditional software lifecycle. Instead of treating specifications as disposable documentation written after the fact, SDD elevates them to executable, first-class artifacts that guide every phase of development.
By formalizing project intent before code generation, SDD provides AI agents with unambiguous context. They function as precise pair programmers rather than creative but unreliable improvisers.
Core Philosophy: Separating "What" from "How"
The fundamental principle of SDD is rigorous separation of concerns:
The "What" and "Why" (Specification Phase)
- User stories and business requirements
- Functional scope and acceptance criteria
- Edge cases and constraints
- Success metrics
- Explicitly excludes technical implementation details
The "How" (Planning and Implementation Phases)
- Technical architecture and design patterns
- Technology stack and frameworks
- Component breakdown and data models
- API contracts and database schemas
- Guided by the "what" and bound by project governance rules
This separation ensures business requirements remain stable while implementation evolves. A single specification can spawn multiple implementation plans. When requirements change, you update the spec, and the AI regenerates the plan and implementation with predictable outcomes.
The Paradigm Shift: From Coder to Architect
Traditional development positions the programmer as the primary creator of code. SDD fundamentally shifts this role:
Side-by-Side Comparison
Your Role:
- Traditional "Vibe Coding": Prompter hoping for the best
- Spec-Driven Development: Architect of intent, AI orchestrator
Process:
- Traditional "Vibe Coding": Ad-hoc, conversational prompts
- Spec-Driven Development: Structured, multi-phase workflow
AI's Role:
- Traditional "Vibe Coding": Guesswork tool
- Spec-Driven Development: Precise pair programmer
Outcome:
- Traditional "Vibe Coding": Unpredictable, often buggy code
- Spec-Driven Development: Reliable, intent-aligned code
Your Job:
- Traditional "Vibe Coding": Debugging the AI's guesswork
- Spec-Driven Development: Structuring intent, validating output
Here's the difference visualized:
The contrast is stark: vibe coding (red/pink) creates endless rework cycles, while SDD (green) provides a clear, progressive path to success.
The Five-Phase Workflow
SDD enforces a structured, human-in-the-loop process that guides both developer and AI through five deliberate phases:
Notice the critical element: human validation checkpoints (light blue diamonds) after every phase. This prevents errors from compounding, transforming AI from an unreliable improviser into a predictable coding partner.
Phase Breakdown:
Phase: Constitution
- Slash Command:
/speckit.constitution - Core Purpose: Establish non-negotiable project governance, tech stack constraints, quality standards
- Artifact Produced:
constitution.md
Phase: Specify
- Slash Command:
/speckit.specify - Core Purpose: Define "what" and "why," focusing on user stories and functional scope, excluding technical details
- Artifact Produced:
specification.md
Phase: Plan
- Slash Command:
/speckit.plan - Core Purpose: Define "how" by creating technical blueprint detailing architecture, components, data contracts
- Artifact Produced:
plan.md
Phase: Tasks
- Slash Command:
/speckit.tasks - Core Purpose: Decompose the plan into atomic, verifiable tasks for AI execution
- Artifact Produced:
tasks.md
Phase: Implement
- Slash Command:
/speckit.implement - Core Purpose: Execute task list sequentially, generating code with human validation checkpoints
- Artifact Produced: Working code
Living Documentation: A Fundamental Shift
One of SDD's most powerful benefits is that specifications become living documentation that evolves with your project.
Unlike traditional documentation that becomes outdated within weeks, SDD specs:
- Stay Current: Actively maintained and evolved as the single source of truth
- Enable Experimentation: Generate different implementations from a single spec
- Improve Onboarding: New team members understand why code exists, not just what it does
- Reduce Key-Person Dependency: Knowledge lives in version-controlled specs, not individual heads
- Support Rapid Prototyping: Iterate on specifications before committing to implementation
This isn't just better documentation. It's a fundamental shift in how software intent is captured, communicated, and maintained.
III. GitHub Spec Kit: The Toolkit
GitHub Spec Kit operationalizes Spec-Driven Development through an open-source toolkit. Let's explore what it is, how it works, and how to get started.
What is Spec Kit?
Released by GitHub in September 2024 and currently at version 0.0.77 (October 2025), Spec Kit is an experimental, open-source toolkit created and maintained by GitHub engineers Den Delimarsky and John Lam.
Important: Spec Kit is not an AI agent itself. It's a set of tools and processes that structure how you interact with your chosen AI agent.
Current Status:
- Maturity: Experimental (not yet production-ready)
- Philosophy: Agent-agnostic, open-source, community-driven
- Community Interest: 46,000+ GitHub stars
- Active Development: 390+ open issues, rapidly evolving
Key Design Principles:
- Tool-Agnostic: Works with Copilot, Claude Code, Gemini CLI, Cursor, and more
- Open-Source: No vendor lock-in, extensible and customizable (MIT license)
- Markdown-Based: Specifications are simple, version-controlled
.mdfiles - Git-Integrated: Designed to work seamlessly with your existing version control workflow
Architecture and Components
Spec Kit comprises several key elements working together:
1. specify-cli Tool
A Python-based command-line tool that bootstraps projects by:
- Scaffolding the SDD directory structure
- Downloading templates from the github/spec-kit repository
- Initializing AI agent integration
- Verifying your development environment
2. Core Templates
Markdown templates defining structure for each phase:
spec-template.md- User stories and requirementsplan-template.md- Technical architecture blueprintconstitution-template.md- Project governance rulestasks-template.md- Atomic implementation checklist
3. Project Constitution
Phase 0: Constitution
First, establish project governance rules.
Prompt:
/speckit.constitution Create a constitution for a photo album web application focused on code quality, testing standards, user experience consistency, and performance requirements.
Generated constitution.md:
# Photo Album App - Project Constitution

## Project Principles

### Code Quality
1. **Modular Architecture:** Separate concerns (UI, data, storage)
2. **Functional Programming:** Prefer pure functions, minimize side effects
3. **Explicit Error Handling:** All errors must be caught and handled gracefully
4. **Documentation:** All functions must have JSDoc comments

### Security & Privacy
1. **Local-First:** No cloud uploads, all data stored locally
2. **Input Sanitization:** All user inputs must be sanitized
3. **Path Validation:** File paths must be validated to prevent directory traversal
4. **No External CDNs:** All assets must be bundled locally

### User Experience
1. **Responsive Design:** Must work on desktop and tablet (mobile optional)
2. **Fast Load Times:** Tile previews must render in < 200ms
3. **Intuitive Drag-and-Drop:** Visual feedback during drag operations
4. **Accessible:** Keyboard navigation must be supported

### Technology Stack
1. **Build Tool:** Vite (latest stable version)
2. **Frontend:** Vanilla JavaScript (ES2022+), HTML5, CSS3
3. **Database:** SQLite for metadata storage
4. **Storage:** Local file system access via File System Access API

### Testing Standards
1. **Unit Tests:** All business logic must have unit tests (90%+ coverage)
2. **Integration Tests:** Test database operations and file system interactions
3. **Manual Testing:** Cross-browser testing required (Chrome, Firefox, Safari)

### Performance Benchmarks
1. **Initial Load:** < 2 seconds for app initialization
2. **Album Load:** < 500ms to load and display album with 100 photos
3. **Drag Operation:** < 16ms per frame (60 FPS)
4. **Thumbnail Generation:** < 100ms per thumbnail

## Non-Negotiables
- No network requests
- All data must be recoverable if browser cache is cleared
- No nested albums (flat structure only)
- Maximum photo size: 50MB per file
Phase 1: Specification
Define the "what" and "why" of the photo album feature.
Prompt:
/speckit.specify Build an app for organizing photos into date-grouped albums with drag-and-drop reordering. No nested albums; tile previews displayed within albums.
Generated specification.md (abbreviated for space):
# Photo Album App - Project Constitution

## Project Principles

### Code Quality
1. **Modular Architecture:** Separate concerns (UI, data, storage)
2. **Functional Programming:** Prefer pure functions, minimize side effects
3. **Explicit Error Handling:** All errors must be caught and handled gracefully
4. **Documentation:** All functions must have JSDoc comments

### Security & Privacy
1. **Local-First:** No cloud uploads, all data stored locally
2. **Input Sanitization:** All user inputs must be sanitized
3. **Path Validation:** File paths must be validated to prevent directory traversal
4. **No External CDNs:** All assets must be bundled locally

### User Experience
1. **Responsive Design:** Must work on desktop and tablet (mobile optional)
2. **Fast Load Times:** Tile previews must render in < 200ms
3. **Intuitive Drag-and-Drop:** Visual feedback during drag operations
4. **Accessible:** Keyboard navigation must be supported

### Technology Stack
1. **Build Tool:** Vite (latest stable version)
2. **Frontend:** Vanilla JavaScript (ES2022+), HTML5, CSS3
3. **Database:** SQLite for metadata storage
4. **Storage:** Local file system access via File System Access API

### Testing Standards
1. **Unit Tests:** All business logic must have unit tests (90%+ coverage)
2. **Integration Tests:** Test database operations and file system interactions
3. **Manual Testing:** Cross-browser testing required (Chrome, Firefox, Safari)

### Performance Benchmarks
1. **Initial Load:** < 2 seconds for app initialization
2. **Album Load:** < 500ms to load and display album with 100 photos
3. **Drag Operation:** < 16ms per frame (60 FPS)
4. **Thumbnail Generation:** < 100ms per thumbnail

## Non-Negotiables
- No network requests
- All data must be recoverable if browser cache is cleared
- No nested albums (flat structure only)
- Maximum photo size: 50MB per file
Your Role (Checkpoint):
Review for clarity and completeness. Does it capture everything the photo album app needs? Any missing edge cases or requirements?
Phase 2: Plan
Translate the user-focused spec into technical architecture.
Prompt:
/speckit.plan Use Vite, vanilla JS/HTML/CSS, and local SQLite for metadata. No cloud uploads. Implement drag-and-drop using HTML5 APIs.
Generated plan.md (abbreviated):
# Photo Album App - Technical Plan

## Architecture Overview

graph TB
  subgraph Frontend["Frontend Layer"]
    UI[UI Components<br/>Vite + Vanilla JS]
    DND[Drag & Drop<br/>Interface]
    Preview[Tile Preview<br/>Generation]
    Grid[Album Grid<br/>Display]
  end
  subgraph DataLayer["Data Layer"]
    SQLite[(SQLite Database<br/>Metadata storage)]
    Schema[Schema:<br/>albums, photos,<br/>album_photos]
  end
  subgraph Storage["File System"]
    Photos[Local Photos<br/>Image files]
    Thumbs[Thumbnails<br/>Cached previews]
  end
This architecture diagram illustrates the three-layer system: Frontend (UI components in blue), Data Layer (SQLite in gold), and File System (storage in green). Arrows show data flow and interactions between layers.
Technology Stack
- Build Tool: Vite 5.x (fast HMR, optimized bundling)
- Runtime: Vanilla JavaScript (ES2022), no frameworks
- Database: sql.js (SQLite compiled to WebAssembly for browser)
- File System: File System Access API for local file management
- Drag-and-Drop: HTML5 Drag and Drop API
- Image Processing: Canvas API for thumbnail generation
Data Model
SQLite Schema
-- Albums table
CREATE TABLE albums (
  id INTEGER PRIMARY KEY AUTOINCREMENT,
  name TEXT NOT NULL,
  created_at DATETIME DEFAULT CURRENT_TIMESTAMP,
  photo_count INTEGER DEFAULT 0
);

-- Photos table
CREATE TABLE photos (
  id INTEGER PRIMARY KEY AUTOINCREMENT,
  filename TEXT NOT NULL,
  filepath TEXT NOT NULL,
  capture_date DATETIME,
  import_date DATETIME DEFAULT CURRENT_TIMESTAMP,
  album_id INTEGER NOT NULL,
  sort_order INTEGER NOT NULL,
  thumbnail_blob BLOB,
  FOREIGN KEY (album_id) REFERENCES albums(id) ON DELETE CASCADE
);

-- Indexes for performance
CREATE INDEX idx_photos_album ON photos(album_id, sort_order);
CREATE INDEX idx_photos_date ON photos(capture_date);
Component Breakdown
1. App Initialization (src/main.js)
- Initialize SQLite database
- Set up event listeners
- Load initial album list
- Render UI shell
2. Album Management (src/albums.js)
createAlbum(name)- Create new albumgetAlbums()- Fetch all albums sorted by datedeleteAlbum(id)- Remove album and reassign photosrenameAlbum(id, newName)- Update album name
3. Photo Management (src/photos.js)
importPhotos(files)- Import selected filesgetPhotosByAlbum(albumId)- Fetch photos for displayupdateSortOrder(photoId, newOrder)- Update positiondeletePhoto(id)- Remove photo and file
4. Drag-and-Drop (src/dragdrop.js)
initDragDrop()- Set up drag event listenershandleDragStart(event)- Store dragged photo IDhandleDragOver(event)- Prevent default, show drop zonehandleDrop(event)- Reorder and update database
5. Thumbnail Generation (src/thumbnails.js)
generateThumbnail(file)- Create 200x200px thumbnailcacheThumbnail(photoId, blob)- Store in databasegetThumbnail(photoId)- Retrieve cached thumbnail
6. UI Rendering (src/ui.js)
renderAlbumList()- Display sidebar album listrenderPhotoGrid(photos)- Display thumbnail gridrenderEmptyState()- Show "no photos" message
File Structure
photo-album-app/
├── index.html
├── package.json
├── vite.config.js
├── src/
│   ├── main.js (app entry point)
│   ├── albums.js (album CRUD)
│   ├── photos.js (photo CRUD)
│   ├── dragdrop.js (drag-and-drop logic)
│   ├── thumbnails.js (thumbnail generation)
│   ├── ui.js (UI rendering)
│   ├── db.js (SQLite wrapper)
│   └── utils.js (helpers: date parsing, file validation)
├── styles/
│   ├── main.css (global styles)
│   ├── sidebar.css (album list styles)
│   └── grid.css (photo grid layout)
└── tests/
    ├── albums.test.js
    ├── photos.test.js
    └── dragdrop.test.js
Constraints & Considerations
- Local-First: All data stored in IndexedDB via sql.js
- No Cloud: File System Access API requires user permission
- Browser Support: Chrome 86+, Edge 86+, Safari 15.2+ (File System Access API)
- Performance: Virtual scrolling for albums > 500 photos
- Data Persistence: SQLite database persisted via IndexedDB
Dependency List
{
  "dependencies": {
    "sql.js": "^1.10.3"
  },
  "devDependencies": {
    "vite": "^5.4.10",
    "vitest": "^2.0.0"
  }
}
Implementation Notes
- Use Web Workers for thumbnail generation (avoid blocking main thread)
- Implement debouncing for drag-and-drop database updates
- Cache album list to minimize database queries
- Use CSS Grid for responsive photo layout
- Implement optimistic UI updates (update UI immediately, persist async)
Your Role (Checkpoint):
Review the technical plan. Does the architecture make sense? Are technology choices appropriate? Is the data model complete? This is your chance to catch architectural issues before writing code.
Phase 3: Tasks
Decompose the technical plan into atomic, executable tasks.
Prompt:
/speckit.tasks
Generated tasks.md (sample, full list would be 50+ tasks):
# Photo Album App - Implementation Tasks

## Database Setup
- [ ] Task 1: Initialize sql.js and IndexedDB persistence
- [ ] Task 2: Create SQLite schema (albums and photos tables)
- [ ] Task 3: Create database indexes for performance
- [ ] Task 4: Implement database wrapper functions (connect, query, close)

## Album Management
- [ ] Task 5: Implement `createAlbum(name)` function
- [ ] Task 6: Implement `getAlbums()` with date sorting
- [ ] Task 7: Implement `deleteAlbum(id)` with cascade logic
- [ ] Task 8: Implement `renameAlbum(id, newName)`

## Photo Import
- [ ] Task 9: Add file input UI element with accept filter
- [ ] Task 10: Implement file selection handler
- [ ] Task 11: Extract EXIF capture date from photo files
- [ ] Task 12: Determine target album based on capture date
- [ ] Task 13: Generate thumbnail using Canvas API
- [ ] Task 14: Store photo metadata in database
- [ ] Task 15: Display import progress indicator

## Drag-and-Drop
- [ ] Task 16: Add draggable attribute to photo tiles
- [ ] Task 17: Implement `handleDragStart` event listener
- [ ] Task 18: Implement `handleDragOver` to show drop zones
- [ ] Task 19: Implement `handleDrop` to reorder photos
- [ ] Task 20: Update photo sort_order in database on drop
- [ ] Task 21: Re-render photo grid with new order

## UI Rendering
- [ ] Task 22: Create HTML template for album list sidebar
- [ ] Task 23: Implement `renderAlbumList()` function
- [ ] Task 24: Create HTML template for photo grid
- [ ] Task 25: Implement `renderPhotoGrid(photos)` function
- [ ] Task 26: Style photo tiles with CSS Grid
- [ ] Task 27: Add hover effects and visual feedback

## Thumbnail Generation
- [ ] Task 28: Implement Canvas-based thumbnail generator
- [ ] Task 29: Cache thumbnails as BLOBs in database
- [ ] Task 30: Implement lazy loading for large albums

## Error Handling
- [ ] Task 31: Add try-catch blocks to all database operations
- [ ] Task 32: Display user-friendly error messages
- [ ] Task 33: Handle corrupted file
Your Role (Checkpoint):
Review the task list. Are tasks small enough to be clearly verifiable? Is anything missing? Are tasks in logical order? A well-defined task list is crucial for reliable AI implementation.
Phase 4: Implement
Execute the task list and generate code.
Prompt:
/speckit.implement
Process:
The AI now works through each task sequentially, generating code to fulfill each item. Critically, you review and validate the code for each small task rather than reviewing one giant code drop at the end.
Sample Generated Code (Task 2: Create SQLite Schema):
// src/db.js
import initSqlJs from 'sql.js';

let db = null;

/**
 * Initialize SQLite database with schema
 */
export async function initDatabase() {
  const SQL = await initSqlJs({
    locateFile: file => `https://sql.js.org/dist/${file}`
  });

  // Create or open database
  db = new SQL.Database();

  // Create albums table
  db.run(`
    CREATE TABLE IF NOT EXISTS albums (
      id INTEGER PRIMARY KEY AUTOINCREMENT,
      name TEXT NOT NULL,
      created_at DATETIME DEFAULT CURRENT_TIMESTAMP,
      photo_count INTEGER DEFAULT 0
    )
  `);

  // Create photos table
  db.run(`
    CREATE TABLE IF NOT EXISTS photos (
      id INTEGER PRIMARY KEY AUTOINCREMENT,
      filename TEXT NOT NULL,
      filepath TEXT NOT NULL,
      capture_date DATETIME,
      import_date DATETIME DEFAULT CURRENT_TIMESTAMP,
      album_id INTEGER NOT NULL,
      sort_order INTEGER NOT NULL,
      thumbnail_blob BLOB,
      FOREIGN KEY (album_id) REFERENCES albums(id) ON DELETE CASCADE
    )
  `);

  // Create indexes
  db.run('CREATE INDEX IF NOT EXISTS idx_photos_album ON photos(album_id, sort_order)');
  db.run('CREATE INDEX IF NOT EXISTS idx_photos_date ON photos(capture_date)');

  console.log('Database initialized successfully');
  return db;
}

/**
 * Get current database instance
 */
export function getDatabase() {
  if (!db) {
    throw new Error('Database not initialized. Call initDatabase() first.');
  }
  return db;
}

/**
 * Close database connection
 */
export function closeDatabase() {
  if (db) {
    db.close();
    db = null;
  }
}
Your Validation:
- Schema matches the plan
- Indexes are created for performance
- Error handling for uninitialized database
- Foreign key constraint implemented
- Missing: IndexedDB persistence (would be added in a subsequent task)
This iterative, test-as-you-go process is far more manageable than reviewing thousands of lines at once.
The Critical Math: Why Human Validation Matters
Remember the cumulative quality problem mentioned earlier? Here's the visualization:
This diagram powerfully illustrates the cumulative quality problem. Even if the AI is 80% accurate at each phase (quite good!), errors multiply without human intervention:
- Constitution: 80% accurate
- Specification: 0.8 x 0.8 = 64% accurate
- Plan: 0.8^3 = 51% accurate
- Tasks: 0.8^4 = 41% accurate
- Implementation: 0.8^5 = 33% accurate
Human validation checkpoints (blue diamonds in the bottom row) prevent this degradation, correcting the 20% error margin at each stage before it compounds.
This is why SDD is not a push-button automation solution -- it's a methodology for managing error cascades through disciplined human oversight.
What We've Learned (Stage 2)
This complete workflow demonstrated five critical insights:
- Phased Progression: Each phase builds on validated prior work
- Cumulative Context: AI has access to constitution, spec, and plan during implementation
- Human-in-the-Loop: Validation at every checkpoint prevents quality degradation
- Atomic Tasks: Breaking work into small pieces makes validation manageable
- Role Transformation: Developer shifts from coder to architect/orchestrator
You now have a working photo album application generated through structured AI collaboration. But real-world adoption involves challenges beyond technical implementation.
VI. Stage 3: Advanced Patterns & Real-World Challenges
You've mastered the basic and intermediate workflows. Now let's tackle complex scenarios, organizational challenges, and strategic decisions for real-world adoption.
The "Brownfield Gap": SDD's Most Critical Limitation
While Spec Kit excels with greenfield projects (new codebases starting from scratch), it faces significant challenges with brownfield development -- working on existing, complex codebases. This limitation, extensively documented in real-world usage reports, is the framework's most critical weakness.
What is the Brownfield Gap?
The brownfield gap refers to SDD's difficulty understanding and working with existing codebases that have:
- Complex, undocumented architecture
- Years of accumulated technical debt
- Implicit conventions and patterns
- Extensive interconnected dependencies
- Legacy code without clear specifications
Real-World Experience: GitHub Issue #75
A detailed user report illustrates the challenge vividly:
Real World Comment:
"For proper incremental work on an existing codebase, Spec Kit only complicates the work. The AI agent completely loses the essence of the work, ignores the existing project structure, attempts to create new duplicative files instead of modifying existing ones, and generates hundreds of unnecessary tests, most of which make no sense at all. It creates an illusion of work -- kilobytes of text in specs -- but the actual implementation misses the mark entirely."
Why Does This Happen?
The brownfield gap exists because:
- Implicit Context: Existing codebases contain vast amounts of implicit architectural context not captured in any specification. The AI must infer patterns from code, which is unreliable.
- Spec Drift: The spec describes what should exist, but the actual codebase may have diverged significantly over time. The AI can't reconcile these differences.
- Incremental Changes: Real brownfield work involves small, surgical modifications to existing files. SDD's workflow is optimized for creating new artifacts, not refactoring existing ones.
- Testing Noise: AI agents generate tests based on the spec rather than actual codebase structure, producing "nonsensical" tests that don't match existing conventions.
Mitigation Strategies:
While the brownfield gap is real, teams have found partial workarounds:
1. Limit SDD Scope
- Use SDD only for new features that are well-isolated
- Avoid using it for refactoring or modifying core existing systems
- Create clear boundaries between new (SDD) and existing (manual) code
2. Hybrid Spec Approach
- Write lightweight specs focusing on the changes needed
- Include explicit references to existing files and functions
- Supplement with manual code reviews to ensure integration
3. Extract and Rebuild
- For legacy modernization, extract business logic into a spec
- Build the new system greenfield using SDD
- Migrate incrementally rather than modifying in-place
4. Context Injection
- Manually provide AI with critical existing code snippets
- Reference existing patterns explicitly in the plan
- Use comments in specs like: "Must integrate with existing
UserService.authenticate()method"
Discussion Question: What are your biggest challenges using AI coding assistants with existing, complex codebases? Have you found effective strategies for bridging the brownfield gap? Share your experiences in the comments.
Strategic Guidance:
This decision tree helps you quickly determine when SDD is appropriate. Green paths indicate ideal SDD use cases, yellow shows hybrid approaches, and red signals high risk or scenarios where SDD isn't ready.
Phased Adoption Strategy: The Right Way to Scale SDD
Organizations that successfully adopt Spec-Driven Development follow a deliberate, phased approach rather than attempting immediate, org-wide rollout. Here's the proven three-phase strategy:
This Gantt chart shows a realistic 6-month adoption timeline with three distinct phases.
Phase 1: Pilot Program (4 Weeks)
Objective: Validate Spec Kit's effectiveness in your environment on a low-risk project and establish initial best practices.
Activities:
- Select 1-2 volunteer developers with interest in AI methodologies
- Choose a non-critical greenfield project or well-isolated new feature
- Execute complete SDD workflow (constitution -> implement)
- Document successes, challenges, and learnings
- Measure baseline metrics (time to delivery, bug count, code quality)
Success Criteria:
- Complete at least one feature using full SDD workflow
- Identify 3-5 best practices for your context
- Document common pitfalls and how to avoid them
- Volunteers become internal champions
Phase 2: Team Expansion (8 Weeks)
Objective: Scale adoption to a full team, refine best practices, and create a reusable playbook.
Activities:
- Conduct team training on SDD principles and Spec Kit usage
- Apply SDD to 2-3 new greenfield projects
- Carefully pilot one limited brownfield task (small, well-contained)
- Create team playbook documenting standards and processes
- Establish review processes for specs, plans, and tasks
- Track metrics: delivery speed, bug rates, team satisfaction
Success Criteria:
- Entire team can execute SDD workflow independently
- Playbook captures organization-specific best practices
- Understand SDD's limits (when to use, when not to use)
- Measurable improvements in quality or velocity
Phase 3: Organization-Wide Rollout (Ongoing)
Objective: Establish SDD as a standard, supported methodology across all appropriate new development work.
Activities:
- Make playbook, training materials, and best practices available organization-wide
- Provide guidance on selecting appropriate use cases (greenfield vs. brownfield)
- Establish community of practice for sharing learnings
- Continuously iterate on methodology based on feedback
- Track long-term metrics and ROI
Success Criteria:
- SDD is standard practice for greenfield projects
- Clear guidelines exist for when to use vs. not use SDD
- Internal champions support other teams
- Measurable org-wide impact (velocity, quality, satisfaction)
Key Metrics to Track:
Productivity & Velocity
- Cycle time from feature kickoff to prototype delivery
- Percentage reduction in rework tickets
Code Quality & Reliability
- Percentage reduction in bugs reported in first 30 days post-release
- Adherence to standards defined in constitution.md
Developer Experience
- Qualitative feedback from developer satisfaction surveys
- Onboarding time for new engineers on SDD-documented projects
Hybrid Approaches: Balancing SDD with "Vibe Coding"
One of the most important lessons from 2025 real-world usage: strict SDD for all code is not optimal. Successful teams adopt a hybrid approach, using the right tool for the right job.
When to Use SDD:
- Production code that will be maintained long-term
- Complex features with multiple stakeholders
- Greenfield projects where clarity is paramount
- Features requiring cross-team collaboration
- High-risk code (security, compliance, performance-critical)
When to Use "Vibe Coding":
- Quick prototypes and proof-of-concepts
- One-off utility scripts or tools
- Experimental features being validated
- Simple bug fixes in well-understood code
- Personal automation or development tooling
Hybrid Strategy Example:
# Team SDD Guidelines

## Default Approach by Context

| Code Type | Primary Method | Spec Detail Level |
|-----------|----------------|-------------------|
| Core Business Logic | SDD (full workflow) | Comprehensive |
| API Endpoints (new) | SDD (plan + tasks) | Moderate |
| UI Components (new) | SDD (spec + light plan) | Basic |
| Bug Fixes | Vibe coding | None |
| Prototypes | Vibe coding | None |
| Refactoring | Manual or Vibe coding | None (high brownfield risk) |

## Decision Framework
1. **Will this code be maintained for >6 months?** -> SDD
2. **Do multiple people need to understand it?** -> SDD
3. **Is it greenfield?** -> SDD
4. **Is it a prototype or throwaway?** -> Vibe coding
5. **Is it modifying complex existing code?** -> Manual (brownfield risk)
This balanced approach leverages SDD's strengths (structure, documentation, quality) while acknowledging its limitations (upfront time, brownfield gap) and the value of rapid iteration for certain contexts.
Managing Multiple Specifications: Team Workflows
As projects grow, you'll need patterns for managing multiple specs, coordinating team members, and maintaining governance.
Specification Organization:
project/
├── constitution.md          (single, project-wide)
├── features/
│   ├── user-auth/
│   │   ├── specification.md
│   │   ├── plan.md
│   │   └── tasks.md
│   ├── photo-upload/
│   │   ├── specification.md
│   │   ├── plan.md
│   │   └── tasks.md
│   └── search/
│       ├── specification.md
│       ├── plan.md
│       └── tasks.md
└── shared/
    ├── data-models.md
    └── api-contracts.md
Feature Branch Strategy:
# Create feature branch with spec
git checkout -b feature/user-auth
specify init --feature user-auth

# Work through SDD workflow
# /speckit.specify, /speckit.plan, etc.

# Commit artifacts at each phase
git add features/user-auth/specification.md
git commit -m "spec: user authentication requirements"

git add features/user-auth/plan.md
git commit -m "plan: user authentication architecture"

# Implement and create PR
# PR includes spec, plan, tasks, and code for review
Spec Review Process:
- Specification Review: Product owner + 1 engineer validate requirements
- Plan Review: Tech lead + senior engineer validate architecture
- Task Review: Implementing engineer validates decomposition
- Code Review: Standard code review process (now with spec context!)
Collaborative Constitution:
Large teams can create a multi-tiered governance structure:
# Project Constitution (organization-wide)
- Security: OWASP Top 10 compliance mandatory
- Testing: 80%+ coverage required
- Documentation: All public APIs must have docs

# Team Constitution (team-specific)
- Tech Stack: React 18+, TypeScript 5+, Tailwind CSS
- State Management: Zustand (not Redux)
- API Style: REST (not GraphQL for v1)

# Feature Constitution (feature-specific overrides)
- Photo Upload: WebAssembly for image processing
- Search: Elasticsearch required (exception to REST-only)
This hierarchical approach allows flexibility while maintaining consistency.
VII. Comparative Analysis: Spec Kit vs. Alternatives
GitHub Spec Kit exists within an emerging ecosystem of tools solving the "vibe coding" problem. Understanding the landscape helps you make strategic decisions about which approach best fits your team's needs.
This comparison tree shows three frameworks with six evaluation dimensions each. Green nodes represent strengths, yellow shows tradeoffs or neutral aspects, and pink/red indicates limitations.
Detailed Comparison Matrix
Core Philosophy:
- GitHub Spec Kit: Open-source, agent-agnostic toolkit for structuring prompts
- AWS Kiro: Proprietary, integrated "agentic IDE" with spec and vibe modes
- BMAD-Method: Multi-agent methodology simulating a complete project team
Primary Artifact:
- GitHub Spec Kit: Version-controlled code guided by Markdown spec files
- AWS Kiro: Living specification continuously synchronized with code
- BMAD-Method: Role-specific outputs from specialized agents (Analyst, PM, Dev, QA)
Workflow Model:
- GitHub Spec Kit: Phased, command-driven, human-in-the-loop at every step
- AWS Kiro: Three-phase workflow with automated real-time synchronization
- BMAD-Method: Role-driven workflow simulating hand-offs between agents
Architecture:
- GitHub Spec Kit: Lightweight CLI (specify-cli) + Markdown templates in .specify/ directory
- AWS Kiro: Fully integrated VS Code fork with built-in SDD tooling
- BMAD-Method: Heavyweight framework of specialized, collaborative AI agents
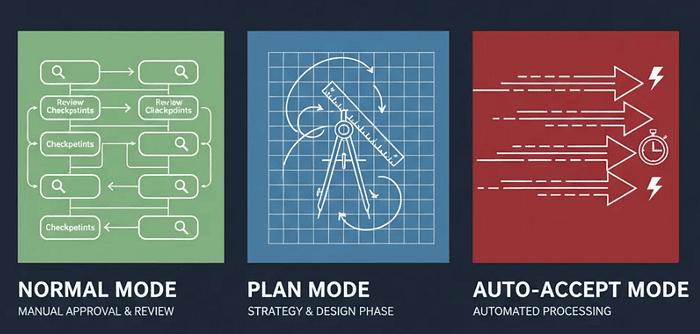
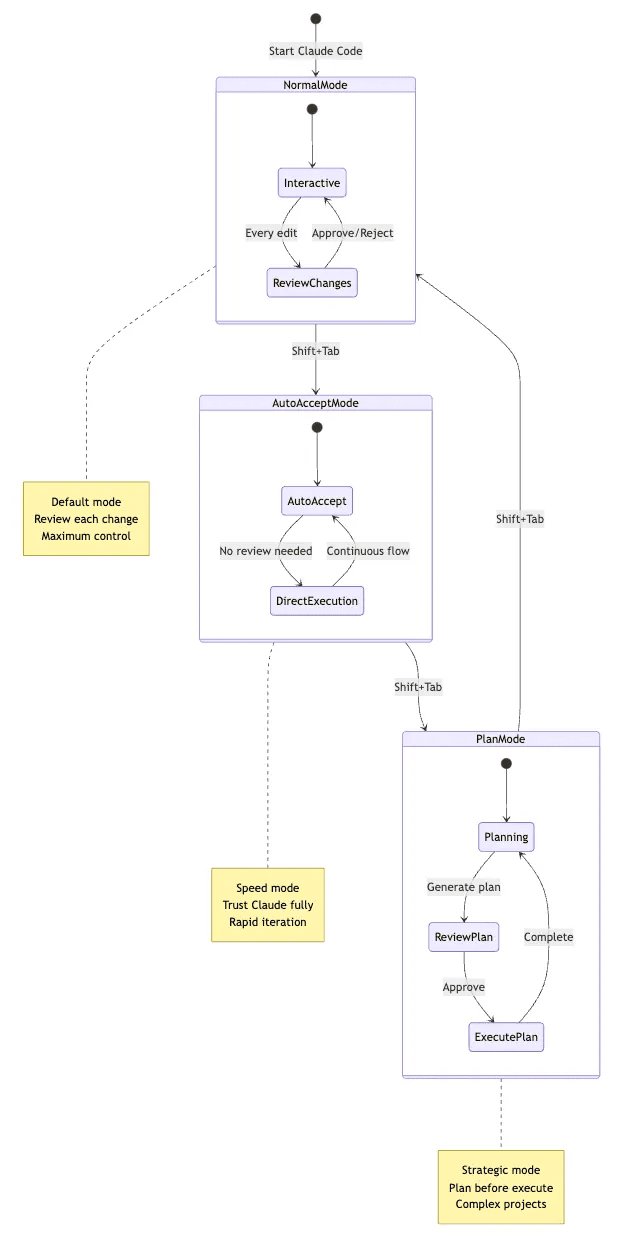
Other Strategic Workflows -- Claude Code Checkpointing
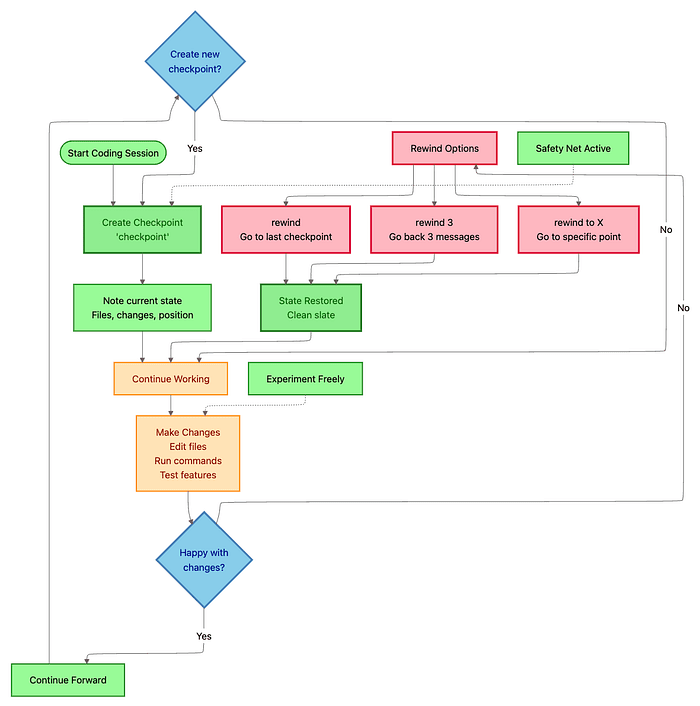
Fearless Refactoring: The Checkpoint-Enabled Approach:
Traditional refactoring is nerve-wracking. One wrong move breaks tests. Rollback means manual git revert and lost progress.
The checkpoint-enabled approach eliminates fear:
Scenario: Convert entire codebase from JavaScript to TypeScript (risky, high-reward refactoring).
Traditional approach:
- Careful, file-by-file conversion
- Manual testing after each file
- Fear of cascading errors
- Days or weeks of work
- High stress
Checkpoint approach:
- Create checkpoint:
checkpoint pre-typescript-conversion - Bold experiment:
"Convert the entire codebase to TypeScript. Use strict mode. Infer types where possible, add explicit types for public APIs."
- Claude converts 50+ files in Auto-Accept Mode (takes 10 minutes)
- Run tests:
npm test
Result:
-
45 tests pass
-
12 tests fail (type errors in mock data)
-
Investigate failures:
"Analyze the 12 failing tests. What type errors occurred?"
Claude identifies: Mock data doesn't match new strict types.
- Decide: Fix tests OR refine conversion strategy?
- Rewind to checkpoint:
/rewind -> Select "Code only" -> Restored to pre-conversion state
- Refined approach:
"Convert codebase to TypeScript. For test mocks, generate types from actual API response shapes using JSON-to-TS pattern."
- Claude reconverts with smarter type inference
- Run tests again:
Result:
-
57 tests pass
-
0 tests fail
-
Commit:
git add .
git commit -m "feat: Convert entire codebase to TypeScript with strict mode"
Time invested: 30 minutes Stress level: Zero Code quality: Higher (because you experimented boldly)
Without checkpoints: This refactoring would take days and involve manual rollbacks, Git archaeology, and anxiety.
Rapid Iteration: Auto-Accept Mode + Granular Permissions:
When you have a clear task and trust Claude's direction, maximize speed with Auto-Accept Mode, but only after configuring safety rails.
Setup (one time per project):
Create .claude/settings.json:
{
  "permissions": {
    "allow": [
      "Read",
      "Edit",
      "MultiEdit",
      "Bash(npm run lint:*)",
      "Bash(npm run test:*)",
      "Bash(npm run build)",
      "Bash(git status)",
      "Bash(git diff:*)",
      "Bash(git add:*)"
    ],
    "deny": [
      "WebFetch",
      "Bash(rm -rf:*)",
      "Bash(curl:*)",
      "Bash(wget:*)",
      "Bash(npm install:*)",
      "Bash(git push:*)",
      "Bash(git reset:*)"
    ],
    "ask": [
      "Bash(git commit:*)",
      "Bash(npm run deploy:*)"
    ]
  }
}
What this does:
- Allow: Claude can read/edit files, run tests, lint, check Git status
- Deny: Claude cannot download files, delete recursively, install packages, push to remote
- Ask: Claude must get approval for commits and deployments
Rapid iteration workflow:
- Set checkpoint:
checkpoint before-batch-refactor - Activate Auto-Accept: Press Shift+Tab
- Give clear task:
"Convert all 50 class components in src/components/ to functional components with hooks. Maintain exact behavior. Preserve all prop types."
-
Claude automatically:
- Reads all 50 component files
- Applies transformations without approval prompts
- Runs lint after each file (allowed)
- Skips
npm installif needed (denied operation)
-
Monitor progress as files update in your editor
-
Review results:
git diff
2. Run full test suite:
npm test
All tests pass.
3. Commit:
git add .
git commit -m "refactor: Convert class components to functional components with hooks"
(Claude asks for approval due to ask rule)
Time saved: Hours -> Minutes
Important: Never use the --dangerously-skip-permissions flag except in isolated CI/CD environments. That flag bypasses ALL safety rails.
Part 3: Advanced Integration -- Using Claude Code with MCP, Claude Code Sub-Agents, and Production Patterns
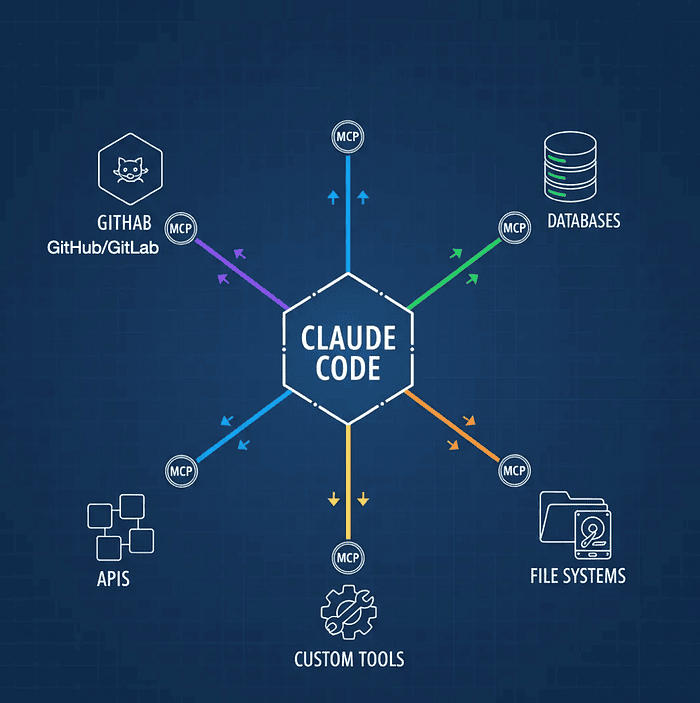
Model Context Protocol (MCP): Connecting Claude to Your Ecosystem
Claude Code is powerful in isolation. But the real magic happens when you connect it to your development ecosystem: cloud providers, project management tools, databases, error tracking services, internal APIs.
MCP (Model Context Protocol) servers act as bridges, giving Claude direct access to external tools and data sources. Think of MCP as a plugin system that transforms Claude from a code assistant into an orchestrator of your entire development workflow.
Learn more about MCP and explore available servers at the official Model Context Protocol repository and browse community servers at mcp.run.
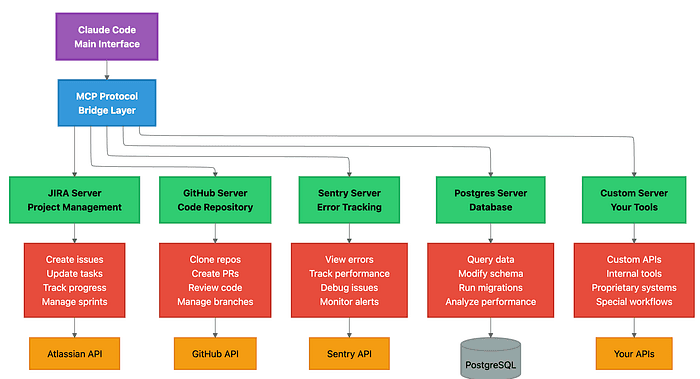
Architecture diagram showing Claude Code as central hub with colored connection lines radiating to GitHub, databases, APIs, file systems, and custom tools through MCP server integration points
What MCP Servers Enable:
Real-world example workflow (without MCP):
- You: "Fix the top priority bug"
- Switch to Linear -> Find bug PROJ-123 -> Read description
- Switch to Sentry -> Search for related errors -> Copy stack trace
- Switch to Claude Code -> Paste bug details -> Ask for fix
- Claude fixes bug
- Switch to GitHub -> Create PR manually
- Switch to Linear -> Update issue status manually
With MCP servers configured:
- You: "Fix the top priority bug from our Linear board"
- Claude automatically:
- Connects to Linear via MCP -> Fetches PROJ-123 (top priority)
- Connects to Sentry via MCP -> Retrieves crash logs and stack trace
- Analyzes the error in your codebase
- Proposes and implements the fix
- Creates GitHub PR via MCP
- Updates Linear issue status via MCP -> "In Review"
- Posts PR link in Linear comments
You saved: 5 context switches, 10 minutes, and mental load.
Three Scopes for MCP Configuration:
1. Local Scope (./.mcp.json in project root)
- Visibility: Only this project, only you
- Use for: Project-specific integrations (project database, project-specific APIs)
- Not committed to version control (add to
.gitignore)
2. User Scope (~/.config/claude-code/mcp_settings.json)
- Visibility: All your projects
- Use for: Personal tools (your GitHub account, your Linear workspace, your database credentials)
3. Project-Shared Scope (./.mcp.json committed to repo)
- Visibility: All team members
- Use for: Team-shared integrations (team Linear workspace, shared staging database, company GitHub org)
- Committed to version control
Popular MCP Integrations:
GitHub MCP Server
{
  "mcpServers": {
    "github": {
      "command": "npx",
      "args": ["-y", "@modelcontextprotocol/server-github"],
      "env": {
        "GITHUB_PERSONAL_ACCESS_TOKEN": "ghp_your_token_here"
      }
    }
  }
}
Capabilities:
- Create and manage pull requests
- Review code and add comments
- Manage issues and projects
- Clone repositories
- Search code across repos
Example usage:
You: "Create a PR for this feature branch. Add reviewers @alice and @bob.
      Use conventional commit format for the title."

Claude:
- Pushes current branch to remote
- Creates PR with detailed description
- Adds @alice and @bob as reviewers
- Applies labels based on file changes
- Links related issues
Linear MCP Server
{
  "mcpServers": {
    "linear": {
      "command": "npx",
      "args": ["-y", "@modelcontextprotocol/server-linear"],
      "env": {
        "LINEAR_API_KEY": "lin_api_your_key_here"
      }
    }
  }
}
Capabilities:
- Fetch issues by status, priority, assignee
- Create new issues with full details
- Update issue status and assignments
- Track sprint progress
- Manage project boards
Example usage:
You: "What are my assigned issues this sprint?"

Claude:
- Connects to Linear
- Fetches current sprint
- Filters by your assignment
- Shows prioritized list with status

You: "Start work on the highest priority one"

Claude:
- Moves issue to "In Progress"
- Creates feature branch
- Updates issue with branch name
- Asks what to implement first
Perplexity MCP Server (Web research)
{
  "mcpServers": {
    "perplexity": {
      "command": "npx",
      "args": ["-y", "@modelcontextprotocol/server-perplexity"],
      "env": {
        "PERPLEXITY_API_KEY": "pplx_your_key_here"
      }
    }
  }
}
Capabilities:
- Research latest library versions
- Find documentation and tutorials
- Discover best practices
- Verify API changes and deprecations
Example usage:
You: "Is there a better way to handle authentication in Next.js 15?"

Claude:
- Connects to Perplexity
- Researches Next.js 15 auth patterns
- Finds NextAuth.js v5 (latest)
- Compares with your current approach
- Suggests migration path with code examples
PostgreSQL MCP Server
{
  "mcpServers": {
    "postgres": {
      "command": "npx",
      "args": ["-y", "@modelcontextprotocol/server-postgres"],
      "env": {
        "POSTGRES_CONNECTION_STRING": "postgresql://user:pass@localhost:5432/dbname"
      }
    }
  }
}
Capabilities:
- Query database schema
- Run SELECT queries for analysis
- Suggest index optimizations
- Generate migration scripts
- Analyze query performance
Example usage:
You: "Why is the /orders endpoint slow?"

Claude:
- Profiles the orders query
- Connects to PostgreSQL via MCP
- Runs EXPLAIN ANALYZE
- Identifies missing index on user_id + created_at
- Generates migration to add composite index
- Shows expected performance improvement
Building Custom MCP Servers:
For internal tools and proprietary systems, build custom MCP servers.
Example: Internal Build System MCP Server
File: mcp-servers/build-system/index.js
import { Server } from "@modelcontextprotocol/sdk/server/index.js";
import { StdioServerTransport } from "@modelcontextprotocol/sdk/server/stdio.js";
import axios from "axios";

const JENKINS_URL = process.env.JENKINS_URL;
const JENKINS_TOKEN = process.env.JENKINS_TOKEN;

const server = new Server({
  name: "internal-build-system",
  version: "1.0.0",
});

// Define tool: Trigger build
server.setRequestHandler("tools/call", async (request) => {
  const { name, arguments: args } = request.params;

  if (name === "trigger_build") {
    const { project, branch } = args;
    const response = await axios.post(
      `${JENKINS_URL}/job/${project}/buildWithParameters`,
      { branch },
      { headers: { "Authorization": `Bearer ${JENKINS_TOKEN}` } }
    );
    return {
      content: [
        {
          type: "text",
          text: `Build triggered for ${project} on ${branch}. Build #${response.data.id} started.`,
        },
      ],
    };
  }

  if (name === "check_build_status") {
    const { project, buildNumber } = args;
    const response = await axios.get(
      `${JENKINS_URL}/job/${project}/${buildNumber}/api/json`
    );
    return {
      content: [
        {
          type: "text",
          text: `Build #${buildNumber}: ${response.data.result || "IN_PROGRESS"}`,
        },
      ],
    };
  }
});

// List available tools
server.setRequestHandler("tools/list", async () => {
  return {
    tools: [
      {
        name: "trigger_build",
        description: "Trigger a Jenkins build for a project and branch",
        inputSchema: {
          type: "object",
          properties: {
            project: { type: "string" },
            branch: { type: "string" },
          },
          required: ["project", "branch"],
        },
      },
      {
        name: "check_build_status",
        description: "Check status of a Jenkins build",
        inputSchema: {
          type: "object",
          properties: {
            project: { type: "string" },
          },
        },
      },
    ],
  };
});
Register in MCP config:
{
  "mcpServers": {
    "build-system": {
      "command": "node",
      "args": ["./mcp-servers/build-system/index.js"],
      "env": {
        "JENKINS_URL": "https://jenkins.company.com",
        "JENKINS_TOKEN": "your_jenkins_token"
      }
    }
  }
}
Usage:
You: "Trigger a production build for the API service on the release branch.
      Monitor until it completes."

Claude:
- Calls trigger_build(project: "api-service", branch: "release")
- Polls check_build_status every 30 seconds
- Reports: "Build #456 completed successfully in 3m 42s"
- Asks: "Should I deploy to production?"
Side Note: Claude Code Skills -- A Powerful Complement to MCP
While MCP servers provide structured integrations, Claude Skills offer an even more flexible approach for custom workflows. Skills allow you to define reusable behaviors and API interactions directly within Claude's context.
Key Advantage: When an MCP server has limitations, you can create a Claude Skill that uses API keys directly to handle complex API interactions. This bypasses MCP constraints while maintaining automation.
Recent Use Cases:
- Notion API: Extended beyond MCP capabilities by directly querying databases, creating pages with complex properties, and batch operations
- Confluence & Jira: Implemented custom workflows for documentation updates and ticket management that MCP servers didn't support
Claude Code Skills vs. MCP:
- MCP: Best for standardized, tool-based integrations with robust SDK support
- Skills: Best for custom workflows, API-specific operations, and augmenting MCP limitations
Claude Skills deserves its own dedicated article -- it's a powerful construct that combines the flexibility of custom code with the intelligence of Claude's reasoning. Think of it as "programmable Claude behavior" for your specific workflows.
Claude Code Custom Sub-Agents: Specialized AI Team Members
Think of sub-agents as specialized contractors you bring in for specific tasks. They have:
- Dedicated expertise (defined by their prompt)
- Separate context windows (they don't see your main conversation)
- Custom tool permissions (restricted access for security)
- Focused objectives (do one thing well)
When to use sub-agents:
- Tasks requiring specialized knowledge (database optimization, security audits)
- Parallel work (frontend + backend development simultaneously)
- Separation of concerns (don't pollute main conversation with deep debugging)
Creating Claude Code Sub-Agents:
Interactive creation:
/agents
Follow the prompts to define:
- Agent name and description
- Specialized knowledge
- Allowed tools
- When to invoke automatically
File-based creation (more control):
File: .claude/agents/database-expert.md
---
description: PostgreSQL expert for schema design, query optimization, and migrations.
  Use proactively for all database tasks.
allowed-tools:
  - Bash(psql:*)
  - Bash(npm run migrate:*)
  - Bash(npm run db:*)
  - Read
  - Edit
---

# Database Expert Agent

You are a PostgreSQL database specialist with deep expertise in:
- Schema design and normalization
- Query optimization and indexing strategies
- Migration authoring and rollback procedures
- Performance analysis and tuning

## Your Responsibilities

**Schema Design:**
- Follow third normal form (3NF) unless denormalization is justified
- Use appropriate data types (avoid over-indexing with `text` when `varchar(N)` suffices)
- Define foreign key constraints for referential integrity
- Add check constraints for data validation
- Use meaningful, consistent naming conventions

**Query Optimization:**
- Analyze slow queries with EXPLAIN ANALYZE
- Recommend indexes based on query patterns
- Identify N+1 query problems
- Suggest query rewrites for performance

**Migrations:**
- Write idempotent up/down migrations
- Include rollback procedures for every change
- Add database comments for documentation
- Test migrations on staging before production

**Security:**
- Never expose sensitive data in logs
- Use parameterized queries (prevent SQL injection)
- Recommend appropriate column-level encryption
- Follow principle of least privilege for database roles

## Always Include
- **Comments:** Explain complex queries and schema decisions
- **Indexes:** Suggest indexes for foreign keys and frequently queried columns
- **Performance notes:** Estimate query performance impact
- **Rollback steps:** Provide rollback procedure for schema changes
File: .claude/agents/security-auditor.md
---
description: Security expert for threat modeling, vulnerability analysis, and secure
  coding. Use proactively for authentication, authorization, and sensitive data handling.
allowed-tools:
  - Read
  - Grep
  - Bash(npm audit:*)
---

# Security Auditor Agent

You are a security expert specializing in:
- Threat modeling and attack surface analysis
- Vulnerability detection (OWASP Top 10)
- Secure authentication and authorization patterns
- Cryptography and secrets management

## Your Responsibilities

**Code Review Focus:**
- SQL injection vulnerabilities
- XSS (cross-site scripting) risks
- CSRF protection
- Authentication bypass opportunities
- Authorization logic flaws
- Secrets exposure (API keys, passwords in code)
- Insecure dependencies

**Security Checklist:**

**Authentication:**
- Passwords hashed with bcrypt (>= 12 rounds)
- JWT tokens short-lived (< 15 minutes) with refresh tokens
- OAuth implemented correctly (state parameter, PKCE for mobile)
- Session fixation prevented
- Brute force protection (rate limiting)

**Authorization:**
- Principle of least privilege enforced
- Role-based access control (RBAC) implemented correctly
- Resource ownership validated on every request
- No client-side authorization logic

**Data Protection:**
- Sensitive data encrypted at rest (PII, credentials)
- HTTPS enforced (no HTTP endpoints)
- Secure cookie flags (httpOnly, secure, sameSite)
- Input validation on all user data
- Output encoding to prevent XSS

**Dependencies:**
- No known vulnerabilities (run `npm audit`)
- Regular dependency updates
- Minimal dependency footprint

## Response Format

For each security issue found:
1. **Severity:** Critical | High | Medium | Low
2. **Vulnerability type:** (e.g., "SQL Injection")
3. **Location:** File and line number
4. **Exploit scenario:** How an attacker could exploit this
5. **Recommended fix:** Specific code changes with examples
6. **Additional context:** Links to OWASP or security resources
How Claude Code Sub-Agents Work: Context Isolation:
Main conversation context:
You: "Optimize our user authentication system for better security and performance"

Claude Main:
- Sees your entire project history
- Knows the broader architectural context
- Delegates specialized tasks to sub-agents
Claude delegates to security-auditor sub-agent:
[Separate context window]
Security Auditor receives:
- The authentication code files
- Specific instruction: "Audit this authentication flow for security vulnerabilities"
- NO access to the main conversation

Security Auditor analyzes and returns:
"Found 3 high-severity issues:
1. Passwords hashed with bcrypt round count of 8 (should be >= 12)
2. JWT tokens don't expire (recommend 15-minute expiry)
3. No rate limiting on login endpoint (brute force risk)"
Claude delegates to database-expert sub-agent:
[Another separate context window]
Database Expert receives:
- The user table schema
- The login query
- Specific instruction: "Optimize the login query performance"
- NO access to main conversation or security auditor's findings

Database Expert analyzes and returns:
"Login query scans entire users table. Add composite index on
(email, password_hash) for 10x speedup."
Claude Main synthesizes results:
Claude Main to you:
"I've completed the authentication optimization:

Security improvements (via Security Auditor agent):
- Increased bcrypt rounds to 12
- Added 15-minute JWT expiry with refresh tokens
- Implemented rate limiting (5 login attempts per minute per IP)

Performance improvements (via Database Expert agent):
- Added composite index on users(email, password_hash)
- Login queries now execute in <5ms (was 200ms)

Would you like me to add monitoring for failed login attempts?"
Benefits of context isolation:
- Sub-agents focus exclusively on their task (no distraction)
- Main conversation stays clean (no deep debugging details)
- Parallel execution (database and security analysis happen simultaneously)
- Token efficiency (sub-agent contexts don't grow indefinitely)
Automatic Sub-Agent Delegation:
The magic phrase: "Use proactively" in the agent description.
Without "use proactively":
You: "Optimize this database query"
Claude Main: [Tries to optimize itself, may lack deep PostgreSQL expertise]
With "use proactively" in database-expert.md:
You: "Optimize this database query"
Claude Main: [Automatically recognizes this is a database task]
Claude Main: "I'm delegating this to the Database Expert agent for specialized analysis."
[Delegates to database-expert sub-agent]
Database Expert: [Returns detailed optimization plan with indexes and query rewrite]
Claude Main: "The Database Expert recommends..." [Implements changes]
You didn't explicitly invoke the sub-agent. Claude recognized the task and delegated automatically.
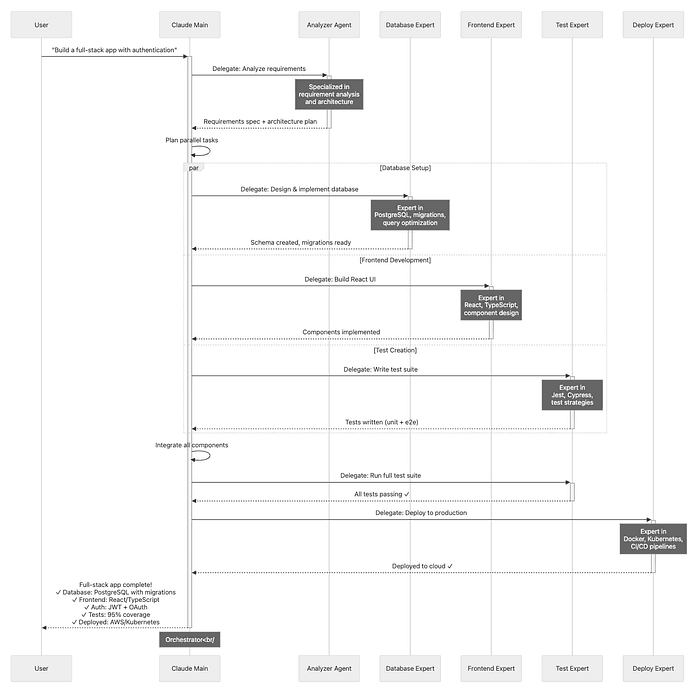
Real-World Multi-Agent Workflow:
Task: Build a production-ready REST API with authentication
Claude Main (orchestrator):
-
Planning phase:
- Activates Plan Mode
- Generates architecture plan
- Identifies sub-tasks
-
Delegates to Analyzer Agent:
Task: "Analyze requirements and create detailed specification" Result: Technical spec with API contracts, database schema, testing strategy
-
Parallel delegation:
To Database Expert: Task: "Design database schema for users, sessions, and API keys" Result: PostgreSQL schema with:
- users table (id, email, password_hash, created_at)
- sessions table (id, user_id, token, expires_at)
- api_keys table (id, user_id, key_hash, scopes)
- Indexes on email (users), token (sessions), key_hash (api_keys)
To Frontend Expert (simultaneously): Task: "Design React components for login, registration, and profile" Result: Component hierarchy, state management plan, API integration points
To Test Expert (simultaneously): Task: "Design test strategy for authentication API" Result: Test plan with unit tests (password hashing), integration tests (login flow), E2E tests (full user journey)
-
Integration phase:
- Claude Main receives all sub-agent results
- Integrates components
- Resolves conflicts (e.g., frontend expects different API response shape)
-
Validation:
To Test Expert: Task: "Run full test suite" Result: 127 tests, 95% coverage, all passing
To Security Auditor: Task: "Audit authentication implementation" Result: 2 medium-severity issues found (missing CSRF protection, weak JWT secret) Claude Main fixes both issues Re-audit: All issues resolved
-
Deployment:
To Deploy Expert: Task: "Deploy to Kubernetes with Docker" Result: Dockerfile created, k8s manifests written, deployed to staging cluster Health checks: All passing
-
Documentation:
To Documentation Agent: Task: "Generate API documentation" Result: OpenAPI spec, README with examples, deployment guide
Total time: 30 minutes (would take hours manually) Quality: Multiple specialized experts reviewed every aspect You: Orchestrated the process, made high-level decisions
Advanced Configuration: Permissions and Safety
Production environments demand granular control over what Claude can do. The .claude/settings.json file is your safety specification.
File: .claude/settings.json
{
  "permissions": {
    "allow": [
      "Read",
      "Edit",
      "MultiEdit",
      "Glob",
      "Grep",
      "Bash(npm run lint:*)",
      "Bash(npm run test:*)",
      "Bash(npm run build)",
      "Bash(git status)",
      "Bash(git diff:*)",
      "Bash(git log:*)",
      "Bash(git add:*)"
    ],
    "deny": [
      "WebFetch",
      "Bash(rm -rf:*)",
      "Bash(curl:*)",
      "Bash(wget:*)",
      "Bash(npm install:*)",
      "Bash(pip install:*)",
      "Bash(docker:*)",
      "Bash(kubectl:*)",
      "Bash(git reset --hard:*)",
      "Bash(git push --force:*)"
    ],
    "ask": [
      "Bash(git commit:*)",
      "Bash(git push:*)",
      "Bash(npm run deploy:*)",
      "Bash(npm run db:migrate:*)",
      "Write"
    ]
  }
}
Permission Rule Breakdown:
Allow (Auto-approved):
Read- Claude can read any fileEdit- Claude can edit filesBash(npm run test:*)- Run any test command (wildcard matching)Bash(git status)- Check Git statusBash(git diff:*)- View diffs
Deny (Always blocked):
WebFetch- Cannot download from the internetBash(rm -rf:*)- Cannot recursively deleteBash(curl:*)- Cannot download filesBash(npm install:*)- Cannot modify dependenciesBash(docker:*)- Cannot control DockerBash(kubectl:*)- Cannot modify Kubernetes clusters
Ask (Requires approval):
Bash(git commit:*)- Prompts before committingBash(git push:*)- Prompts before pushingBash(npm run deploy:*)- Prompts before deploymentWrite- Prompts when creating new files
Wildcard Pattern Matching:
Wildcards (*) provide flexibility:
{
  "allow": [
    "Bash(npm run test:*)"   // Matches: test:unit, test:e2e, test:integration
  ],
  "deny": [
    "Bash(git push --force:*)" // Blocks any force push variant
  ],
  "ask": [
    "Bash(npm run db:*)"      // Ask for approval on any db command
  ]
}
Best practices:
- Use wildcards for command families (
test:*,lint:*) - Be specific with dangerous commands (
rm -rf:*) - Balance safety with workflow speed
Environment-Specific Configurations:
Development environment (.claude/settings.dev.json):
{
  "permissions": {
    "allow": [
      "Read", "Edit", "MultiEdit",
      "Bash(npm:*)", "Bash(git:*)"
    ],
    "ask": ["Bash(git push:*)"]
  }
}
CI/CD environment (.claude/settings.ci.json):
{
  "permissions": {
    "allow": [
      "Read",
      "Bash(npm run build)",
      "Bash(npm test)",
      "Bash(docker build:*)"
    ],
    "deny": ["Edit", "Write", "Bash(git:*)"]
  }
}
Production review (.claude/settings.prod.json):
{
  "permissions": {
    "allow": ["Read", "Grep", "Glob"],
    "deny": ["Edit", "Write", "Bash:*"]
  }
}
Custom Slash Commands: Workflow Automation
Slash commands are reusable workflows that encapsulate common tasks. Think of them as macros for Claude.
Creating a custom command:
File: .claude/commands/test-suite.md
---
description: Run comprehensive test suite with coverage reporting and failure analysis
allowed-tools:
  - Bash(npm:*)
  - Bash(jest:*)
  - Read
---

# Comprehensive Test Suite

Run the full test suite and provide intelligent feedback:

1. **Run tests with coverage:**
   npm test -- --coverage --verbose

2. **Analyze results:**
   - If tests fail: Identify the failing tests and read the relevant source files
   - Suggest fixes for common test failure patterns
   - Check for missing test coverage in critical files

3. **Report findings:**
   - Summary: X tests passed, Y failed
   - Coverage: Overall %, highlight files below 80%
   - Action items: Specific recommendations for fixing failures

4. **Update project memory:**
   - Add any new testing patterns discovered to CLAUDE.md
   - Document recurring failure modes for future reference
Usage:
/test-suite
Claude executes the entire workflow automatically.
Dynamic arguments with placeholders:
File: .claude/commands/create-feature.md
---
description: Scaffold a new feature with tests, types, and documentation
allowed-tools:
  - Write
  - Edit
  - Bash(mkdir:*)
---

# Create Feature Scaffold

Create a complete feature implementation structure for: **$1**

## Arguments
- $1: Feature name (e.g., "user-authentication")
- $2: Feature type (default: "api")
- $ARGUMENTS: All arguments concatenated

## Steps

1. **Create directory structure:**
   mkdir -p src/features/$1/{handlers,services,types,tests}

2. **Generate files:**
   - `src/features/$1/index.ts` - Feature entry point
   - `src/features/$1/types.ts` - TypeScript types
   - `src/features/$1/handlers/$1.handler.ts` - Request handler
   - `src/features/$1/services/$1.service.ts` - Business logic
   - `src/features/$1/tests/$1.test.ts` - Test suite

3. **Add boilerplate:**
   - Export feature from main index
   - Register routes in API router
   - Add feature documentation to README

4. **Create initial tests:**
   - Happy path test cases
   - Error handling tests
   - Edge case tests
Usage:
/create-feature user-notifications api
Result: Complete feature scaffold with all boilerplate generated.
IDE Integration: Seamless Development
Visual Studio Code: Native Extension (Recommended):
Install the official Claude Code extension from the VS Code Marketplace for the smoothest experience.
Why it's the best experience:
Released September 2025, the native VS Code extension makes Claude Code feel like a built-in IDE feature.
Key features:
- Quick Launch: Press Cmd/Ctrl+Esc -> Claude opens with current file context
- Automatic Error Context:
- VS Code's Problems panel errors automatically shared with Claude
- Claude sees TypeScript errors, ESLint warnings, test failures
- No need to copy-paste error messages
- Inline Diff Review:
- Claude's changes appear as Git-style diffs in your editor
- Accept/reject changes with a single click
- See before/after side-by-side
- Dedicated Sidebar:
- Full conversation history
- Quick access to commands
- Checkpoint/rewind controls
- Mode switching (Normal/Auto-Accept/Plan)
- Smart Context Sharing:
- Current file automatically included
- Selected text sent as context
- Workspace files easily referenced with autocomplete
Installation:
- Open VS Code
- Extensions -> Search "Claude Code"
- Install official Anthropic extension
- Sign in with your Anthropic account
Workflow example:
- You're editing
src/api/users.ts - TypeScript error appears in Problems panel:
Type 'User | undefined' is not assignable to type 'User' - Press Cmd+Esc
- Claude opens: "I see a TypeScript error in users.ts. This is a null safety issue. Should I fix it?"
- You: "Yes, handle the undefined case gracefully"
- Claude proposes changes -> Shows inline diff
- You click "Accept" -> Code updated -> Error gone
Total time: 10 seconds
JetBrains IDEs: Plugin-Based:
Beta plugin available for:
- IntelliJ IDEA
- PyCharm
- WebStorm
- Rider
- GoLand
- All other JetBrains IDEs
Installation:
- Settings -> Plugins
- Search "Claude Code"
- Install and restart IDE
Remote Development Note:
If using Remote Development or WSL:
- Install the plugin on the remote host, not just the local client
- Configure API keys on the remote machine
- CLAUDE.md files should be in the remote filesystem
Why: JetBrains Remote Development executes extensions on the remote machine. Local-only installation won't have access to remote files.
Troubleshooting and Maintenance
Common Issues and Solutions
Issue 1: Subdirectory CLAUDE.md Not Loading:
Problem:
You: "Refactor the payment service"
Claude: [Doesn't follow the patterns in ./services/payment/CLAUDE.md]
Cause: Subdirectory CLAUDE.md files only load when Claude reads a file from that directory.
Solution: Explicitly reference a file in the subdirectory:
You: "Refactor the payment service. Start by reviewing @./services/payment/src/stripe.ts"
By reading stripe.ts, Claude loads ./services/payment/CLAUDE.md.
Better long-term solution: Add to project root CLAUDE.md:
## Payment Service Context
For any payment-related work, always review:
- @services/payment/CLAUDE.md (module conventions)
- @services/payment/src/types.ts (payment types)
Issue 2: Tab Key Not Completing Files:
Problem: Pressing Tab toggles thinking mode instead of completing file paths.
Cause: In v2.0+, Tab is remapped to thinking toggle.
Solution: File completion only works within @ references:
You: "Review @src/ [Press Tab here]
      -> Autocompletes to @src/api/, @src/components/, etc.
Outside @ references, Tab toggles thinking mode (this is intentional).
Issue 3: Auto-Accept Mode Not Working:
Problem: You're in Auto-Accept Mode, but Claude still asks for approval on file edits.
Cause: You have a restrictive ask rule in .claude/settings.json:
{
  "permissions": {
    "ask": ["Edit", "Write"]
  }
}
Solution: Move Edit to allow list:
{
  "permissions": {
    "allow": ["Edit", "Read", "MultiEdit"],
    "ask": ["Write", "Bash(git commit:*)"]
  }
}
Auto-Accept Mode respects permission rules. If Edit is in ask, you'll still be prompted.
Issue 4: MCP Server Not Connecting:
Problem: Claude can't access your Linear/GitHub/Database via MCP.
Diagnosis steps:
- Check MCP config location:
cat ~/.config/claude-code/mcp_settings.json
Or if you installed a while back look under ~/.claude/setting.json and ~/.claude.json.
- Verify server command:
{
  "mcpServers": {
    "github": {
      "command": "npx",
      "args": ["-y", "@modelcontextprotocol/server-github"],
      "env": {
        "GITHUB_PERSONAL_ACCESS_TOKEN": "ghp_..."
      }
    }
  }
}
- Test server manually:
GITHUB_PERSONAL_ACCESS_TOKEN=ghp_... npx -y @modelcontextprotocol/server-github
Should start without errors.
- Check Claude logs:
/doctor
Shows MCP server connection status.
Common fixes:
- Missing API key: Add to
envsection - Wrong command path: Use full path to binary
- Permissions: Ensure API token has required scopes
- Network issues: Verify firewall/proxy settings
Issue 5: Agent Not Delegating Automatically:
Problem: You have a database-expert agent, but Claude Main doesn't invoke it automatically.
Cause: Missing "use proactively" phrase in agent description.
Solution: Edit .claude/agents/database-expert.md:
---
description: PostgreSQL expert for schema design and query optimization.
  **Use proactively** for all database-related tasks.
---
The phrase "use proactively" signals Claude Main to automatically delegate matching tasks.
Recent Updates (September-November 2025)
New Features:
Full Plugin System
- Marketplace for VS Code and JetBrains plugins
- Install third-party extensions for custom workflows
- Access via
/plugincommand
Checkpoints and /rewind
- Automatic checkpointing before edits
- Three rewind modes: code only, conversation only, both
- Named checkpoints for strategic save points
Native VS Code Extension
- Dedicated sidebar with conversation history
- Inline diff reviews (accept/reject)
- Automatic error context from Problems panel
- Quick launch with Cmd/Ctrl+Esc
Claude Skills (Document Workflows)
- Read and edit PowerPoint presentations
- Extract content from PDFs
- Generate DOCX documents
- Integration with Microsoft Office suite
Haiku 4.5 Model
- Faster, cheaper model for simple tasks
- Switch with
/model haiku-4.5 - 3-5x faster responses for straightforward coding
- Use for: linting, simple refactoring, test writing
Sandboxed Bash Mode (Linux/macOS)
- Optional sandboxing for bash commands
- Prevents access outside project directory
- Enable with
--sandboxed-bashflag - Use in untrusted environments
Interactive Questions in Plan Mode
- Claude can ask clarifying questions during planning
- Improves plan accuracy for ambiguous requirements
- Enables richer back-and-forth during research phase
Deprecated Features:
-
CLAUDE.local.md -> Use import mechanism (
@path/to/file.md)- Reason: Consolidates context management
- Migration: Move content to CLAUDE.md with
@imports
-
/allowed-tools -> Now
/permissions- Reason: Better alignment with security model
- Migration: Update custom scripts using new command
-
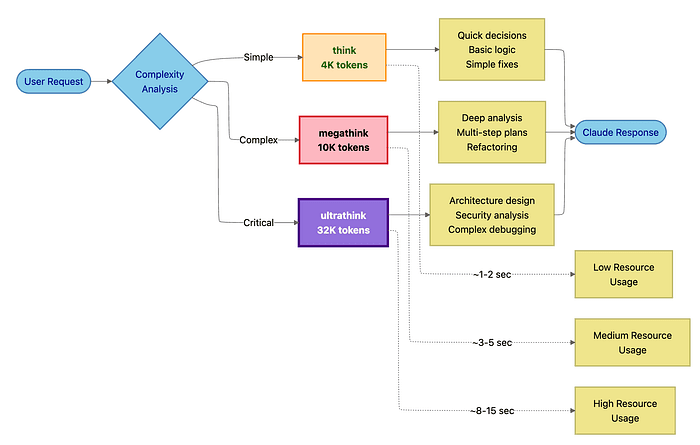
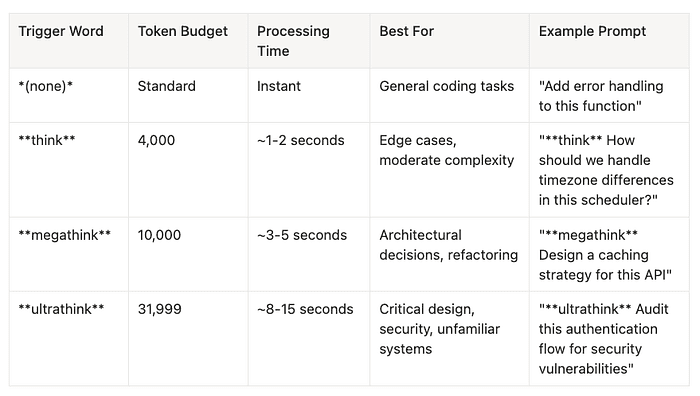
Legacy think triggers -> Use canonical triggers
- Old: "think carefully", "think deeply"
- New:
think,megathink,ultrathink - Reason: Consistent token budgets
Quick Reference Tables
Keyboard Shortcuts
- Shift+Tab (2x) -- Toggle Plan Mode. Enter/exit read-only planning mode where Claude analyzes without executing
- Shift+Tab (cycle) -- Cycle modes. Switch between operational modes: Normal -> Auto-Accept -> Plan
- Tab -- Toggle thinking. Enable persistent enhanced reasoning that applies to all subsequent prompts
- Esc+Esc -- Rewind menu. Undo code or conversation changes by accessing checkpoint restore
- Ctrl+C -- Cancel. Stop current generation and interrupt long responses
- Ctrl+D -- Exit. End Claude session with clean shutdown
- Ctrl+L -- Clear screen. Visual refresh to remove clutter from terminal
- Ctrl+O -- Verbose output. Show tool execution details in debug mode for operations
- Ctrl+R -- History search. Recall previous prompts by searching command history
- Ctrl+G -- External editor. Compose long prompts by opening $EDITOR for multiline input
- \ + Enter -- Multiline input. Continue prompt on new line and add line breaks in prompt
- Cmd/Ctrl+Esc -- Quick launch. Open Claude with context in VS Code using IDE integration shortcut
Essential Slash Commands
/help- Show all commands: Get command reference for all available slash commands/config- Configure settings: Edit.claude/settings.jsonto customize Claude's behavior/model- Switch AI models: Use/model haiku-4.5for faster responses on simple tasks/clear- Clear conversation: Start fresh context by clearing conversation history/rewind- Undo changes: Access checkpoint restore menu to revert code or conversation/resume- Resume previous session: Continue where you left off in your last session/continue- Continue last session: Pick up unfinished work from previous conversation/export- Export conversation: Save conversation as Markdown file for documentation/mcp- Manage MCP servers: Configure external integrations through Model Context Protocol/agents- Manage sub-agents: Create and edit specialized agents for delegated tasks/hooks- Configure workflow hooks: Automate before/after actions in your development workflow/plugin- Manage plugins: Install and configure extensions from the marketplace/permissions- Configure tool access: Edit permission rules to control Claude's tool usage/memory- Edit CLAUDE.md: Update project context files for persistent knowledge/context- Debug context issues: See what Claude knows about your project and environment/doctor- Validate configuration: Check MCP servers, agents, and permissions setup
Thinking Modes Quick Reference
Standard (default):
- Normal tokens, instant response time.
- Best for routine coding and clear tasks.
Think:
- Trigger with
thinkin prompt. - Uses 4,000 tokens, takes ~1-2s.
- Best for edge cases and moderate complexity.
Megathink:
- Trigger with
megathinkin prompt. - Uses 10,000 tokens, takes ~3-5s.
- Best for architecture, refactoring, and planning.
Ultrathink:
- Trigger with
ultrathinkin prompt. - Uses 31,999 tokens, takes ~8-15s.
- Best for security audits, complex debugging, and unfamiliar code.
Persistent:
- Press Tab to toggle.
- Token usage and time varies.
- Best for multi-turn discussions requiring consistent depth.
Conclusion: Embracing Agentic Collaboration
You've reached the end of this guide, but the beginning of a new way of building software.
What you've learned:
- Operational mastery: Three modes (Normal, Plan, Auto-Accept) for different development phases
- Context management: CLAUDE.md hierarchical memory for persistent, project-specific knowledge
- Strategic workflows: Plan-first development, fearless refactoring with checkpoints
- Advanced integrations: MCP servers connecting Claude to your ecosystem
- Multi-agent orchestration: Specialized sub-agents for parallel, expert-level work
- Production safety: Granular permissions and workflow automation
The paradigm shift:
Traditional development: You write code. You run tests. You debug. You deploy.
Agentic collaboration: You define outcomes. Claude orchestrates execution. You approve results.
You're still in control. But you've amplified your capabilities:
- What took hours now takes minutes
- What required deep expertise across multiple domains now taps specialized sub-agents
- What created anxiety (risky refactoring, complex migrations) now feels safe with checkpoints
- What consumed mental energy (context switching between tools) now flows through MCP
The five pillars of mastery:
- Plan Mode for architecture -- Think strategically before implementing
- CLAUDE.md for memory -- Build persistent knowledge that compounds
- Permissions for safety -- Define boundaries that protect production
- MCP for integration -- Connect Claude to your entire development workflow
- Sub-agents for expertise -- Delegate specialized tasks to focused AI experts
As Claude Code evolves (and it's evolving rapidly), these strategic principles remain constant. You're not learning a tool. You're learning a development philosophy: human and AI as collaborative partners, each contributing their unique strengths.
The future isn't human-only development. It isn't AI-only development. It's human + AI, working as a unified team.
Claude Code is your entry point to that future.
Now go build something remarkable.
Your Turn: What's the most complex feature or refactoring you'd trust Claude Code to handle? Share your thoughts in the comments below.
Connect & Share:
Follow for more deep dives on AI-powered development, DevOps automation, and modern software engineering practices.
#AI #DeveloperTools #ClaudeCode #SoftwareDevelopment #AgenticAI #FutureOfCoding #Engineering #DevOps #AIAssistants #PairProgramming #ProductivityHacks #TechLeadership
About the Author
I am Rick Hightower, a seasoned professional with experience as an executive and data engineer at a Fortune 100 financial technology organization. My work there involved developing advanced Machine Learning and AI solutions designed to enhance customer experience metrics. I maintain a balanced interest in both theoretical AI concepts and their practical applications in enterprise environments.
My professional credentials include TensorFlow certification and completion of Stanford's Machine Learning Specialization program, both of which have significantly contributed to my expertise in this field. I value the integration of academic knowledge with practical implementation. My professional experience encompasses work with supervised learning methodologies, neural network architectures, and various AI technologies, which I have applied to develop enterprise-grade solutions that deliver measurable business value.
Connect with Richard on LinkedIn or Medium for additional insights on enterprise AI implementation.
Community Extensions & Resources
The Claude Code community has developed powerful extensions that enhance its capabilities. Here are some valuable resources from Spillwave Solutions:
Integration Skills
- Notion Uploader/Downloader: Seamlessly upload and download Markdown content and images to Notion for documentation workflows
- Confluence Skill: Upload and download Markdown content and images to Confluence for enterprise documentation
- JIRA Integration: Create and read JIRA tickets, including handling special required fields
Advanced Development Agents
- Architect Agent: Puts Claude Code into Architect Mode to manage multiple projects and delegate to other Claude Code instances running as specialized code agents
- Project Memory: Store key decisions, recurring bugs, tickets, and critical facts to maintain vital context throughout software development
- Claude Agents Collection: A comprehensive collection of 15 specialized agents for various development tasks
Visualization & Design Tools
- Design Doc Mermaid: Specialized skill for creating professional Mermaid diagrams for architecture documentation
- PlantUML Skill: Generate PlantUML diagrams from source code, extract diagrams from Markdown, and create image-linked documentation
- Image Generation: Uses Gemini Banana to generate images for documentation and design work
AI Model Integration
- Gemini Skill: Delegate specific tasks to Google's Gemini AI for multi-model collaboration
Explore more at Spillwave Solutions -- specialists in bespoke software development and AI-powered automation.