LangGraph Essentials in Python: Build AI Agent Workflows with State, Routing, and Human-in-the-Loop
Mastering LangGraph in Python: Crafting Intelligent Workflows with State Management and Human Oversight
Originally published on Medium.
 LangGraph Python tutorial cover: Python snake intertwined with a glowing directed graph showing state flowing between checkpointed nodes
Mastering LangGraph in Python: Crafting Intelligent Workflows with State Management and Human Oversight
Summary: This tutorial provides a comprehensive guide to building AI agent workflows using LangGraph in Python, focusing on concepts such as state management with TypedDict, parallel execution, conditional routing, and human-in-the-loop interrupts. It includes practical examples for creating a production email triage system, emphasizing the importance of reducers for state accumulation and the use of checkpointers for persistence and crash recovery. Key takeaways highlight the roles of nodes, edges, and the distinction between TypedDict for graph state and Pydantic for structured LLM output.
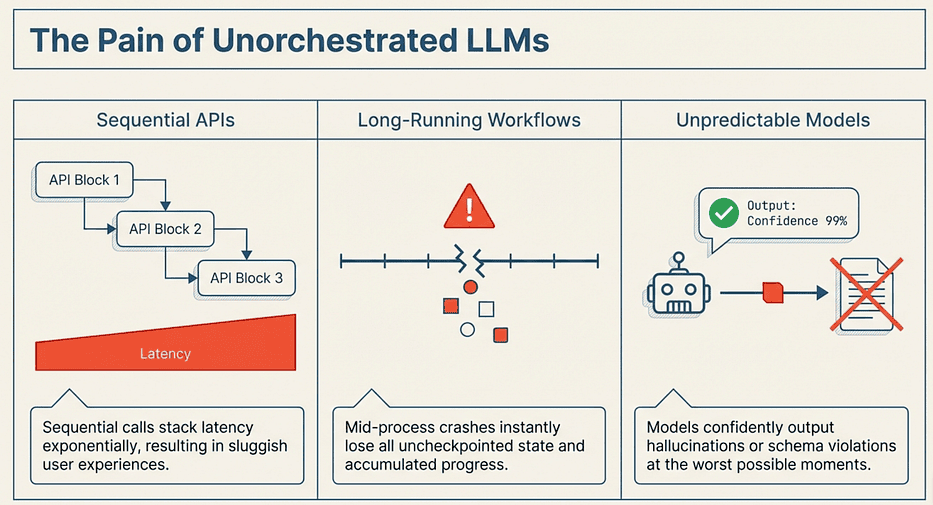
If you have built anything beyond a toy with LLMs, you already know the pain. Sequential API calls stack latency. Long-running workflows crash and lose all progress. And the model surprises you at the worst possible moment with a confident, completely wrong answer.
 LangGraph: Solved the Pain of Unorchestrated LLMs
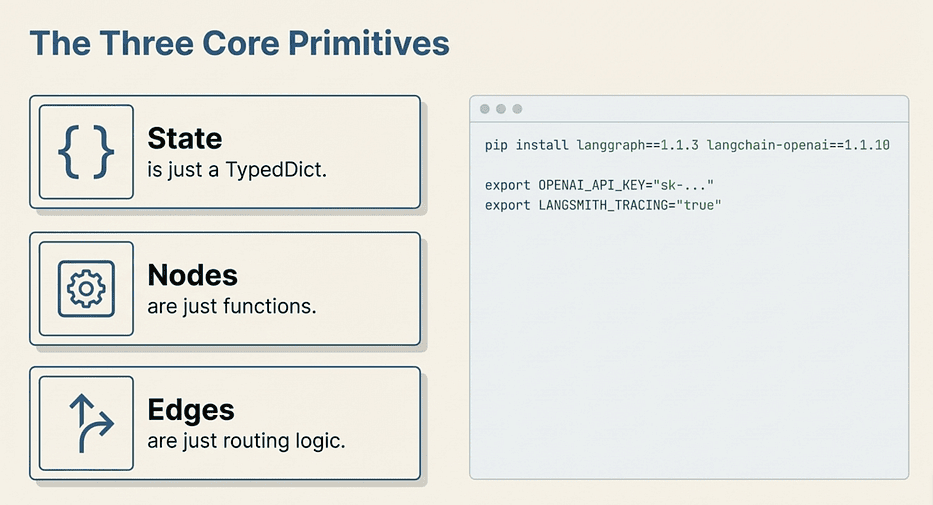
This LangGraph Python tutorial solves all three problems. LangGraph is a graph-based orchestration framework where state is just a TypedDict, nodes are just functions, and edges are just routing logic. You compose these primitives into workflows that run nodes in parallel, checkpoint state for crash recovery, and pause for human review when the stakes are high.
This tutorial walks you through LangGraph in Python, building progressively: a single node, then parallel execution, conditional routing, persistent memory, human-in-the-loop interrupts, and finally a complete email triage workflow that ties everything together. Every code example is runnable. Think of this as pair-programming with a senior dev who has already hit all the problems so you don't have to.
TypeScript developer? There is a companion article covering these same concepts with the TypeScript SDK. The APIs are nearly identical; the mental model transfers directly.
Setup
Before we start building, install the dependencies:
pip install langgraph langchain-openai
Set your environment variables for OpenAI and (optionally) LangSmith tracing:
export OPENAI_API_KEY="your-key-here"
# Optional: enable LangSmith tracing for debugging
export LANGSMITH_TRACING=true
export LANGSMITH_API_KEY="your-langsmith-key"
We are using langgraph 1.1.3 (March 2026) and langchain-openai 1.1.10. Python 3.10 or higher is required.
Note on LangSmith variables: Older tutorials may reference
LANGCHAIN_TRACING_V2andLANGCHAIN_API_KEY. Those still work, butLANGSMITH_TRACINGandLANGSMITH_API_KEYare the current recommended names.
State and Nodes: The Two Core Primitives of AI Agent Workflows
Everything in LangGraph starts with two ideas: state holds your data, and nodes are functions that transform it. Get comfortable with both and the rest of the framework clicks into place.
 LangGraph: Three Core Primitives
Defining State with TypedDict
State in LangGraph is a plain Python TypedDict. No magic base classes, no framework-specific decorators. Just typed dictionaries:
from typing import Annotated
from typing_extensions import TypedDict
import operator

class State(TypedDict):
    messages: Annotated[list[str], operator.add]
    summary: str
What this does: Declares the shape of the data that flows through your graph. Every node reads from and writes to this shared structure.
Why TypedDict instead of a regular dict or a dataclass?
TypedDict gives you static type checking (mypy and Pyright understand it) and Python type hints without the runtime overhead of a dataclass or Pydantic model. LangGraph can inspect the type annotations to understand your schema, which matters for things like structured output and schema validation.
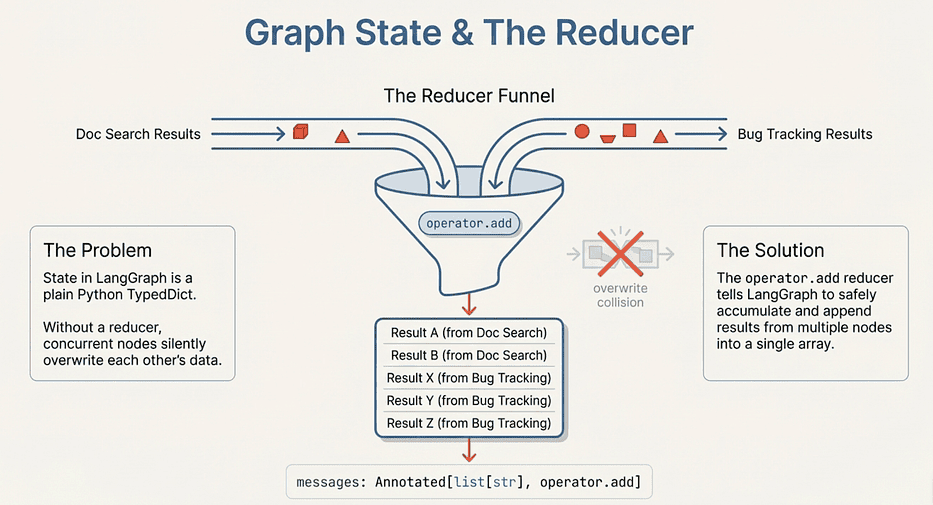
The key line to understand: Annotated[list[str], operator.add] declares a reducer. This is the most important concept in LangGraph state, and it catches everyone off guard the first time.
Without a reducer, when a node returns {"summary": "new value"}, it overwrites whatever was there. That is fine for scalar fields like summary. But if two parallel nodes both write to messages, only the last one to finish would survive. The operator.add reducer tells LangGraph: instead of replacing the list, append to it. The results from every node that touches messages accumulate safely.
You can also write custom reducers for more complex merge logic:
def keep_latest_n(existing: list[str], new: list[str]) -> list[str]:
    """Keep only the last 10 messages."""
    combined = existing + new
    return combined[-10:]

class State(TypedDict):
    messages: Annotated[list[str], keep_latest_n]
What this custom reducer does: Merges the existing list with any new messages, then trims to the 10 most recent. Useful for long conversations where you want to avoid ballooning token counts.
When to write a custom reducer: Use operator.add for simple append semantics. Write a custom reducer when you need to deduplicate, cap list size, or implement any merge logic beyond "just append."
 LangGraph: Graph State and the Reducer
Watch out for: Forgetting the reducer on any field that parallel nodes write to. Without one, your parallel branches will silently overwrite each other's results. The last branch to finish wins, and you will never see an error.
TypedDict vs Pydantic: Knowing When to Use Each
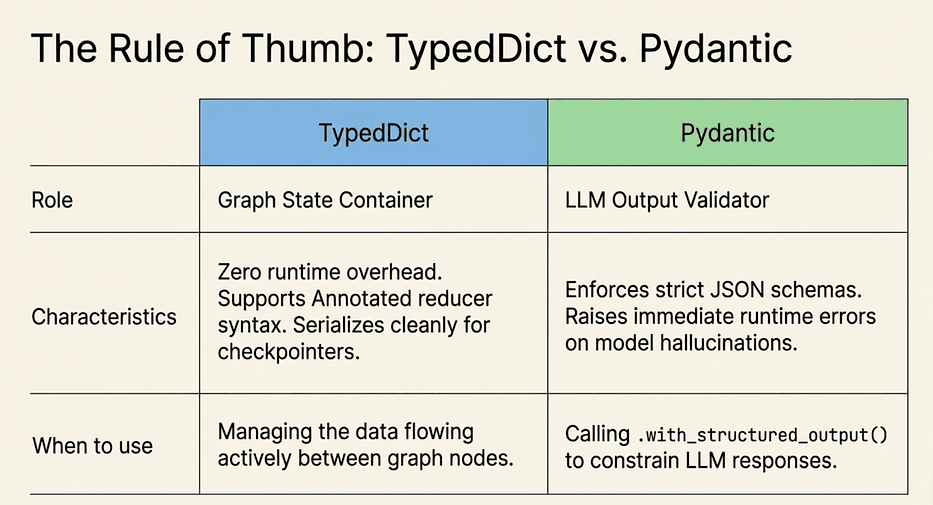
You will use both TypedDict and Pydantic in LangGraph, and the split is intentional. Here is the rule of thumb:
Use TypedDict for graph state. It is the right tool for the container that flows through the graph. LangGraph was designed around it. TypedDict fields support the Annotated reducer syntax, serialize cleanly for checkpointing, and add zero runtime overhead.
Use Pydantic for LLM-facing schemas. When you call .with_structured_output(SomeModel), Pydantic gives the LLM a JSON schema to target and validates that the response actually matches. If the model returns something that does not fit the schema, Pydantic raises an error immediately instead of letting malformed data propagate through your graph.
The capstone workflow at the end of this article uses exactly this split: EmailState is a TypedDict (the graph container), and EmailClassification is a Pydantic model (the LLM output schema). Keep that distinction in mind as we work toward it.
 LangGraph: TypeDict vs. Pydantic, Internal vs. LLM faces
Writing Your First Node
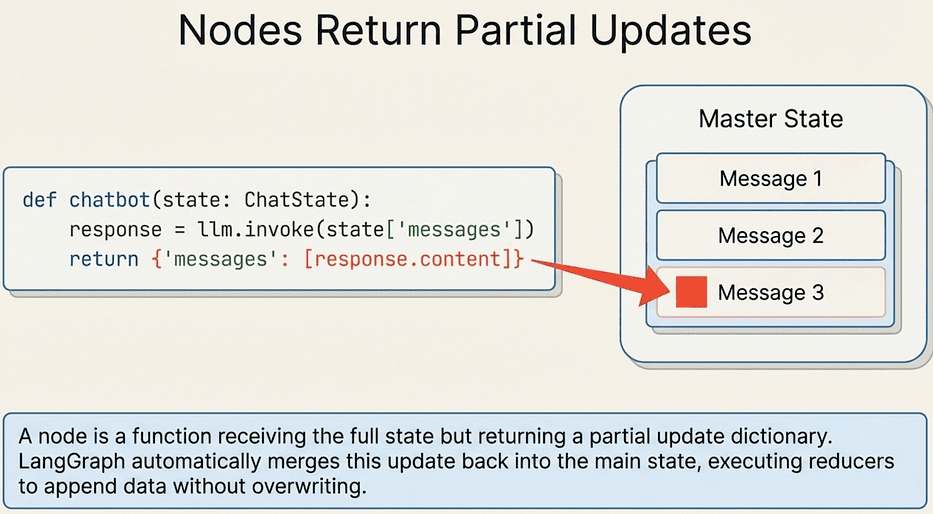
A node is a function that receives the full state and returns a partial update dictionary. LangGraph merges that partial update back into the state (applying reducers where defined):
from langchain_openai import ChatOpenAI
from langgraph.graph import StateGraph, START, END

class ChatState(TypedDict):
    messages: Annotated[list[str], operator.add]

llm = ChatOpenAI(model="gpt-4o-mini", temperature=0)

def chatbot(state: ChatState) -> dict:
    """Call the LLM with the conversation history."""
    response = llm.invoke(state["messages"])
    return {"messages": [response.content]}

# Build the graph
graph = StateGraph(ChatState)
graph.add_node("chatbot", chatbot)
graph.add_edge(START, "chatbot")
graph.add_edge("chatbot", END)
app = graph.compile()
# Run it
result = app.invoke({"messages": ["What is LangGraph?"]})
print(result["messages"][-1])
What each line does:
StateGraph(ChatState)creates a new graph that uses ChatState as its state schema. LangGraph reads the type annotations to understand reducers and field types.graph.add_node("chatbot", chatbot)registers the chatbot function under the name "chatbot". The name is what you reference in edge definitions.graph.add_edge(START, "chatbot")tells LangGraph that the first node to run is "chatbot". START is a built-in sentinel.graph.add_edge("chatbot", END)means execution ends after chatbot runs. END is also a built-in sentinel.graph.compile()validates the graph structure (no dangling edges, all nodes reachable) and returns a runnable CompiledGraph object.app.invoke({"messages": [...]})runs the graph synchronously and returns the final state.
Why the node returns a list wrapping the string: Because messages uses operator.add as its reducer. When the node returns {"messages": [response.content]}, LangGraph appends that single-item list to the existing messages list. If you returned {"messages": response.content} (a string, not a list), you would get a runtime error because operator.add on a string and a list is invalid.
 LangGraph: Nodes Return Partial Updates
Pro tip: Always match the type of what you return to the type of the field including its reducer. If the field is
list[str]withoperator.add, return alist[str]. If it is a plainstrwith no reducer, return astr.
That is a complete, working LangGraph application in about 20 lines. Now let us look at what actually happens when you call invoke().
Super Steps: How Execution Actually Works
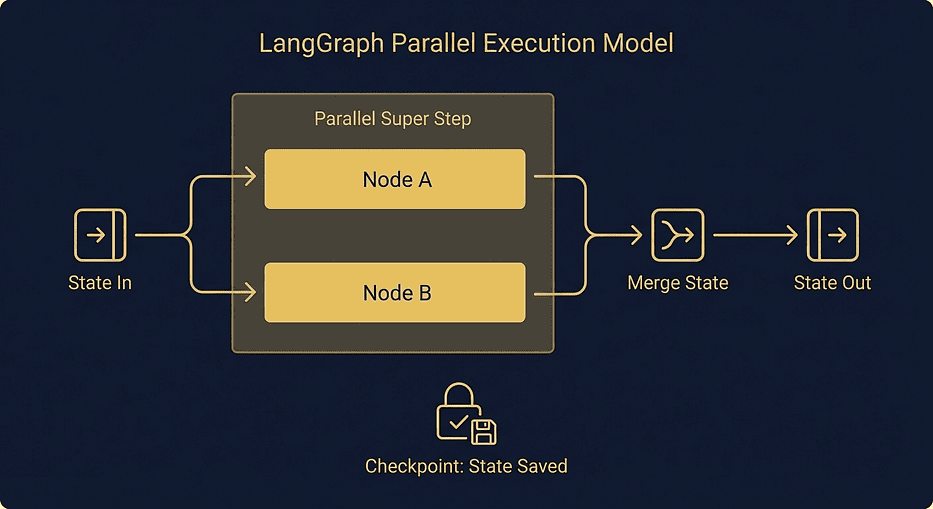
LangGraph executes nodes in super steps. All nodes scheduled for the same step run concurrently and must complete before the next step begins. In the single-node example above, there is one super step containing one node. When we add parallel edges in the next section, you will see multiple nodes executing in the same super step.
 LangGraph parallel execution super steps: two nodes running concurrently with state merging via reducers at each checkpoint boundary
This matters for two reasons. First, parallel execution is not an afterthought you bolt on later. It is built into the execution model from the ground up. Second, when you use a checkpointer, LangGraph saves a full state snapshot after each super step completes. That is what makes crash recovery possible: if the process dies mid-execution, you resume from the last completed super step.
Now that you understand how state flows through a single node, what happens when you need to control the order of execution or run nodes at the same time? That is what edges are for.
Edges: Serial, Parallel, and Conditional Routing in LangGraph
Edges control how execution flows between nodes. LangGraph gives you three types, and they cover every routing pattern you will need. You have already seen the simplest form in the chatbot example. Let us dig into all three.
 LangGraph: Serial Edges vs. Parallel Edges
Serial Edges
The simplest case: one node runs, then the next.
class DraftState(TypedDict):
    topic: str
    draft: str
    review: str

def generate_draft(state: DraftState) -> dict:
    response = llm.invoke(f"Write a short paragraph about: {state['topic']}")
    return {"draft": response.content}

def review_draft(state: DraftState) -> dict:
    response = llm.invoke(f"Review this draft and suggest improvements:\n{state['draft']}")
    return {"review": response.content}

graph = StateGraph(DraftState)
graph.add_node("generate", generate_draft)
graph.add_node("review", review_draft)
graph.add_edge(START, "generate")
graph.add_edge("generate", "review")
graph.add_edge("review", END)

app = graph.compile()
result = app.invoke({"topic": "Why Python developers love type hints"})
print(result["review"])
What this does: Runs generate_draft first. Once it completes and LangGraph merges the draft field into state, review_draft runs with access to that draft in state["draft"].
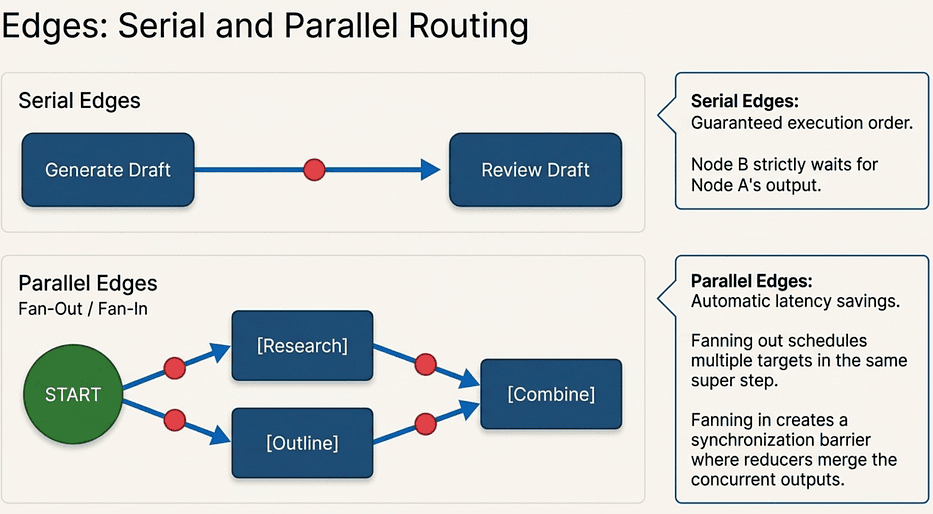
Why this matters: Serial ordering is a guarantee. The review_draft node will never run before generate_draft because the edge enforces that dependency. You do not need to write any sequencing logic yourself.
When to use serial edges: Any time node B depends on output from node A. Generate then review. Fetch then process. Classify then route.
Watch out for: Accidentally creating cycles. LangGraph by default is a DAG (directed acyclic graph). If you add an edge from
reviewback togenerate, LangGraph will raise an error at compile time unless you explicitly configure it as a cyclic graph. For iterative loops you usually wantStateGraphwith conditional edges that can route back to an earlier node.
Parallel Edges
When two edges fan out from the same node, the target nodes execute concurrently in the same super step. This is where reducers become essential:
class ResearchState(TypedDict):
    topic: str
    findings: Annotated[list[str], operator.add]
    outline: str
    final_summary: str

def research(state: ResearchState) -> dict:
    response = llm.invoke(f"List 3 key facts about: {state['topic']}")
    return {"findings": [f"Research: {response.content}"]}

def create_outline(state: ResearchState) -> dict:
    response = llm.invoke(f"Create a brief outline for an article about: {state['topic']}")
    return {"outline": response.content}

def combine(state: ResearchState) -> dict:
    research_text = "\n".join(state["findings"])
    response = llm.invoke(
        f"Combine this research and outline into a summary:\n"
        f"Research:\n{research_text}\n\n"
        f"Outline:\n{state['outline']}"
    )
    return {"final_summary": response.content}

graph = StateGraph(ResearchState)
graph.add_node("research", research)
graph.add_node("outline", create_outline)
graph.add_node("combine", combine)
# Fan-out: both start after START
graph.add_edge(START, "research")
graph.add_edge(START, "outline")
# Fan-in: both feed into combine
graph.add_edge("research", "combine")
graph.add_edge("outline", "combine")
graph.add_edge("combine", END)
app = graph.compile()
result = app.invoke({"topic": "LangGraph parallel execution"})
print(result["final_summary"])
What the fan-out does: Adding two edges from START schedules both research and outline in the same super step. LangGraph runs them concurrently.
What the fan-in does: Both research and outline have an edge to combine. LangGraph will not schedule combine until every node that has an edge pointing to it has finished. This is the automatic synchronization barrier.
Why findings needs the reducer: Both research and outline could theoretically write to the same field. In this example only research writes to findings, but the reducer is there because in a real system you might have four parallel research agents all appending to the same list. Without the reducer, only one result survives.
The latency math: If research takes 2 seconds and outline takes 3 seconds, the serial version takes 5 seconds total. The parallel version takes 3 seconds (the longer task). For independent LLM calls, parallel execution is essentially free latency savings.
Pro tip: Identify every pair of nodes in your graph that do not depend on each other's output. Those are candidates for parallelization. Even moving two 1-second calls into the same super step adds up when you are processing thousands of requests.
Watch out for: Nodes that look independent but actually share state in non-obvious ways. If two parallel nodes both write to a field without a reducer, you have a race condition. The last node to finish determines the final value. LangGraph will not warn you.
This fan-out/fan-in pattern is the backbone of the email capstone, where we will run knowledge base search and bug tracker lookup in parallel before drafting a response.
Conditional Edges
Sometimes the next node depends on what the current node produced. That is where add_conditional_edges comes in:
class ClassifyState(TypedDict):
    text: str
    sentiment: str
    result: str

def classify(state: ClassifyState) -> dict:
    response = llm.invoke(
        f"Classify the sentiment of this text as 'positive' or 'negative'. "
        f"Reply with just the word.\n\n{state['text']}"
    )
    return {"sentiment": response.content.strip().lower()}

def handle_positive(state: ClassifyState) -> dict:
    return {"result": f"Great feedback! Text was: {state['text']}"}

def handle_negative(state: ClassifyState) -> dict:
    return {"result": f"Escalating concern. Text was: {state['text']}"}

def route_by_sentiment(state: ClassifyState) -> str:
    """Routing function: inspect state, return a string key."""
    if state["sentiment"] == "positive":
        return "positive"
    return "negative"

graph = StateGraph(ClassifyState)
graph.add_node("classify", classify)
graph.add_node("handle_positive", handle_positive)
graph.add_node("handle_negative", handle_negative)
graph.add_edge(START, "classify")
graph.add_conditional_edges(
    "classify",
    route_by_sentiment,
    {"positive": "handle_positive", "negative": "handle_negative"}
)
graph.add_edge("handle_positive", END)
graph.add_edge("handle_negative", END)
app = graph.compile()
result = app.invoke({"text": "This product is absolutely fantastic!"})
print(result["result"])
# Great feedback! Text was: This product is absolutely fantastic!
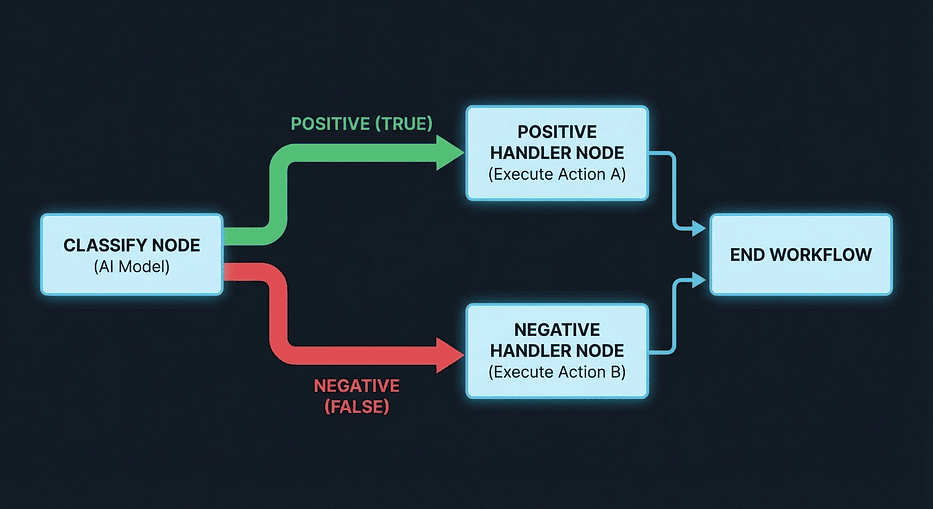
What the routing function does: route_by_sentiment inspects the current state and returns a string key. The mapping dictionary in add_conditional_edges translates that key to a node name.
Why separate the routing function from the node: Keeping the routing function pure (state in, string out, no side effects) makes it easy to test. You can unit test route_by_sentiment without running the LLM.
What add_conditional_edges takes: Three arguments. First, the source node. Second, the routing function. Third, a dictionary mapping string keys to destination node names. Every key your routing function could return must appear in that dictionary, or LangGraph will raise an error at runtime.
 LangGraph conditional edges routing diagram: classify node branching into positive and negative handler paths with color-coded decision flow
Alternative: The Command Pattern:
When you need to update state and route at the same time, you can return a Command directly from a node instead of using add_conditional_edges:
from langgraph.types import Command

def classify_and_route(state: ClassifyState) -> Command:
    response = llm.invoke(
        f"Classify sentiment as 'positive' or 'negative'.\n\n{state['text']}"
    )
    sentiment = response.content.strip().lower()
    if sentiment == "positive":
        return Command(update={"sentiment": sentiment}, goto="handle_positive")
    else:
        return Command(update={"sentiment": sentiment}, goto="handle_negative")
What Command does: Combines a state update (update=) with a routing decision (goto=) in one return value. The node both writes data to state and decides where execution goes next.
When to use add_conditional_edges vs Command:
Use add_conditional_edges when:
- The routing logic only reads state; it does not write anything new
- You want to keep routing decisions separate from node logic
- You have multiple source nodes that all use the same routing function
Use Command when:
- The node needs to produce new data that influences its own routing decision
- You want to avoid a separate routing function for a one-off case
- The routing target depends on something computed inside the node, not already in state
In the email capstone, we use add_conditional_edges for the human review gate because the routing logic is pure: it just checks the classification priority and confidence score that are already in state.
Now that you can control exactly how nodes are ordered and branched, the next problem is persistence. What happens when your process restarts mid-conversation?
 LangGraph: Conditional Edges vs. Command Pattern
Memory and Checkpointers
So far, every invocation starts from scratch. For conversations or multi-step workflows, you need state that persists between calls. LangGraph handles this through checkpointers, and the API is clean enough that switching from development to production persistence is a one-line change.
 LangGraph: Memory, Checkpoints, and Production vs. Dev Storage
MemorySaver for Development
MemorySaver stores state in memory. It is the right tool for development and testing:
from langgraph.checkpoint.memory import MemorySaver

class ConversationState(TypedDict):
    messages: Annotated[list[str], operator.add]

def chatbot(state: ConversationState) -> dict:
    history = "\n".join(state["messages"])
    response = llm.invoke(f"Conversation so far:\n{history}\n\nRespond to the latest message.")
    return {"messages": [response.content]}

graph = StateGraph(ConversationState)
graph.add_node("chatbot", chatbot)
graph.add_edge(START, "chatbot")
graph.add_edge("chatbot", END)

# Compile WITH a checkpointer
memory = MemorySaver()
app = graph.compile(checkpointer=memory)

# Thread 1: a conversation about Python
config_1 = {"configurable": {"thread_id": "user-alice"}}
app.invoke({"messages": ["Hi, I'm learning Python"]}, config=config_1)
result = app.invoke({"messages": ["What should I learn first?"]}, config=config_1)
print(result["messages"][-1])

# The response knows about the previous message because state persisted
# Thread 2: a completely independent conversation
config_2 = {"configurable": {"thread_id": "user-bob"}}
result = app.invoke({"messages": ["Tell me about Rust"]}, config=config_2)
print(result["messages"][-1])
# This conversation has no knowledge of Alice's conversation
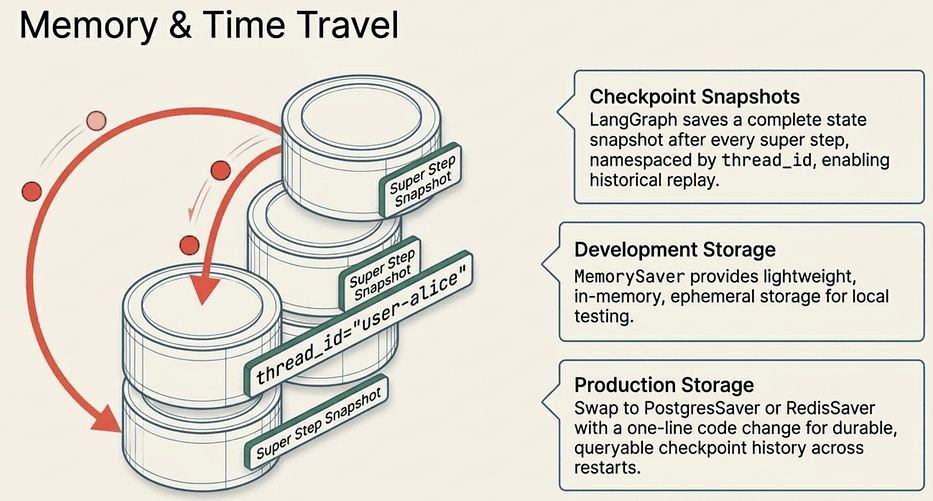
What checkpointer=memory does: Tells the compiled graph to save a full state snapshot after every super step. When you call invoke() again with the same thread_id, LangGraph loads the last checkpoint for that thread before running.
What thread_id does: Namespaces the conversation. Same thread_id means the graph picks up where it left off. Different thread_id means a completely fresh state. Think of it as a session ID.
Why the second invocation does not need to include previous messages: Because the checkpointer already has them. When Alice calls invoke({"messages": ["What should I learn first?"]}), LangGraph loads the checkpoint for "user-alice", finds the existing messages list, and appends the new message via the operator.add reducer. By the time chatbot runs, state["messages"] contains the full history.
Watch out for: Using the same
thread_idfor unrelated conversations. If you reuse"user-alice"for a completely different topic, the chatbot will have all of Alice's prior conversation in context. Always generate a freshthread_idfor a new session.
Pro tip: In development, you can inspect the full checkpoint history for a thread using
app.get_state_history(config). This is also how LangGraph's time-travel debugging works in LangSmith.
Production Checkpointers
MemorySaver lives in process memory. When the process dies, the state dies with it. For production, swap in a durable backend:
# Install: pip install langgraph-checkpoint-postgres
from langgraph.checkpoint.postgres import PostgresSaver

DB_URI = "postgresql://user:pass@localhost:5432/mydb"

with PostgresSaver.from_conn_string(DB_URI) as checkpointer:
    checkpointer.setup()  # Creates tables on first run
    app = graph.compile(checkpointer=checkpointer)
    # Same API, durable state
    result = app.invoke({"messages": ["Hello"]}, config=config_1)
What checkpointer.setup() does: Creates the necessary tables in your database on the first run. You only need to call it once during initialization. After that it is a no-op.
Why the API is identical: LangGraph's checkpointer interface is an abstraction. MemorySaver, PostgresSaver, and RedisSaver all implement the same protocol. Your graph code does not know or care which backend is underneath. Swapping out the backend is truly a one-line change.
When to use which:
- MemorySaver: Development, testing, and demos where persistence across restarts does not matter
- PostgresSaver: Production workflows where you need durability and the ability to query checkpoint history
- RedisSaver (via langgraph-redis): High-throughput scenarios where you need fast checkpoint reads and are okay with Redis's persistence tradeoffs
What Gets Checkpointed
LangGraph saves a full state snapshot at every super step. This enables time travel: you can inspect the state at any point in the execution history, replay from a specific checkpoint, or debug exactly where things went wrong.
This checkpoint mechanism is also the foundation for interrupts. When a node calls interrupt(), LangGraph needs somewhere to save the paused state so it can resume later. Without a checkpointer, there is no way to store that state, and the interrupt pattern falls apart entirely.
With persistent state in place, you have everything you need to tackle the most powerful LangGraph pattern: pausing for a human.
Human-in-the-Loop with Interrupts
Some decisions are too important to automate. Before your agent sends a customer email, approves a refund, or deploys code, you want a human to review and approve. LangGraph handles this with the interrupt() function. The mental model is straightforward once you see it.
 LangGraph: Human-in-the-loop (HITL) Interrupts
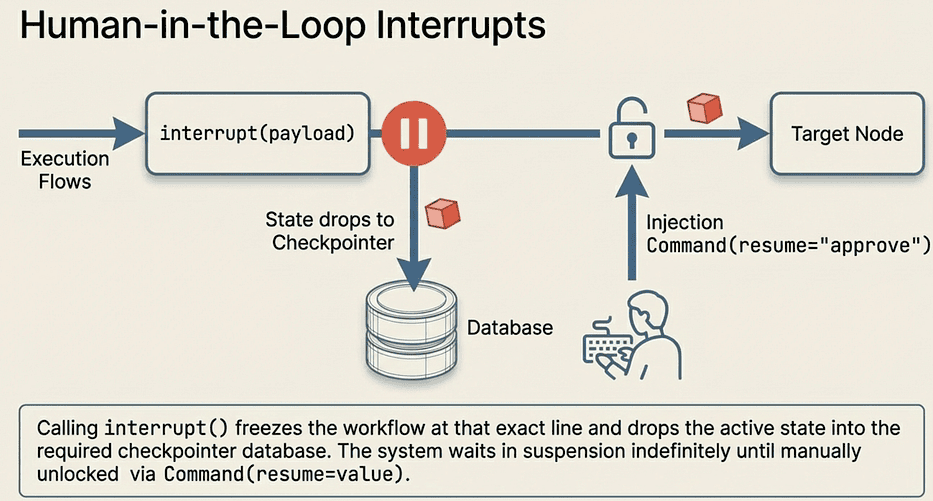
The interrupt() Function
Calling interrupt() inside a node pauses execution, saves state to the checkpointer, and surfaces a payload to the caller:
from langgraph.types import interrupt, Command

class ReviewState(TypedDict):
    messages: Annotated[list[str], operator.add]
    draft: str
    approved: bool

def generate(state: ReviewState) -> dict:
    response = llm.invoke("Write a short thank-you email to a customer.")
    return {"draft": response.content}

def review(state: ReviewState) -> dict:
    """Pause here for human review."""
    decision = interrupt(f"Please review this draft:\n\n{state['draft']}")
    if decision == "approve":
        return {"approved": True}
    return {"approved": False}

def send(state: ReviewState) -> dict:
    if state["approved"]:
        return {"messages": ["Email sent successfully."]}
    return {"messages": ["Email was rejected. Not sent."]}
What interrupt() does, step by step:
- Freezes execution at the exact line where it is called
- Saves the complete state to the checkpointer (this is why a checkpointer is required)
- Returns the payload you passed (in this case, the draft text) to the invoke() caller
- Waits. The graph is now in a suspended state.
What the decision variable receives: Nothing yet. The interrupt() call does not return until you resume the graph with Command(resume=value). When you do, decision receives whatever value you passed to resume=.
Why pass a payload to interrupt(): The payload is how you communicate to the human reviewer what they are looking at. Pass whatever they need: the draft, a summary, a structured dict with context. The caller receives this as part of the interrupt notification.
Resuming with Command
To continue execution after an interrupt, invoke the graph again with a Command(resume=value):
memory = MemorySaver()

graph = StateGraph(ReviewState)
graph.add_node("generate", generate)
graph.add_node("review", review)
graph.add_node("send", send)
graph.add_edge(START, "generate")
graph.add_edge("generate", "review")
graph.add_edge("review", "send")
graph.add_edge("send", END)
app = graph.compile(checkpointer=memory)
config = {"configurable": {"thread_id": "email-review-1"}}

# Step 1: Invoke the graph. It will run generate, then pause at review.
result = app.invoke({"messages": ["Start email workflow"]}, config=config)
# result contains the interrupt payload with the draft

# Step 2: The human reviews the draft and approves.
result = app.invoke(Command(resume="approve"), config=config)
print(result["messages"][-1])
# "Email sent successfully."
What happens in Step 1: LangGraph runs generate, saves the draft to state, then hits interrupt() in the review node. It checkpoints state and returns. The result from this first invoke() contains the interrupt payload (the draft text for the human to review).
What happens in Step 2: Command(resume="approve") tells LangGraph to load the checkpoint for "email-review-1", resume execution from the interrupt() call, and pass "approve" as the return value. The review node's decision variable receives "approve", sets approved=True, and execution continues to send.
The same config is required for both calls. LangGraph uses thread_id to find the right checkpoint. If you used a different thread_id for the second call, LangGraph would look for a different (nonexistent) checkpoint and fail.
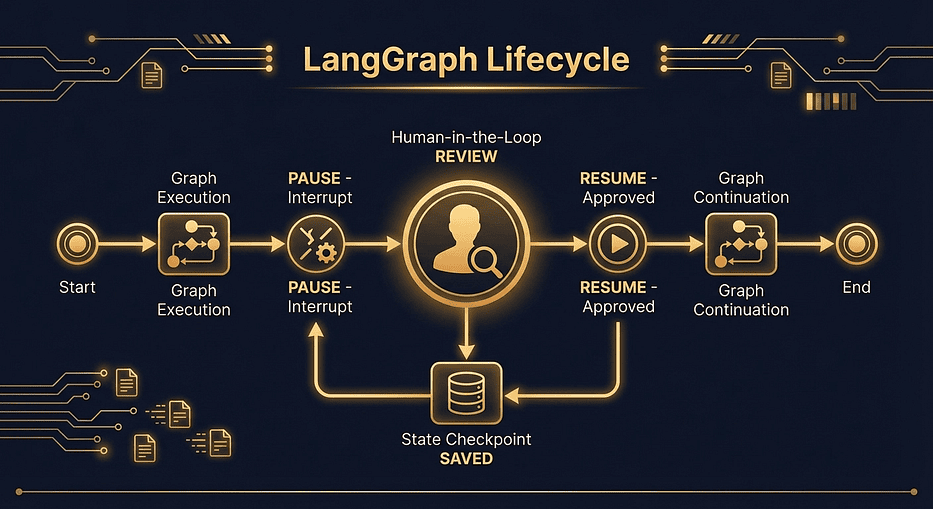 LangGraph human-in-the-loop interrupt lifecycle: execution timeline pausing at interrupt call, state saved to checkpoint, then resuming with Command(resume=) after human approval
A checkpointer is required for interrupts. Without one, there is nowhere to save the paused state. app.compile(checkpointer=memory) is not optional here.
Tip: LangGraph 1.1.0 introduced
version="v2"forinvoke(), which returns aGraphOutputobject with.valueand.interruptsattributes for more type-safe interrupt handling. Worth exploring once you are comfortable with the basics.
Pro tip: The interrupt payload can be any serializable value: a string, a dict, a list. In production systems, you typically pass a structured dict containing everything the reviewer needs (the draft, the classification, the sender, a review URL). Your application layer receives this dict and can display it in a UI or send it via Slack or email.
Watch out for: Calling
invoke()a second time with the full initial state instead ofCommand(resume=value). If you callapp.invoke({"messages": [...]}, config=config)again with the samethread_id, LangGraph will restart the graph from scratch for that thread, losing the paused state. Always useCommand(resume=value)to continue an interrupted graph.
You now have all the building blocks. Let us put them together into something real.
Email Workflow Capstone
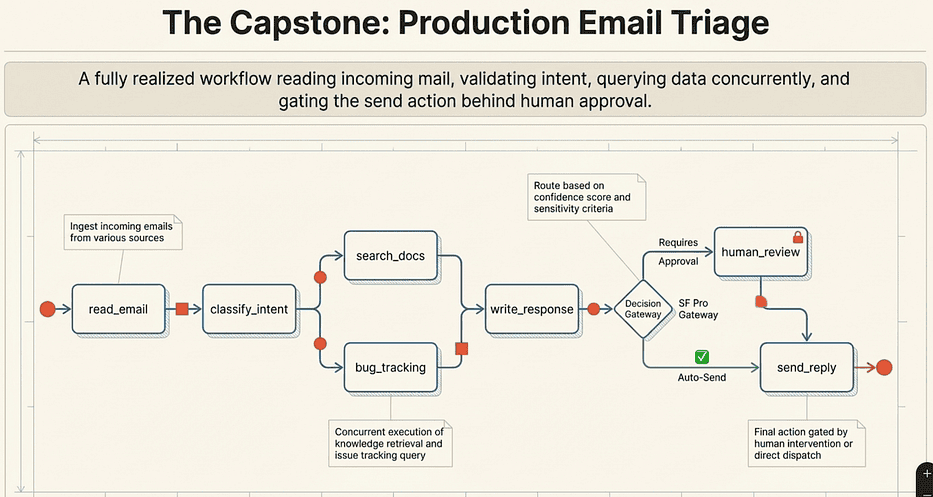
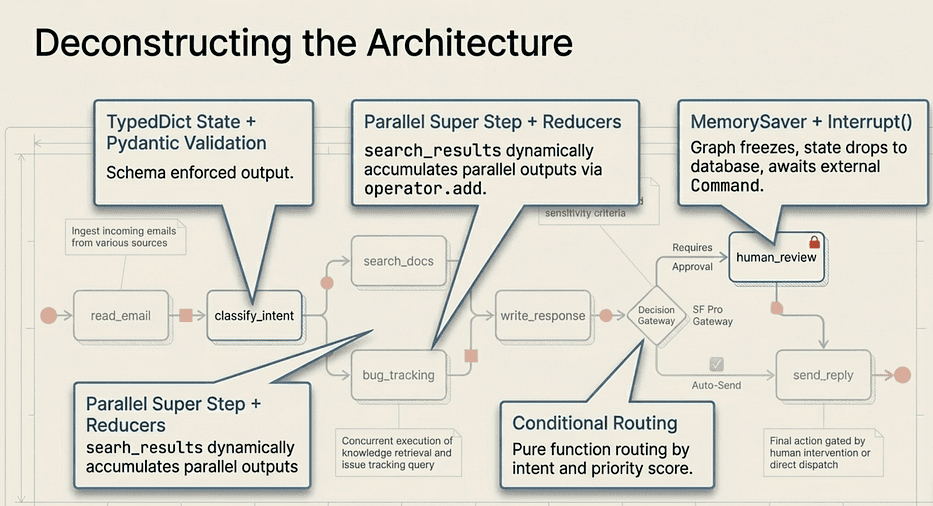
Let us combine every concept into a production-style email triage system. This workflow reads an incoming email, classifies its intent using structured output, searches a knowledge base and bug tracker in parallel, drafts a response, and optionally pauses for human review before sending.
 LangGraph: Example Project Email Triage
Here is how each concept from the previous sections maps to this workflow:
- TypedDict state with reducers: EmailState with operator.add on search_results
- Serial edges: read_email to classify_intent
- Parallel edges: classify_intent fans out to search_docs and bug_tracking
- Fan-in synchronization: Both parallel nodes feed into write_response
- Conditional routing: route_by_priority decides human review vs. auto-send
- Pydantic structured output: EmailClassification constrains LLM response
- Interrupt: human_review pauses for approval
- Checkpointer: MemorySaver enables the interrupt/resume cycle
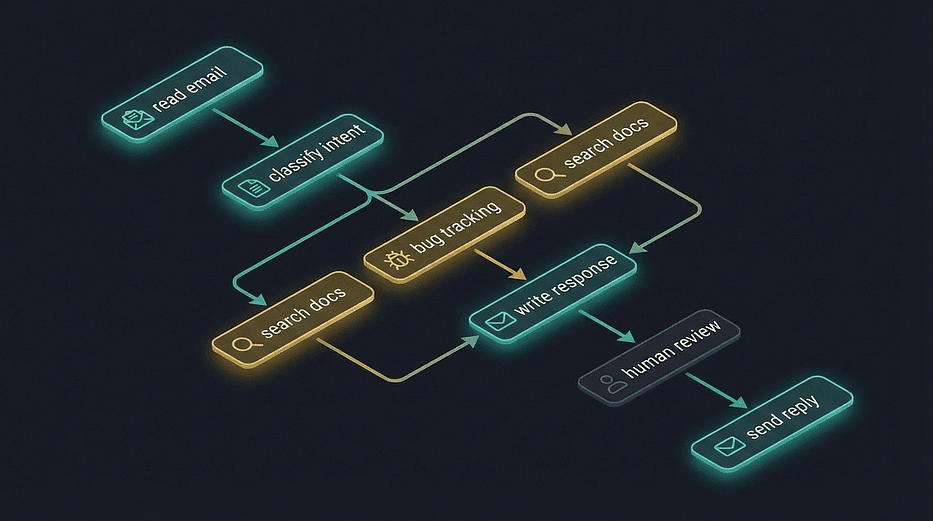 LangGraph email triage workflow graph: nodes for read email, classify intent, parallel search docs and bug tracking, write response, human review, and send reply connected by directed edges
State and Schemas
First, define the state and the Pydantic schema for structured LLM classification:
from typing import Annotated
from typing_extensions import TypedDict
import operator
from pydantic import BaseModel, Field
from langchain_openai import ChatOpenAI
from langgraph.graph import StateGraph, START, END
from langgraph.types import Command, interrupt
from langgraph.checkpoint.memory import MemorySaver

# Pydantic model for structured classification
class EmailClassification(BaseModel):
    intent: str = Field(description="The intent: 'bug_report', 'question', 'feedback', or 'other'")
    priority: str = Field(description="Priority level: 'high', 'medium', or 'low'")
    confidence: float = Field(description="Confidence score between 0.0 and 1.0")

# Graph state
class EmailState(TypedDict):
    email_subject: str
    email_body: str
    email_sender: str
    classification: dict
    search_results: Annotated[list[str], operator.add]
    bug_info: str
    draft_response: str
    approved: bool
    status: str
llm = ChatOpenAI(model="gpt-4o-mini", temperature=0)
Why EmailClassification is a Pydantic model, not part of EmailState: This is the TypedDict/Pydantic split in action. EmailClassification is the shape you hand to the LLM as a JSON schema target. Pydantic validates the response and raises immediately if the model returns something that does not match. EmailState is the graph container; it uses TypedDict because LangGraph needs the reducer syntax and efficient serialization.
Why classification is stored as dict in EmailState: After Pydantic validates the response, we call .model_dump() to convert to a plain dict before storing in state. This keeps the state serializable by any checkpointer without needing Pydantic as a dependency at restore time.
The critical field: search_results: Annotated[list[str], operator.add]. Both search_docs and bug_tracking run in parallel and both could write to the results. The reducer ensures their outputs accumulate. Without it, one parallel branch would silently overwrite the other.
Building the Nodes
Each node is a focused function that reads what it needs from state and returns a partial update:
def read_email(state: EmailState) -> dict:
    """Parse the incoming email into structured fields."""
    return {
        "email_subject": state["email_subject"],
        "email_body": state["email_body"],
        "email_sender": state["email_sender"],
    }


def classify_intent(state: EmailState) -> dict:
    """Use structured output to classify the email."""
    structured_llm = llm.with_structured_output(EmailClassification)
    classification = structured_llm.invoke(
        f"Classify this email.\n\n"
        f"Subject: {state['email_subject']}\n"
        f"Body: {state['email_body']}"
    )
    return {"classification": classification.model_dump()}

def search_docs(state: EmailState) -> dict:
    """Search knowledge base for relevant documentation."""
    intent = state["classification"]["intent"]
    # In production, this would hit a real vector store or search API
    response = llm.invoke(
        f"Suggest 2 relevant documentation links for a {intent} "
        f"about: {state['email_subject']}"
    )
    return {"search_results": [f"[Docs] {response.content}"]}

def bug_tracking(state: EmailState) -> dict:
    """Look up related bugs in the tracking system."""
    # In production, this would query Jira, Linear, GitHub Issues, etc.
    response = llm.invoke(
        f"Summarize any known bugs related to: {state['email_subject']}"
    )
    return {"bug_info": response.content}

def write_response(state: EmailState) -> dict:
    """Draft an email response using all gathered context."""
    context_parts = [
        f"Original email from {state['email_sender']}:",
        f"Subject: {state['email_subject']}",
        f"Body: {state['email_body']}",
        f"\nClassification: {state['classification']}",
        f"\nRelevant docs: {chr(10).join(state['search_results'])}",
        f"\nBug info: {state['bug_info']}",
    ]
    context = "\n".join(context_parts)
    response = llm.invoke(
        f"Draft a helpful, professional reply to this customer email.\n\n{context}"
    )
    return {"draft_response": response.content}
Node-by-node breakdown:
read_email looks redundant (it just returns fields that are already in state), but it serves as an explicit parsing step. In production, this node would receive a raw webhook payload and extract the fields. The function here is a placeholder for that extraction logic.
classify_intent is where Pydantic earns its place. The line structured_llm = llm.with_structured_output(EmailClassification) wraps the LLM to enforce schema conformance. The model receives a JSON schema derived from EmailClassification and must return valid JSON matching it. If it does not, LangChain retries automatically before raising. .model_dump() converts the validated Pydantic object to a plain dict for storage in state.
search_docs and bug_tracking both write to different fields: search_results and bug_info respectively. They run in parallel, so their LLM calls happen concurrently. Notice search_docs wraps its result in a list ([f"[Docs] {response.content}"]) because search_results uses operator.add, which expects a list. bug_tracking writes a plain string to bug_info, which has no reducer, so a simple assignment is fine.
write_response is the fan-in node. By the time it runs, both search_docs and bug_tracking have finished and their results are in state. It assembles everything into a prompt and drafts the reply.
human_review passes a structured dict to interrupt() rather than a plain string. This is production practice: the dict contains the draft, the classification, and a message to the reviewer. Whatever system is on the other side (a web UI, a Slack bot, an email notification) receives this complete context.
send_reply uses state.get("approved", True) as a defensive default. If somehow approved is not in state, it defaults to sending. Adjust this to False if your production risk profile leans toward caution.
Pro tip: In production,
search_docsandbug_trackingwould call real APIs: a vector database, Jira, GitHub Issues. The LangChain@tooldecorator makes wrapping those calls straightforward. The node structure stays identical; you just replace the LLM call with a tool call.
Watch out for: The
write_responsenode accessingstate["search_results"]whensearch_resultsis still an empty list. Initializesearch_results: []in your initial invoke payload, and the reducer will start appending from there.
Wiring the Graph
Now connect the nodes with serial, parallel, and conditional edges:
def route_by_priority(state: EmailState) -> str:
    """Route based on priority and confidence."""
    classification = state["classification"]
    if classification["priority"] == "high" or classification["confidence"] < 0.8:
        return "needs_review"
    return "auto_send"


graph = StateGraph(EmailState)

# Add all nodes
graph.add_node("read_email", read_email)
graph.add_node("classify_intent", classify_intent)
graph.add_node("search_docs", search_docs)
graph.add_node("bug_tracking", bug_tracking)
graph.add_node("write_response", write_response)
graph.add_node("human_review", human_review)
graph.add_node("send_reply", send_reply)

# Serial edges
graph.add_edge(START, "read_email")
graph.add_edge("read_email", "classify_intent")

# Parallel fan-out from classify_intent
graph.add_edge("classify_intent", "search_docs")
graph.add_edge("classify_intent", "bug_tracking")

# Parallel fan-in to write_response
graph.add_edge("search_docs", "write_response")
graph.add_edge("bug_tracking", "write_response")

# Conditional routing after write_response
graph.add_conditional_edges(
    "write_response",
    route_by_priority,
    {"needs_review": "human_review", "auto_send": "send_reply"}
)

# After human review, send the reply
graph.add_edge("human_review", "send_reply")
graph.add_edge("send_reply", END)

# Compile with memory for interrupt support
memory = MemorySaver()
app = graph.compile(checkpointer=memory)
What route_by_priority does: High-priority emails get human review regardless of confidence. Low-confidence classifications (below 0.8) also get human review, because if the model is not sure what the email is about, a human should decide. Everything else gets auto-sent. This is a reasonable production default that you would tune based on your actual error rates.
Why add_conditional_edges instead of Command here: The routing function route_by_priority is pure. It reads from state and returns a key. It does not produce any new data. That is the right profile for add_conditional_edges.
The complete edge map:
- Serial: START to read_email to classify_intent
- Parallel fan-out: classify_intent to search_docs AND bug_tracking
- Parallel fan-in: search_docs AND bug_tracking to write_response
- Conditional: write_response to either human_review or send_reply
- After review: human_review to send_reply to END
 LangGraph: Mapping LangGraph Components to Capstone Project
Running It End-to-End
config = {"configurable": {"thread_id": "email-001"}}

# Invoke with a sample email
result = app.invoke({
    "email_subject": "Login page broken after update",
    "email_body": (
        "Hi, since yesterday's update I can't log into my account. "
        "I get a 500 error every time. This is blocking my team. "
        "Please fix ASAP."
    ),
    "email_sender": "[email protected]",
    "search_results": [],
    "bug_info": "",
    "draft_response": "",
    "approved": False,
    "status": "",
}, config=config)

# The graph will classify this as high-priority, so it pauses at human_review.
# The interrupt payload contains the draft for review.
print("Interrupt payload received. Draft response ready for review.")
At this point, the graph has done the following:
- Read and parsed the email in read_email
- Classified it as a high-priority bug report using structured Pydantic output in classify_intent
- Searched docs and bug tracking in parallel in the same super step
- Drafted a response incorporating all context in write_response
- Hit the human_review node, which called interrupt() and paused
The entire processing pipeline, including two parallel LLM calls, completed before the interrupt. When the graph pauses, state is fully saved. The human reviewer can take minutes or hours to respond; nothing is lost.
Now the human reviews and approves:
# Resume after human approval
final = app.invoke(Command(resume="approve"), config=config)
print(final["status"])
# "Reply sent to [email protected]"
What just happened: LangGraph loaded the checkpoint for "email-001", resumed the human_review node from the interrupt() call, passed "approve" as the return value, set approved=True in state, and continued to send_reply, which returned the confirmation status.
Every concept from this tutorial appears in that capstone:
- TypedDict state with reducers
- Serial and parallel edges
- Conditional routing
- Pydantic structured output
- Interrupt-based human review
- Checkpointed memory
Pro tip: For a low-priority, high-confidence email,
route_by_priorityreturns"auto_send"andhuman_reviewis skipped entirely. The graph runs straight through: read, classify, parallel search, draft, send. The interrupt only appears in the code path that needs it. That is the value of conditional routing.
Watch out for: Not initializing all state fields in your initial
invoke()call. Unlike Pydantic,TypedDictdoes not set defaults for missing fields. Ifwrite_responsetries to accessstate["search_results"]and that key is not in the initial state, you get aKeyError. Always provide all fields in the initial state dict, even if they start as empty strings, empty lists, orFalse.
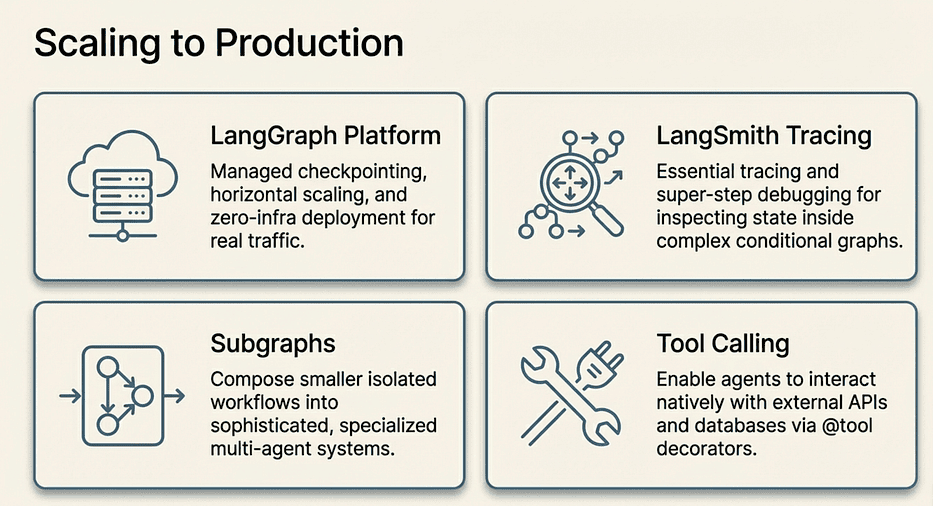
What's Next in Your LangGraph Journey
 LangGraph: Scaling to Production
LangSmith gives you tracing and debugging for every graph execution. When a node produces unexpected output, you can inspect the exact state at each super step. This becomes essential once you have graphs with five or more nodes and conditional paths.
Subgraphs let you compose smaller graphs into larger multi-agent systems. Each subgraph manages its own state while communicating through a parent graph. Once you are comfortable with single-graph workflows, subgraphs are the natural next step for building teams of specialized agents.
Tool calling with LangChain's @tool decorator and ToolNode lets your agents interact with external APIs, databases, and services as part of their graph execution. The search_docs and bug_tracking nodes in the capstone are practically begging to be replaced with real tool calls.
Production persistence: When you are ready to move beyond MemorySaver, install langgraph-checkpoint-postgres (pip install langgraph-checkpoint-postgres) for durable state that survives process restarts. The API swap is one line.
For the full deep dive, the LangChain Academy course covers these concepts and more with interactive exercises.
If you work on a cross-language team, check out the TypeScript companion article covering these same patterns with the JS/TS SDK. The concepts are identical; only the syntax changes. The mental model you built here transfers directly.
Key Takeaways
- State is a TypedDict. Fields with
Annotated[list, operator.add]accumulate values across multiple writes. Fields without a reducer overwrite on each write. - Nodes are functions. They receive full state and return a partial update dict. LangGraph handles the merge.
- Edges control flow. Serial for ordered dependencies. Parallel for independent concurrent work. Conditional for data-driven branching.
- TypedDict for graph state, Pydantic for LLM schemas. Use TypedDict for the container that flows through the graph. Use Pydantic with
.with_structured_output()to constrain LLM output. - Checkpointers enable persistence and interrupts. MemorySaver for development. PostgresSaver for production. The interrupt pattern requires a checkpointer.
- Interrupts are just paused state.
interrupt(payload)freezes execution and checkpoints state.Command(resume=value)picks up exactly where you left off. - Parallel execution is built-in, not bolted-on. Two edges from the same source node run their targets concurrently. Use reducers on any field that parallel nodes write to.
 LangGraph: Key takeaways
Discussion Questions
- The tutorial uses MemorySaver for development and PostgresSaver for production. What other storage backends would you consider for a high-throughput system, and what tradeoffs would guide that decision?
- The
route_by_priorityfunction sends high-priority emails to human review and auto-sends low-priority ones. How would you tune that threshold in a real system, and what metrics would you track to know whether the threshold is set correctly? - The capstone uses
add_conditional_edgesfor routing afterwrite_response. Can you think of a scenario in the email workflow where the Command pattern would be a better fit than a separate routing function?
LangGraph #Python #AIAgents #LangChain #LLM #MachineLearning #SoftwareEngineering
About the Author
Rick Hightower is a technology executive and data engineer who led ML/AI development at a Fortune 100 financial services company. He created skilz, the universal agent skill installer, supporting 30+ coding agents including Claude Code, Gemini, Copilot, and Cursor, and co-founded the world's largest agentic skill marketplace. Connect with Rick Hightower on LinkedIn or Medium. Check out SpillWave, your source for AI expertise.
Further Reading
- LangChain Deep Agents: Real-World Use Cases and the Democratization of AI Agents
- LangChain's Harness Engineering: From Top 30 to Top 5 on Terminal Bench 2.0
- The Agent Framework Landscape: LangChain Deep Agents vs. Claude Agent SDK
- LangChain Deep Agents: Harness and Context Engineering: Memory, Skills, and Security
- Introduction to LangChain Deep Agents and the Shift to "Agent 2.0"
- From Chatbots to AI Agents: Building Real-Time, Tool-Using Systems with LangChain
- LangChain and MCP: Building Enterprise AI Workflows with Universal Tool Integration
- LangChain: Building Intelligent AI Applications with LangChain
- Deep Agents: LangChain Just Open-Sourced a Replica of Claude Code