Taming the Cloud: Production-Grade GCP Infrastructure with Pulumi and TypeScript
How to build agile, secure, and maintainable cloud systems without drowning in configuration chaos
Originally published on Medium.
How to build agile, secure, and maintainable cloud systems without drowning in configuration chaos
Part 0: Introduction — The Cloud Chaos Problem
You start simple. A few Cloud Run services, some YAML configs. Then you grow.
Suddenly, you’re drowning in configuration files, tracking what connects to what, and it feels like a full-time job. You’re clicking through the GCP Console at 2 AM, trying to remember if you created that IAM binding. Sound familiar?
The Pain Points
Manual clicking for every change. Open the GCP Console. Navigate to Cloud Run. Find the correct service. Update the config. Click save. Hope nothing breaks. Repeat 47 times.
Scattered configuration with no single source of truth. YAML files in five repositories. Bash scripts in someone’s home directory or even 30 bash scripts checked into git, but not sure which one to run. That one critical config you saved somewhere. “Did I create that IAM binding? Let me check the console…”
Deploy anxiety. Every deployment feels like defusing a bomb. “Will this break production? Did I update all the references? Is the service account configured?” You hold your breath and click deploy.
Copy-paste errors everywhere. You need to update 10 services. Copy the YAML. Paste. Change one value. Miss a typo. Deploy. Break production. Spend an hour debugging why service #7 has a different configuration than the other nine.
Modern applications are intricate webs of services. A serverless React frontend talks to a private Python API. The API hits a high-performance AlloyDB database. Meanwhile, a scheduled job pulls data for a Vertex AI ML pipeline using Gemini, Claude, and open-source models.
The simple declarative tools of yesterday: pure YAML, manual clicks, bash scripts; weren’t built for this level of complexity.
The Transformation
What if infrastructure became as testable, reusable, and maintainable as application code?
This isn’t science fiction. It’s a paradigm shift from “configuration management” to “software engineering.” Instead of managing infrastructure, you build it.
Think about the difference between a grocery list and a recipe. A grocery list is static: “Buy eggs, flour, sugar.” That’s YAML, a fixed declaration of what you want. A recipe is dynamic: “For each guest, add two eggs. If vegan, substitute applesauce. Repeat until the mixture is smooth.” That’s real code; loops, conditionals, abstractions.
Traditional IaC (YAML/JSON) is the grocery list. You declare exactly what you want, but there’s no logic, no reusability, no abstractions.
Pulumi with TypeScript is the recipe. You use loops to spin up 10 services rather than 1. You use functions to hide complex boilerplate. You build classes to create reusable components. You use TypeScript’s type system to catch errors before deployment. Pulumi has bindings for Python, Go, and others. We picked TypeScript because it gets updated first.
What You’ll Build
This article walks through building a complete production system that demonstrates these principles in action:
The Application Stack:
- Frontend: React admin dashboard (Material-UI, TypeScript)
- Backend: Python FastAPI serving RESTful APIs
- Ingestion: Private ETL service using Vertex AI (Gemini/Claude/open-source models)
- Data Layer: AlloyDB (PostgreSQL 15) for transactional storage
- Automation: Cloud Scheduler triggering batch jobs with OIDC authentication
The Architecture:
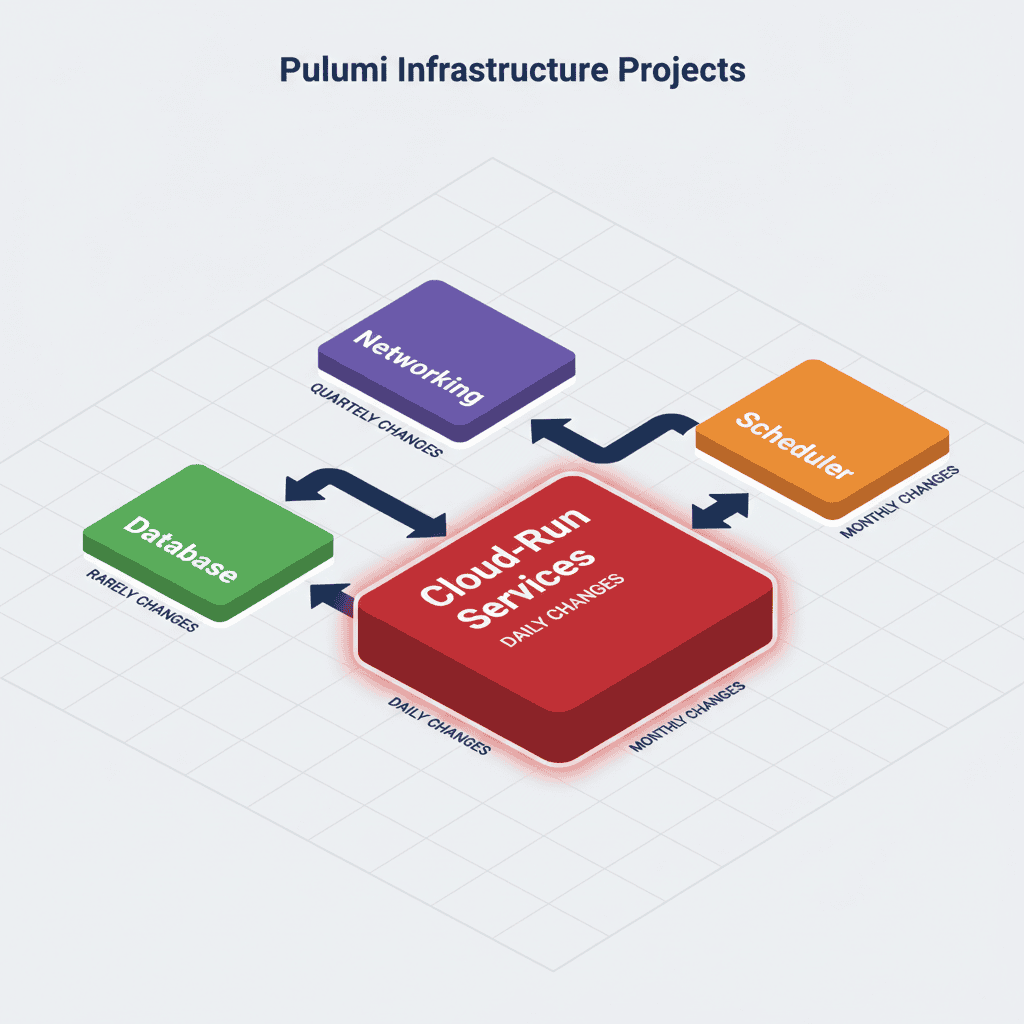
- Multi-project Pulumi structure (4 isolated projects by change frequency)
- Keyless CI/CD with GitHub Actions (Workload Identity Federation)
- Zero-trust security (IAP, OIDC, Secret Manager)
- Multi-environment support (dev/uat/prod) from single codebase
Who is this guide for?
This comprehensive guide is for you if you are:
- A Software Engineer who wants to manage infrastructure with the same modern tools you use for application code
- A DevOps or Platform Engineer looking to build scalable, maintainable, and secure CI/CD pipelines on GCP
- A Tech Lead or Architect designing production systems and seeking to enforce best practices across your team
- A Cloud Engineer frustrated with slow deployments and looking for a 10x performance improvement
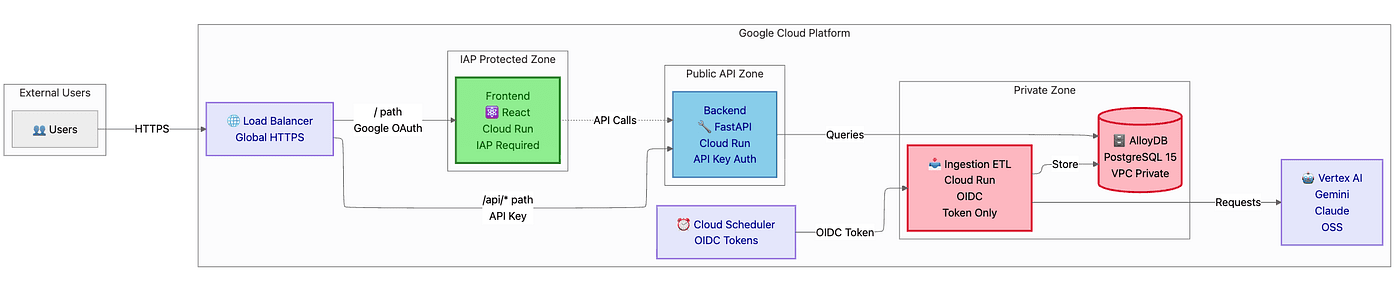
Diagram 1: System Architecture Overview
The Core Insight
“Infrastructure isn’t something you configure anymore. It’s something youbuildwith the same care as your application code. When you make that shift, you gain a level of confidence and velocity that wasn’t possible before.”
The Critical Performance Hack
Here’s the secret that makes this approach 10x faster than traditional Infrastructure-as-Code:
Don’t run Pulumi unless infrastructure changes.
Most teams waste 2–3 minutes running pulumi up on every deployment, even when only application code changed. They're checking 200 resources when they only touched one React component.
This article shows you how to break that pattern:
- Infrastructure changes (new services, IAM roles, networking) → Run
pulumi up(3 min) - Application code changes (React components, Python endpoints) → Skip Pulumi, use
gcloud run deploy(20 sec) - Result: 10x faster deployments for 90% of your work
Article Navigation
This comprehensive guide covers:
- Parts 1–3: Foundation & Architecture (understand the “why”)
- Parts 4–5: Building the System (hands-on implementation)
- Parts 6–8: Deployment Strategy, Security & CI/CD (production patterns)
- Part 9: Production Operations (running it for real)
Let’s tame the cloud.
Part 1: Foundation — Why Pulumi + TypeScript?
Before diving into implementation, let’s understand why this approach works. If you’ve ever spent an hour debugging a YAML file only to find a single misplaced space, you’ll appreciate this.
1.1 The Traditional Way: YAML Hell
Consider this typical Cloud Run deployment. You’ve probably written something similar:
# deploy.yaml (excerpt from massive file)apiVersion: run.cloud.google.com/v1kind: Servicemetadata: name: backend-apispec: template: spec: serviceAccountName: backend-sa # Did you create this? Where? containers: - image: gcr.io/my-project/backend:latest env: - name: DB_HOST value: "???" # Where does this come from? - name: SECRET_KEY valueFrom: secretKeyRef: name: "???" # Was this created? Who knows!
The Problems Stack Up:
- ❌ No dependency management — Did you create resources in the right order? Hope so!
- ❌ No type safety — Typo in
DB_HOST? Find out at runtime when production breaks! - ❌ No abstractions — Copy-paste this 100 times for 100 services (good luck keeping them in sync)
- ❌ No validation until deployment — Your mistakes are expensive
- ❌ No way to reuse patterns — Every service is hand-crafted from scratch
How many times have you copied a YAML file, changed one value, and accidentally created three subtle bugs because you missed a reference update?
1.2 The Pulumi Way: Infrastructure as Software
Now watch what happens when you shift to TypeScript. The same service becomes:
import * as pulumi from "@pulumi/pulumi";import * as gcp from "@pulumi/gcp";// Version numbers: @pulumi/pulumi 3.206.0, @pulumi/gcp 8.41.1 (November 2025)// Reusable component (defined once, used everywhere)const backend = new SecureCloudRunService("backend-api", { imageName: "gcr.io/my-project/backend:latest", location: "us-central1", vpcConnectorId: vpcConnector.id, // Auto-wired dependency ✅ alloyDbClusterId: cluster.id, // Type-safe reference ✅ secretAccessorIds: ["db-password"], // Clear intent ✅});// Export URL for other projects to consumeexport const backendUrl = backend.url;
The Advantages Are Immediate:
- ✅ Dependencies automatically managed — Pulumi ensures correct order (no more “resource not found” errors)
- ✅ TypeScript catches errors at compile-time — Before deployment, your editor shows you the mistake
- ✅ Abstractions reduce duplication by 90% — Define
SecureCloudRunServiceonce, use it 100 times - ✅ Outputs can be shared across projects — StackReference makes cross-project dependencies type-safe
- ✅ Full IDE support — Autocomplete, jump-to-definition, refactoring tools
1.3 Why TypeScript Specifically?
You might ask: “Why TypeScript over Python, Go, or YAML?” Fair question. Here’s the comparison:
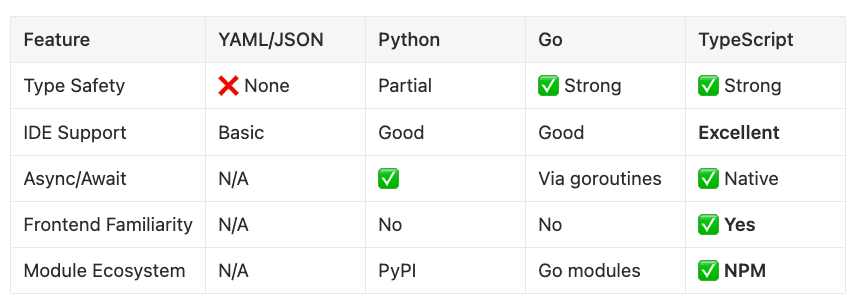
Type Safety
- YAML/JSON: ❌ None
- Python: Partial
- Go: ✅ Strong
- TypeScript: ✅ Strong
IDE Support
- YAML/JSON: Basic
- Python: Good
- Go: Good
- TypeScript: Excellent
Async/Await
- YAML/JSON: N/A
- Python: ✅
- Go: Via goroutines
- TypeScript: ✅ Native
Frontend Familiarity
- YAML/JSON: N/A
- Python: No
- Go: No
- TypeScript: ✅ Yes
Module Ecosystem
- YAML/JSON: N/A
- Python: PyPI
- Go: Go modules
- TypeScript: ✅ NPM
The real reason we picked TypeScript was we used both TypeScript and Python for our other modules, but TypeScript is usually supported first in the Pulumi community and then the other modules get updated over time. Since we already had TypeScript and Python planned for the project, it made sense to go with Python. If we had an all Go Lang modules or all Python modules, we could have gone another way.
Why TypeScript Wins for Cloud Infrastructure:
If you have a React frontend team, they already know TypeScript. Same language for frontend and infrastructure means easier onboarding. Your frontend developers can contribute to infrastructure code without learning a new language.
Excellent Pulumi SDK support. Most Pulumi examples and documentation use TypeScript. The community is largest here.
Strong typing catches 80% of errors before deployment. The TypeScript compiler acts like a code reviewer who never sleeps. Typo in a property name? Red squiggly line before you even save the file.
Native async/await for cloud operations. Cloud operations are inherently asynchronous. TypeScript’s first-class async support makes this natural.
1.4 Installation & Setup
Let’s get your environment ready. This takes about 5 minutes:
Prerequisites:
# Verify versions (November 2025)$ node --version # v20.11.1 (Node.js 20 LTS)$ npm --version # 10.5.0# Install Pulumi CLI$ brew install pulumi/tap/pulumi # macOS$ pulumi version# v3.206.0# Install GCP CLI (for local auth)$ brew install google-cloud-sdk$ gcloud version# Google Cloud SDK 469.0.0$ gcloud auth application-default login
Project Setup:
# Create new Pulumi project$ mkdir my-gcp-infra && cd my-gcp-infra$ pulumi new gcp-typescript# Install dependencies (November 2025 versions)$ npm install @pulumi/pulumi@^3.206 @pulumi/gcp@^8.41# Configure GCP project$ pulumi config set gcp:project my-project-id$ pulumi config set gcp:region us-central1
First Resource (confidence builder):
import * as gcp from "@pulumi/gcp";const bucket = new gcp.storage.Bucket("my-first-bucket", { location: "US", forceDestroy: true,});export const bucketName = bucket.name;
Deploy:
$ pulumi up# Shows preview, asks for confirmation# Creates bucket in ~10 seconds
Key Takeaway:
“In 10 lines of TypeScript, you’ve done what would take 50+ lines of YAML — and you got type safety, dependency management, and reusability for free.”
Now you understand the foundation. Let’s see what we’re building.
2.2 Component Breakdown
Frontend: React + TypeScript + Material-UI:
What It Does:
The admin dashboard serves as your users’ window into the system. It displays data tables, charts, and filters. Users authenticate via Google OAuth (managed by Identity-Aware Proxy). The frontend calls the Backend API for all data operations.
Deployment Model:
- Hosted on Cloud Run at the
/path - Protected by Identity-Aware Proxy (IAP)
- Only authenticated users can access
Tech Stack:
{ "react": "^18.0", "typescript": "^5.3", "@mui/material": "^5.0", "react-router-dom": "^6.0"}
Security Model (what the frontend CAN’T do):
- Frontend CANNOT directly access the database (no database credentials)
- Frontend CANNOT invoke the Ingestion service (no service-to-service auth)
- Frontend CAN ONLY call the Backend API (which enforces authorization)
This represents defense in depth. Even if the frontend is compromised, damage remains limited.
Backend: Python FastAPI:
What It Does:
The Backend API serves as the brain of the system. It handles RESTful API requests at /api/*, connects to AlloyDB for data persistence, sends async jobs to the Ingestion service, and enforces authentication and authorization.
Deployment Model:
- Public-facing API (no IAP, but requires API key)
- Accessible at
/api/*path via Load Balancer - Connects to AlloyDB via VPC connector
Tech Stack:
fastapi==0.109.0sqlalchemy==2.0.25alembic==1.13.0asyncpg==0.29.0 # PostgreSQL driver for AlloyDB
IAM Permissions (Service Account):
roles/alloydb.client- Connect to AlloyDBroles/secretmanager.secretAccessor- Read database passwordroles/run.invoker- Invoke Ingestion service (internal)
Ingestion: Python ETL Service:
What It Does:
This workhorse service remains **PRIVATE. Ingestion is **not exposed via the Load Balancer. Cloud Scheduler triggers it with OIDC tokens. The Backend API can invoke it internally. It processes batch data jobs, uses Vertex AI for ML processing, and stores results in AlloyDB.
Why Private?
This service has powerful permissions (database write access, Vertex AI access). We keep it off the public internet entirely. No firewall rules, no API keys, no network-based security; just identity-based authorization.
Vertex AI Multi-Model Strategy:
Here’s where it gets interesting. We use multiple AI models for different tasks:
- Gemini 2.5 Flash: Fast batch processing (1M token context, low cost)
- Claude 4.5 Haiku: Cost-effective quick tasks (cheap, fast, good)
- Claude 4.5 Sonnet: Advanced analysis for critical data (expensive, slow, excellent)
- Open-source models: Specialized tasks (e.g., embeddings with custom models)
Why Multi-Model?
Cost optimization. Gemini Flash costs 1/10th of Claude Sonnet. For bulk data labeling, use Flash. For critical analysis that determines business decisions, use Sonnet. Use the right tool for the job.
Speed optimization. Flash processes 1000 records in the time Sonnet processes 100. Batch jobs that would take hours complete in minutes.
Vendor resilience. You’re not locked into one provider. If Anthropic has an outage, fall back to Gemini. If pricing changes, adjust your strategy.
Security Model:
ingress: INGRESS_TRAFFIC_INTERNAL_ONLY✅- NO Load Balancer route ✅
- Invoked via OIDC tokens (Cloud Scheduler)
- Invoked via service-to-service auth (Backend API)
Data Layer: AlloyDB (PostgreSQL 15):
Why AlloyDB over Cloud SQL?
AlloyDB delivers Google’s PostgreSQL-compatible database built from the ground up for cloud performance:
- 4x faster analytical queries (columnar engine)
- 100% PostgreSQL compatibility (no surprises)
- Integrated ML capabilities (vector search, recommendations)
- Similar pricing, better performance (no brainer)
Configuration by Environment:
- dev: 2 vCPUs, 16 GB Memory, No Backups, ~$100/month
- uat: 2 vCPUs, 16 GB Memory, 7 days backups, ~$150/month
- prod: 4 vCPUs, 32 GB Memory, 30 days backups with HA, ~$600/month
Access Method:
- VPC-private (no public IP — impossible to access from internet)
- Accessed via VPC Connector from Cloud Run
- IAM-based authentication (no password in config files)
2.3 Data Flow
Let’s walk through two real scenarios to make this concrete.
User-Initiated Flow (interactive):
1. User visits <https://example.com/>2. Load Balancer → IAP (Google OAuth check)3. User authenticated → React Frontend served4. User clicks "View Data" → Frontend calls /api/v1/data → Backend API5. Backend queries AlloyDB → Returns JSON data6. Frontend renders dashboard with data visualization
Scheduled Batch Flow (automated):
1. Cloud Scheduler triggers at 2 AM UTC2. Scheduler generates OIDC token (scheduler-sa identity)3. POST to Ingestion service PRIVATE URL (internal only)4. Ingestion authenticates token (roles/run.invoker check)5. Ingestion processes batch job: a. Fetch raw data from external API b. Send to Vertex AI (Gemini for bulk, Claude for critical) c. Store results in AlloyDB6. Job complete, results available via Backend API next morning
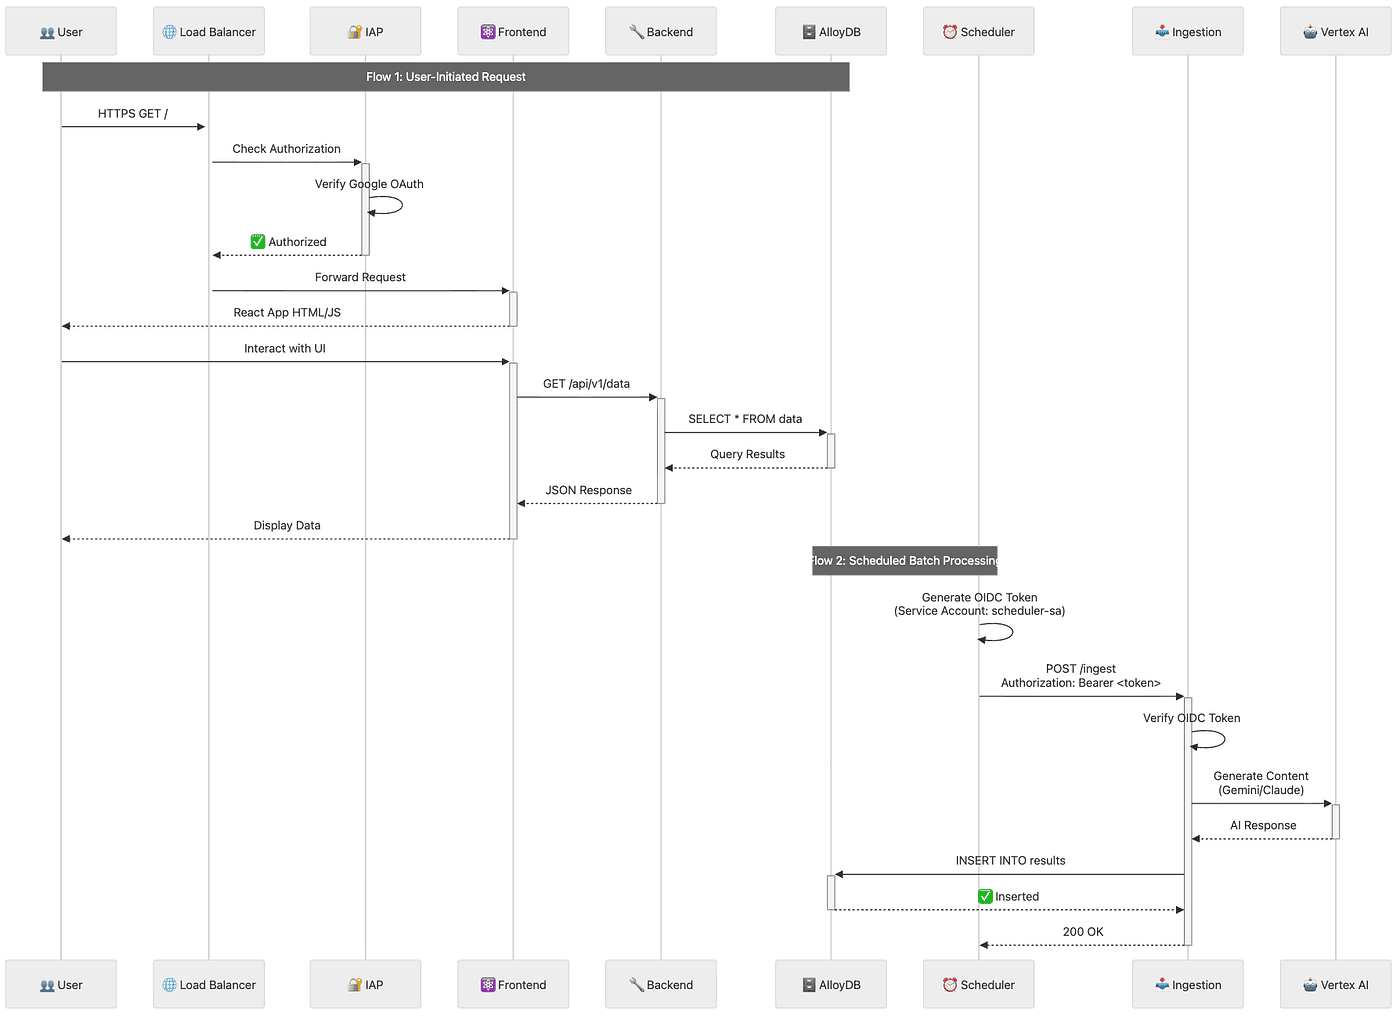
Diagram 3: Data Flow Sequence Diagram
Step-by-Step Flow Description
Flow 1: User-Initiated Request (Interactive)
Step 1: User Makes Initial Request
The user opens their browser and navigates to the application URL (e.g., https://example.com/). This sends an HTTPS GET request to the application.
Step 2: Load Balancer Receives Request
The Google Cloud Load Balancer receives the incoming HTTPS request and routes it to the appropriate backend service.
Step 3: IAP Authorization Check
Before serving any content, the Load Balancer forwards the request to Identity-Aware Proxy (IAP) to verify authorization.
Step 4: Google OAuth Verification
IAP verifies the user’s identity using Google OAuth. This checks if the user is authenticated and authorized to access the application.
Step 5: Authorization Approved
Once IAP confirms the user is authorized, it sends a success response back to the Load Balancer with an “Authorized” status.
Step 6: Request Forwarded to Frontend
The Load Balancer forwards the original request to the Frontend Cloud Run service.
Step 7: React Application Delivered
The Frontend service responds by serving the React application (HTML, JavaScript, CSS) to the user’s browser.
Step 8: User Interacts with UI
The user interacts with the React application in their browser, such as clicking a “View Data” button or navigating to a data page.
Step 9: Frontend Calls Backend API
The React application makes an API call to the Backend service (e.g., GET /api/v1/data) to fetch data needed for the user interface.
Step 10: Backend Queries Database
The Backend API service receives the request and executes a SQL query against AlloyDB (e.g., SELECT * FROM data) to retrieve the requested data.
Step 11: Database Returns Results
AlloyDB processes the query and returns the query results to the Backend service.
Step 12: Backend Sends JSON Response
The Backend service formats the database results as JSON and sends the response back to the Frontend application.
Step 13: Frontend Displays Data
The React application receives the JSON data and renders it in the user interface, displaying the data to the user in a formatted, interactive way.
Flow 2: Scheduled Batch Processing (Automated)
Step 1: Scheduler Generates OIDC Token
At the scheduled time (e.g., 2 AM UTC), Cloud Scheduler generates an OpenID Connect (OIDC) token using the scheduler service account (scheduler-sa). This token proves the scheduler’s identity.
Step 2: Scheduler Invokes Ingestion Service Cloud Scheduler makes a POST request to the Ingestion service’s private URL (e.g., POST /ingest) with the OIDC token in the Authorization header (Authorization: Bearer ).
Step 3: Ingestion Verifies Token
The Ingestion service receives the request and verifies the OIDC token to ensure it’s a legitimate request from an authorized service account with the roles/run.invoker permission.
Step 4: Ingestion Calls Vertex AI
Once authenticated, the Ingestion service begins processing the batch job. It sends data to Vertex AI for content generation or analysis, using either Gemini (for fast bulk processing) or Claude (for critical analysis).
Step 5: Vertex AI Returns Response
Vertex AI processes the data using the appropriate AI model and returns the generated content or analysis results to the Ingestion service.
Step 6: Ingestion Writes to Database
The Ingestion service takes the AI-processed results and inserts them into AlloyDB using an INSERT statement (e.g., INSERT INTO results).
Step 7: Database Confirms Insert
AlloyDB successfully stores the data and returns a confirmation response to the Ingestion service.
Step 8: Job Completion
The Ingestion service sends a 200 OK response back to Cloud Scheduler, indicating the batch job completed successfully. The processed data is now available in the database for users to access via the Frontend/Backend flow.
2.4 Security Boundaries
Understanding the security model proves critical. We have three distinct access patterns, each with different authentication and authorization:
Pattern 1: Public User Access (IAP-Protected):
- User → Google OAuth → IAP → Frontend ✅
- Requires authorization (user email in IAP allowed list)
- No API key, no password — just Google identity
Pattern 2: Public API Access (API Key):
- External client → Load Balancer → Backend API ✅
- Requires API key (no IAP for programmatic access)
- Useful for mobile apps, third-party integrations
Pattern 3: Internal Automation (OIDC):
- Scheduler → OIDC Token → Ingestion ✅
- Backend → Service Account Token → Ingestion ✅
- NOT accessible via Load Balancer ❌
- Pure identity-based authorization (no network rules)
These layers create defense in depth. If one layer fails, others protect the system.
Now that you understand what we’re building and why, let’s tackle the critical question: How do we organize the infrastructure code?
Part 3: Multi-Project Architecture
With the application architecture clear, let’s address a mistake that trips up most teams: the monolithic Pulumi project.
3.1 The Problem with Monolithic Projects
Picture this: You’ve built everything in one giant Pulumi project. Seems logical, right? One codebase, one source of truth, everything in sync.
But here’s what actually happens when you deploy a simple frontend change.
Scenario: You fixed a typo in the React frontend. One line of code. Should take 20 seconds to deploy.
What Happens with a Monolithic Project:
$ pulumi upPreviewing update (prod): Type Name Status pulumi:pulumi:Stack monolith-prod gcp:compute:Network vpc no change ← 😫 gcp:compute:GlobalAddress peering-ip no change ← 😫 gcp:servicenetworking:Conn... vpc-peering no change ← 😫 gcp:alloydb:Cluster db-cluster no change ← 😫 gcp:alloydb:Instance db-primary no change ← 😫 gcp:vpcaccess:Connector vpc-connector no change ← 😫 gcp:cloudrunv2:Service backend no change ← 😫 gcp:cloudrunv2:Service ingestion no change ← 😫 gcp:cloudrunv2:Service frontend updating ← Only this! └─ ... (500 more resources) ... ...Duration: 3m 42s ← 😫 Just to update a React component!
Ever waited 3 minutes for a deployment preview of resources you didn’t even touch? That’s the monolithic project tax.
The Problems Stack Up:
- 😫 Slow: Previews ALL resources every time (hundreds of API calls to GCP)
- 😫 Risky: One mistake can take down the database (blast radius is huge)
- 😫 Confusing: Unclear who owns what (is networking the platform team’s responsibility or the app team’s?)
- 😫 Blocking: Frontend team waits for database preview to complete (coupling slows everyone down)
3.2 The Solution: Multi-Project Architecture
Here’s the insight that changes everything: Separate by lifecycle velocity (how often things change), not by resource type.
Think about your infrastructure:
- How often do you change VPC configuration? Quarterly, maybe.
- How often do you change database specs? Rarely. 1–2 times per quarter.
- How often do you deploy frontend code? Daily. Multiple times per day.
Those resources should NOT be in the same Pulumi project.
Project Structure:
infrastructure/├── 01-networking/ # Changes: Quarterly│ ├── index.ts # VPC, subnets, VPC connector│ ├── Pulumi.yaml│ ├── Pulumi.dev.yaml│ ├── Pulumi.uat.yaml│ └── Pulumi.prod.yaml│├── 02-database/ # Changes: Rarely (1-2x per quarter)│ ├── index.ts # AlloyDB cluster + instance│ ├── Pulumi.yaml│ └── Pulumi.{env}.yaml│├── 03-cloud-run/ # Changes: WEEKLY or DAILY 🚀│ ├── index.ts # Frontend, Backend, Ingestion│ ├── components/│ │ └── SecureCloudRunService.ts│ ├── Pulumi.yaml│ └── Pulumi.{env}.yaml│└── 04-scheduler/ # Changes: Monthly ├── index.ts # Cloud Scheduler, Load Balancer, IAP ├── Pulumi.yaml └── Pulumi.{env}.yaml
Diagram 5: Multi-Project Pulumi Structure

The diagram above illustrates the modular infrastructure broken down into four independent Pulumi projects, each with a distinct deployment lifecycle and set of dependencies. Let’s walk through each project step by step:
Step 1: 01-networking (Foundation Layer)
What It Contains: VPC Network, Subnets, and VPC Access Connector
Change Frequency: Quarterly (infrastructure rarely changes)
Purpose: This project establishes the networking foundation for the entire system. It creates the VPC, allocates IP ranges, sets up VPC peering for AlloyDB, and provisions the VPC Access Connector that allows Cloud Run services to communicate with resources inside the VPC.
Exports:
vpcConnectorId- Used by Cloud Run services to connect to the VPCvpcNetworkId- Used by the database project for peeringvpcNetworkName- Reference to the network for other configurations
Dependencies: None (this is the foundation, deployed first)
Step 2: 02-database (Data Layer)
What It Contains: AlloyDB Cluster and Primary Instance
Change Frequency: Rarely (1–2 times per quarter)
Purpose: This project provisions the AlloyDB cluster and instance. It depends on the VPC peering established by the networking project, as AlloyDB requires private connectivity within the VPC.
Imports from 01-networking:
vpcNetworkId- Required for AlloyDB cluster creationvpcNetworkName- Used for peering configuration
Exports:
alloyDbClusterId- Database cluster identifierdbConnectionName- Connection string for Cloud Run servicesdbInstanceIp- Private IP address of the database instance
Dependencies: 01-networking (must deploy after networking is complete)
Step 3: 03-cloud-run (Application Layer)
What It Contains: Frontend, Backend, and Ingestion Cloud Run services
Change Frequency: Weekly or Daily (this is where most active development happens 🚀)
Purpose: This project deploys the application services. The Frontend serves the user interface, the Backend provides the API, and the Ingestion service handles batch processing. All three services need connectivity to both the VPC (via the connector) and the database.
Imports from 01-networking:
vpcConnectorId- Enables Cloud Run services to access VPC resources
Imports from 02-database:
alloyDbClusterId- Database cluster referencedbConnectionName- Database connection detailsdbInstanceIp- Database IP for configuration
Exports:
frontendUrl- Public URL of the frontend servicebackendUrl- API endpoint URLingestionUrl- Internal URL for the ingestion service (private)
Dependencies: 01-networking AND 02-database (must deploy after both are complete)
Step 4: 04-scheduler (Automation Layer)
What It Contains: Cloud Scheduler, Load Balancer, and Identity-Aware Proxy (IAP)
Change Frequency: Monthly (scheduling and access policies change occasionally)
Purpose: This project sets up the automation and security layers. Cloud Scheduler triggers batch jobs in the Ingestion service, the Load Balancer distributes traffic to the Backend API, and IAP protects the Frontend with Google OAuth.
Imports from 03-cloud-run:
frontendUrl- Configure IAP protection for the frontendbackendUrl- Configure Load Balancer routing to the backendingestionUrl- Configure Cloud Scheduler to invoke the ingestion service
Exports: None (this is the final layer, no downstream dependencies)
Dependencies: 03-cloud-run (must deploy after Cloud Run services are available)
Deployment Flow Summary
The diagram shows a clear dependency chain:
- 01-networking deploys first (no dependencies)
- 02-database deploys second (depends on networking)
- 03-cloud-run deploys third (depends on both networking and database)
- 04-scheduler deploys last (depends on cloud-run)
This modular approach means you can deploy a frontend change in 18 seconds without touching the database or networking layers. Each project has a clear boundary, explicit dependencies via StackReference, and an appropriate deployment frequency based on how often that layer changes.
3.3 Deployment Now vs. Before
Frontend Deploy with Multi-Project Architecture:
$ cd 03-cloud-run$ pulumi up
Previewing update (prod): Type Name Status pulumi:pulumi:Stack cloud-run-prod └─ custom:SecureCloudRun... frontend updatingDuration: 18s ← 🎉 12x faster!
When you see that 18-second deployment time, you’ll never go back to monolithic projects.
Performance Comparison Table:
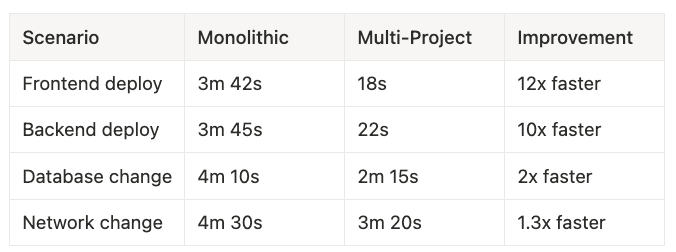
- Frontend deploy: Monolithic 3m 42s → Multi-Project 18s → 12x faster
- Backend deploy: Monolithic 3m 45s → Multi-Project 22s → 10x faster
- Database change: Monolithic 4m 10s → Multi-Project 2m 15s → 2x faster
- Network change: Monolithic 4m 30s → Multi-Project 3m 20s → 1.3x faster
3.4 Linking Projects with StackReference
“But wait,” you ask, “how do projects reference each other’s resources?”
Great question. That’s where StackReference comes in. Think of it like importing from another module in programming. Project A exports values, Project B imports them. Type-safe, environment-aware, automatic.
Provider (01-networking/index.ts):
import * as pulumi from "@pulumi/pulumi";import * as gcp from "@pulumi/gcp";// ... create VPC, connector, etc. ...// Export for other projects to consumeexport const vpcConnectorId = connector.id;export const vpcNetwork = network.selfLink;export const vpcConnectionName = vpcConnection.network;
Consumer (03-cloud-run/index.ts):
import * as pulumi from "@pulumi/pulumi";const stack = pulumi.getStack(); // "dev", "uat", or "prod"// Reference outputs from other projects (same environment)const networkStack = new pulumi.StackReference(`org/networking/${stack}`);const dbStack = new pulumi.StackReference(`org/database/${stack}`);// Type-safe access to exported outputsconst vpcConnectorId = networkStack.getOutput("vpcConnectorId");const alloyDbClusterId = dbStack.getOutput("alloyDbClusterId");// Use in resource definitionsconst backend = new SecureCloudRunService("backend", { vpcConnectorId: vpcConnectorId, // ← From networking project alloyDbClusterId: alloyDbClusterId, // ← From database project});
Key Insights:
getOutput()returnspulumi.Output<T>(not raw value—Pulumi's lazy evaluation)- References are environment-aware (dev → dev, prod → prod, automatically)
- Type-safe across project boundaries (TypeScript ensures the export exists)
3.5 Deployment Order & CI/CD
Order Matters:
1. 01-networking (run first, exports VPC info) ↓2. 02-database (depends on networking exports) ↓3. 03-cloud-run (depends on networking + database exports) ↓4. 04-scheduler (depends on cloud-run exports)
GitHub Actions (parallel where possible):
jobs: deploy-networking: # Runs first deploy-database: needs: deploy-networking # Waits for networking deploy-cloud-run: needs: [deploy-networking, deploy-database] # Waits for both deploy-scheduler: needs: deploy-cloud-run # Waits for cloud-run
With the project structure clear, let’s build the foundation: networking.
Part 4: Building the Networking Foundation
Networking comes first for a critical reason: AlloyDB requires VPC peering, and VPC peering has strict ordering requirements. Get this wrong, and you’ll spend an hour debugging “Network must be peered” errors.
4.1 The Ordered Dependency Chain
Critical Insight: Think of this like building a house. You need the foundation (VPC) before you can install plumbing (peering) before you can connect to city water (AlloyDB).
Provisioning Order (skip a step, nothing works):
1. VPC Network (the foundation) ↓2. Subnet for VPC Connector (/28 required—exactly 16 IPs) ↓3. Global Address (reserved IP range for peering) ↓4. VPC Service Networking Connection (peering—the critical dependency) ↓5. AlloyDB Cluster (depends on peering being active) ↓6. AlloyDB Instance (depends on peering being active) ↓7. VPC Access Connector (bridge for Cloud Run → VPC) ↓8. Cloud Run Services (use connector for VPC access)
⚠️ Common Mistake: Creating AlloyDB before VPC peering completes. You’ll get cryptic errors and waste time. Always use dependsOn for the peering connection.
4.2 Networking Project (01-networking/index.ts)
import * as pulumi from "@pulumi/pulumi";import * as gcp from "@pulumi/gcp";const config = new pulumi.Config("networking");const stack = pulumi.getStack();// 1. VPC Networkconst network = new gcp.compute.Network("vpc", { name: `main-vpc-${stack}`, autoCreateSubnetworks: false, description: `Main VPC for ${stack} environment`,});// 2. Subnet for VPC Connector (MUST be /28 - 16 IPs)const connectorSubnet = new gcp.compute.Subnetwork("vpc-connector-subnet", { name: `vpc-connector-subnet-${stack}`, ipCidrRange: "10.8.0.0/28", // ← MUST be /28 region: "us-central1", network: network.id, description: "Dedicated subnet for VPC Access Connector",});// 3. Reserve IP Range for AlloyDB Peeringconst privateIpAlloc = new gcp.compute.GlobalAddress("alloydb-peering", { name: `alloydb-peering-${stack}`, addressType: "INTERNAL", purpose: "VPC_PEERING", // ← CRITICAL prefixLength: 16, network: network.id, description: "IP range for AlloyDB VPC peering",});// 4. VPC Service Networking Connection (Peering)const vpcConnection = new gcp.servicenetworking.Connection("peering", { network: network.id, service: "servicenetworking.googleapis.com", reservedPeeringRanges: [privateIpAlloc.name],});// 5. VPC Access Connector (Bridge for Cloud Run → VPC)const connector = new gcp.vpcaccess.Connector("connector", { name: `serverless-connector-${stack}`, region: "us-central1", subnet: { name: connectorSubnet.name, }, machineType: stack === "prod" ? "e2-standard-4" : "e2-micro", minInstances: stack === "prod" ? 3 : 2, maxInstances: stack === "prod" ? 100 : 10,});// Export for other projectsexport const vpcConnectorId = connector.id;export const vpcNetworkId = network.id;export const vpcNetworkName = network.name;export const vpcConnectionName = vpcConnection.network;
Key Insights:
- **VPC Connector subnet MUST be **
**/28**(16 IPs)—this is a GCP requirement, not negotiable - **AlloyDB peering requires **
**purpose: "VPC_PEERING"**—wrong purpose, it won't work **vpcConnection**** must complete before AlloyDB creation**—this is the critical dependency
With the VPC peering ready, we can build the database layer.
Part 5: Building the Database Layer
Now that VPC peering is established, we can create AlloyDB. Remember: AlloyDB cannot exist without an active VPC peering connection. That’s why we export vpcConnectionName from the networking project.
5.1 Database Project (02-database/index.ts)
import * as pulumi from "@pulumi/pulumi";import * as gcp from "@pulumi/gcp";const config = new pulumi.Config("database");const stack = pulumi.getStack();// Import from networking projectconst networkStack = new pulumi.StackReference(`org/networking/${stack}`);const vpcNetworkId = networkStack.getOutput("vpcNetworkId");const vpcConnectionName = networkStack.getOutput("vpcConnectionName");// Environment-specific configurationconst cpuCount = config.getNumber("cpuCount") || 2;const backupEnabled = config.getBoolean("backupEnabled") || false;const backupRetentionDays = config.getNumber("backupRetentionDays") || 7;const highAvailability = config.getBoolean("highAvailability") || false;// AlloyDB Clusterconst cluster = new gcp.alloydb.Cluster("cluster", { clusterId: `prod-cluster-${stack}`, location: "us-central1", networkConfig: { network: vpcNetworkId, }, automatedBackupPolicy: backupEnabled ? { enabled: true, backupWindow: "3h", quantityBasedRetention: { count: backupRetentionDays, }, weeklySchedule: { daysOfWeeks: ["SUNDAY"], startTimes: [{ hours: 2, minutes: 0 }], }, } : undefined, continuousBackupConfig: backupEnabled ? { enabled: true, recoveryWindowDays: 14, } : undefined,}, { dependsOn: [vpcConnectionName], // ← CRITICAL: Wait for peering!});// AlloyDB Primary Instanceconst instance = new gcp.alloydb.Instance("primary", { cluster: cluster.name, instanceId: `primary-${stack}`, instanceType: "PRIMARY", machineConfig: { cpuCount: cpuCount, }, availabilityType: highAvailability ? "REGIONAL" : "ZONAL", databaseFlags: { "max_connections": "1000", "work_mem": "4MB", },}, { dependsOn: [vpcConnectionName], // ← CRITICAL: Also wait for peering!});// Export for cloud-run projectexport const alloyDbClusterId = cluster.name;export const dbConnectionName = pulumi.interpolate`${cluster.name}:us-central1:${instance.instanceId}`;export const dbInst
anceIp = instance.ipAddress;
Configuration Files:
Pulumi.dev.yaml:
config: gcp:project: my-project-dev database:cpuCount: 2 database:backupEnabled: false database:highAvailability: false
Pulumi.prod.yaml:
config: gcp:project: my-project-prod database:cpuCount: 4 database:backupEnabled: true database:backupRetentionDays: 30 database:highAvailability: true
With the database ready, we now need to deploy our services efficiently. That’s where ComponentResource shines.
Part 6: Building Cloud Run Services with ComponentResource
You could define each Cloud Run service manually with 100+ lines of boilerplate. Copy-paste it three times for Frontend, Backend, and Ingestion. Hope you don’t make a mistake.
Or you could do it the smart way: ComponentResource.
6.1 The Reusable Component Pattern
Think of ComponentResource as creating your own Lego brick. You define it once with all the best practices baked in (service account, IAM bindings, VPC connector, secrets). Then you use it 100 times. Update the brick, update all 100 uses instantly.
components/SecureCloudRunService.ts:
import * as pulumi from "@pulumi/pulumi";import * as gcp from "@pulumi/gcp";export interface SecureCloudRunServiceArgs { location: pulumi.Input<string>; imageName: pulumi.Input<string>; vpcConnectorId: pulumi.Input<string>; alloyDbClusterId?: pulumi.Input<string>; // Optional secretAccessorIds?: string[]; // Optional envs?: pulumi.Input<{ name: string; value: string }[]>; ingress?: "INGRESS_TRAFFIC_ALL" | "INGRESS_TRAFFIC_INTERNAL_ONLY"; memory?: string; cpu?: string; minInstances?: number; maxInstances?: number;}export class SecureCloudRunService extends pulumi.ComponentResource { public readonly service: gcp.cloudrunv2.Service; public readonly serviceAccount: gcp.serviceaccount.Account; public readonly url: pulumi.Output<string>; constructor( name: string, args: SecureCloudRunServiceArgs, opts?: pulumi.ComponentResourceOptions ) { super("custom:gcp:SecureCloudRunService", name, args, opts); // 1. Dedicated Service Account (least privilege) this.serviceAccount = new gcp.serviceaccount.Account(`${name}-sa`, { accountId: `${name}-sa`, displayName: `Service Account for ${name}`, }, { parent: this }); const dependencies: pulumi.Resource[] = []; // 2. Grant AlloyDB access (if needed) if (args.alloyDbClusterId) { const alloydbBinding = new gcp.alloydb.ClusterIamBinding( `${name}-alloydb`, { cluster: args.alloyDbClusterId, role: "roles/alloydb.client", members: [pulumi.interpolate`serviceAccount:${this.serviceAccount.email}`], location: args.location, }, { parent: this } ); dependencies.push(alloydbBinding); } // 3. Grant Secret Manager access (if needed) if (args.secretAccessorIds) { const secretBindings = args.secretAccessorIds.map((secretId, i) => new gcp.secretmanager.SecretIamMember(`${name}-secret-${i}`, { secretId: secretId, role: "roles/secretmanager.secretAccessor", member: pulumi.interpolate`serviceAccount:${this.serviceAccount.email}`, }, { parent: this }) ); dependencies.push(...secretBindings); } // 4. Create Cloud Run Service this.service = new gcp.cloudrunv2.Service(`${name}-service`, { location: args.location, ingress: args.ingress || "INGRESS_TRAFFIC_ALL", template: { serviceAccount: this.serviceAccount.email, scaling: { minInstanceCount: args.minInstances || 0, maxInstanceCount: args.maxInstances || 10, }, vpcAccess: { connector: args.vpcConnectorId, egress: "ALL_TRAFFIC", }, containers: [{ image: args.imageName, envs: args.envs || [], resources: { limits: { memory: args.memory || "512Mi", cpu: args.cpu || "1", }, }, }], }, }, { parent: this, dependsOn: dependencies }); this.url = this.service.uri; this.registerOutputs({ service: this.service, serviceAccount: this.serviceAccount, url: this.url, }); }}
6.2 Cloud Run Project (03-cloud-run/index.ts)
Now watch the magic. This component turned 300+ lines of boilerplate into 60 lines of clean, readable code:
import * as pulumi from "@pulumi/pulumi";import { SecureCloudRunService } from "./components/SecureCloudRunService";const stack = pulumi.getStack();const config = new pulumi.Config("cloud-run");// Import from other projectsconst networkStack = new pulumi.StackReference(`org/networking/${stack}`);const dbStack = new pulumi.StackReference(`org/database/${stack}`);const vpcConnectorId = networkStack.getOutput("vpcConnectorId");const alloyDbClusterId = dbStack.getOutput("alloyDbClusterId");// Environment-specific configconst minInstances = config.getNumber("minInstances") || 0;const memory = config.get("memory") || "512Mi";const cpu = config.get("cpu") || "1";// Frontend Service (IAP-protected, public)const frontend = new SecureCloudRunService("frontend", { location: "us-central1", imageName: "gcr.io/my-project/frontend:latest", vpcConnectorId: vpcConnectorId, minInstances: minInstances, memory: memory, cpu: cpu, ingress: "INGRESS_TRAFFIC_ALL", // Public (IAP via Load Balancer)});// Backend Service (Public API, database access)const backend = new SecureCloudRunService("backend", { location: "us-central1", imageName: "gcr.io/my-project/backend:latest", vpcConnectorId: vpcConnectorId, alloyDbClusterId: alloyDbClusterId, // ← Backend needs DB secretAccessorIds: ["db-password"], minInstances: minInstances, memory: "1Gi", cpu: "2", ingress: "INGRESS_TRAFFIC_ALL", // Public API envs: [ { name: "DB_NAME", value: "production" }, { name: "API_VERSION", value: "v1" }, ],});// Ingestion Service (PRIVATE, internal-only)const ingestion = new SecureCloudRunService("ingestion", { location: "us-central1", imageName: "gcr.io/my-project/ingestion:latest", vpcConnectorId: vpcConnectorId, alloyDbClusterId: alloyDbClusterId, secretAccessorIds: ["db-password", "vertex-ai-key"], ingress: "INGRESS_TRAFFIC_INTERNAL_ONLY", // ← Private! memory: "2Gi", cpu: "2", envs: [ { name: "VERTEX_AI_REGION", value: "us-central1" }, { name: "ENABLE_GEMINI", value: "true" }, { name: "ENABLE_CLAUDE", value: "true" }, ],});// Grant Backend permission to invoke Ingestionnew gcp.cloudrun.IamMember("backend-invoke-ingestion", { service: ingestion.service.name, role: "roles/run.invoker", member: pulumi.interpolate`serviceAccount:${backend.serviceAccount.email}`, location: "us-central1",});// Export URLsexport const frontendUrl = frontend.url;export const backendUrl = backend.url;export const ingestionUrl = ingestion.url; // Private URL (internal use only)export const backendServiceAccountEmail = backend.serviceAccount.email;
The Benefits Are Massive:
- ✅ Every service gets dedicated SA (automatic — no manual work)
- ✅ Least privilege (only requested permissions granted)
- ✅ Consistent naming (automatic — no typos)
- ✅ No copy-paste errors (DRY principle enforced)
- ✅ Update 100 services by changing component once (this saved us when we changed IAM strategy)
But here’s the critical mistake most teams make with Pulumi — and it costs them hours.
Part 7: The Critical Distinction — When to Run Pulumi
Ever waited 3 minutes for a deployment, watching Pulumi check 200 resources you didn’t touch? Let’s talk about the performance trap most teams fall into.
7.1 The Performance Problem
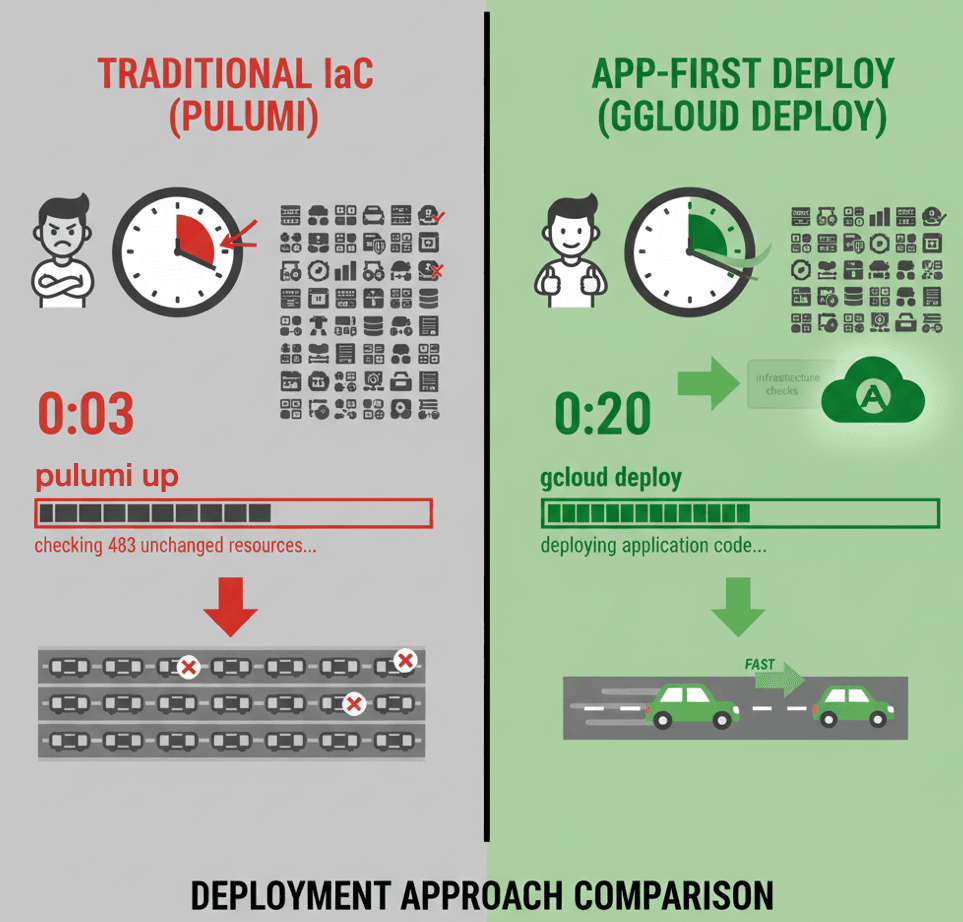
Traditional Approach (Run Pulumi on every deploy):
Code change → Build Docker → Push image → pulumi up → Wait 3 minutes
The Issue: Pulumi previews ALL resources even when only application code changed. It checks the VPC (no change), the database (no change), the load balancer (no change), and 200 other resources that have nothing to do with your React component update.
This wastes time. Worse, it creates a psychological barrier to deploying frequently.
7.2 The Solution: Conditional Deployment
What if I told you 90% of your deployments don’t need Pulumi at all?
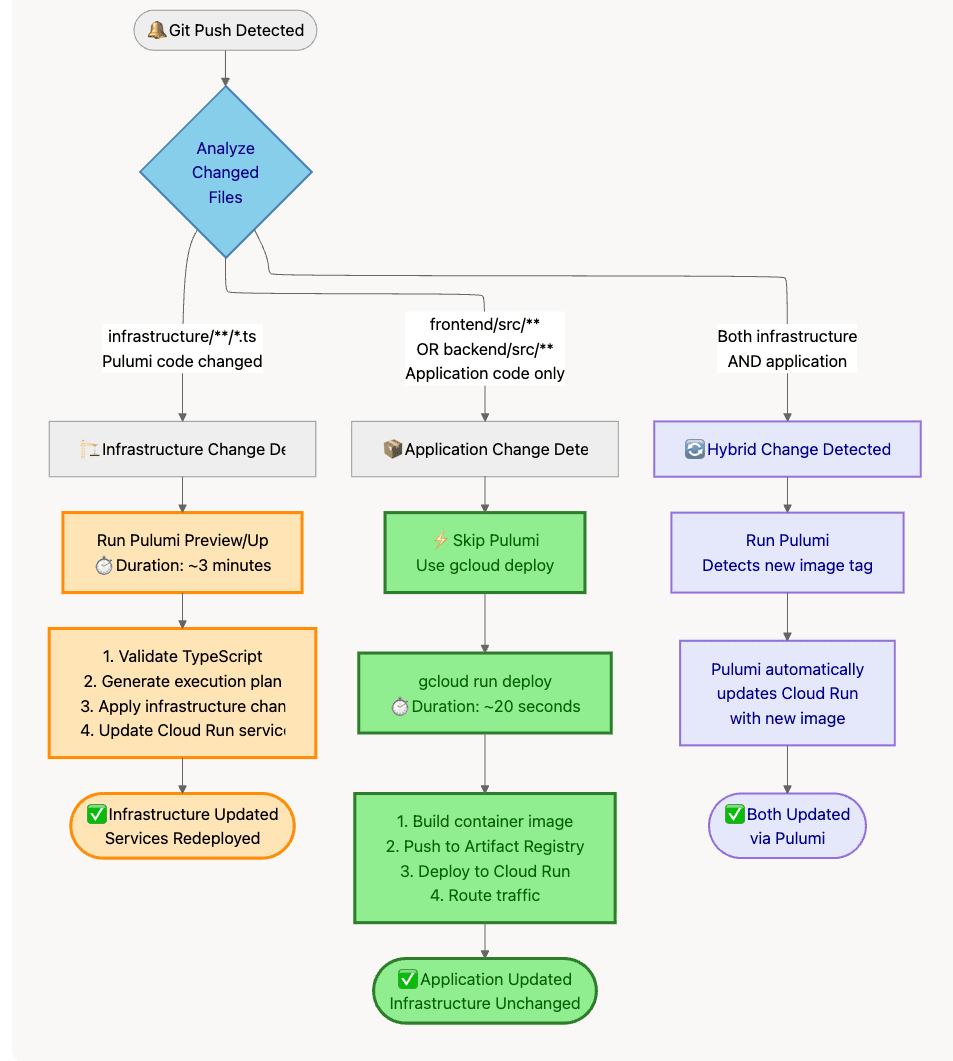
Decision Tree:
What Changed?├─ Infrastructure code (Pulumi TypeScript files)?│ └─ YES → Run `pulumi up`│ Examples: New service account, IAM binding, VPC config│├─ Application code only (Dockerfile, src/)?│ └─ YES → Run `gcloud run deploy` directly│ Examples: Bug fix, new feature, UI update│└─ Both? └─ Run `pulumi up` (detects image change)
Diagram 8: CI/CD Deployment Decision Tree
7.3 GitHub Actions Implementation
Path-Based Change Detection:
# .github/workflows/deploy.ymlname: Deploy to GCPon: push: branches: [main, develop]jobs: detect-changes: runs-on: ubuntu-latest outputs: infra-changed: ${{ steps.changes.outputs.infra }} app-changed: ${{ steps.changes.outputs.app }} steps: - uses: actions/checkout@v4 - uses: dorny/paths-filter@v2 id: changes with: filters: | infra: - 'infrastructure/**/*.ts' - 'infrastructure/**/Pulumi*.yaml' app: - 'frontend/src/**' - 'frontend/Dockerfile' - 'backend/src/**' - 'backend/Dockerfile' deploy-pulumi: needs: detect-changes if: needs.detect-changes.outputs.infra-changed == 'true' runs-on: ubuntu-latest steps: - uses: actions/checkout@v4 - name: Deploy Infrastructure uses: pulumi/actions@v6 with: command: up stack-name: org/cloud-run/prod work-dir: infrastructure/03-cloud-run env: PULUMI_ACCESS_TOKEN: ${{ secrets.PULUMI_ACCESS_TOKEN }} deploy-app-direct: needs: detect-changes if: | needs.detect-changes.outputs.infra-changed == 'false' && needs.detect-changes.outputs.app-changed == 'true' runs-on: ubuntu-latest steps: - uses: actions/checkout@v4 - name: Build Frontend Image run: | docker build -t gcr.io/my-project/frontend:${{ github.sha }} ./frontend docker push gcr.io/my-project/frontend:${{ github.sha }} - name: Deploy to Cloud Run (Direct) run: | gcloud run deploy frontend \ --image gcr.io/my-project/frontend:${{ github.sha }} \ --region us-central1 \ --platform managed
Performance Results:
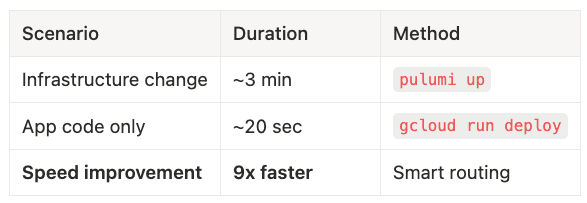
- Infrastructure change: ~3 min using
pulumi up - App code only: ~20 sec using
gcloud run deploy - Speed improvement: 9x faster with smart routing
The first time you deploy in 20 seconds instead of 3 minutes feels like magic.
With speed optimized, let’s lock down security.
Part 8: Zero-Trust Security Patterns
Security isn’t a feature you add at the end. It’s baked into every decision from the start. Let’s walk through three critical patterns that protect production systems.
8.1 Pattern 1: Secret Manager (NOT Pulumi Config)
Here’s a mistake that looks innocent but creates a massive security hole. Let’s see why storing runtime secrets in Pulumi config proves dangerous.
The Anti-Pattern (Pulumi Config for Runtime Secrets):
// ❌ WRONG: CI/CD runner sees plaintext passwordconst config = new pulumi.Config();const dbPassword = config.requireSecret("db-password");new gcp.cloudrunv2.Service("backend", { template: { containers: [{ envs: [ { name: "DB_PASSWORD", value: dbPassword }, // Decrypted in CI/CD! ], }], },});
What’s Wrong?
What happens if your GitHub Actions runner gets compromised? The attacker has access to production database credentials. Game over.
The Problems:
- CI/CD runner has access to plaintext password (violates least privilege)
- If CI/CD compromised, attacker gets prod credentials (single point of failure)
- Password rotation requires
pulumi up(slow, couples unrelated changes) - Pulumi state might contain plaintext (depending on backend)
The Gold Standard (GCP Secret Manager):
Step 1: Admin Creates Secret (Out-of-band, high privileges):
# Run once by admin with elevated privileges$ gcloud secrets create db-password --replication-policy="automatic"$ echo -n "ActualProductionPassword123!" | gcloud secrets versions add db-password --data-file=-
Step 2: Pulumi Manages Permissions (Never sees value):
// Get reference to secret (not the value!)const dbPasswordSecret = gcp.secretmanager.getSecret({ secretId: "db-password",});// Grant Backend service account accessnew gcp.secretmanager.SecretIamMember("backend-secret-access", { secretId: dbPasswordSecret.id, role: "roles/secretmanager.secretAccessor", member: pulumi.interpolate`serviceAccount:${backendSA.email}`,});// Mount secret as volume in Cloud Runnew gcp.cloudrunv2.Service("backend", { template: { containers: [{ volumeMounts: [{ name: "db-pass-vol", mountPath: "/secrets/db", }], }], volumes: [{ name: "db-pass-vol", secret: { secret: "db-password", // Reference by NAME only items: [{ version: "latest", path: "password" }], }, }], },});
Step 3: Application Reads at Runtime:
# backend/app/core/database.pywith open("/secrets/db/password", "r") as f: db_password = f.read().strip()# Use password to connect to AlloyDBengine = create_engine(f"postgresql://user:{db_password}@host/db")
Security Wins:
- ✅ CI/CD never sees plaintext (only manages permissions)
- ✅ Pulumi state doesn’t contain plaintext (only references)
- ✅ Password rotation is instant (10-second gcloud command, no deployment)
- ✅ Audit trail in Secret Manager (who accessed when)
- ✅ Principle of least privilege enforced (only backend SA can read)
Password rotation used to require a deployment. Now it’s a 10-second gcloud command.
8.2 Pattern 2: OIDC Authentication for Cloud Scheduler
Why OIDC vs Basic Auth?
Think of basic auth like giving someone your house key forever. OIDC gives them a temporary all-access badge that expires in an hour and leaves an audit trail.
The Advantages:
- ✅ No hardcoded passwords (identity-based)
- ✅ Short-lived tokens (automatic rotation every hour)
- ✅ Cryptographically verifiable (can’t be forged)
- ✅ Audit trail (GCP logs every invocation with identity)
Implementation:
// 1. Create scheduler service accountconst schedulerSA = new gcp.serviceaccount.Account("scheduler-sa", { accountId: "cloud-scheduler-sa",});// 2. Grant invoker permission to Ingestion serviceconst invokerBinding = new gcp.cloudrun.IamMember("ingestion-invoker", { service: "ingestion-service", role: "roles/run.invoker", member: pulumi.interpolate`serviceAccount:${schedulerSA.email}`,});// 3. Create job with OIDC tokenconst job = new gcp.cloudscheduler.Job("nightly-job", { schedule: "0 2 * * *", // 2 AM daily httpTarget: { uri: ingestionUrl, httpMethod: "POST", oidcToken: { serviceAccountEmail: schedulerSA.email, // ← OIDC magic }, },});
What Happens at Runtime:
- Cloud Scheduler requests OIDC token from GCP (using scheduler-sa identity)
- GCP generates signed JWT token valid for 1 hour
- Scheduler sends POST with
Authorization: Bearer <token>header - Ingestion service validates token (GCP handles this automatically)
- If valid and scheduler-sa has
roles/run.invoker, request succeeds
Security Advantages:
- Ingestion service stays PRIVATE (not exposed via Load Balancer)
- No network-based security needed (no firewall rules, no IP allowlists)
- Identity-based authorization (verifiable cryptographic proof)
- Automatic token rotation (no manual key management)
8.3 Pattern 3: Workload Identity Federation (Keyless CI/CD)
The Problem with Service Account Keys:
Service account keys are long-lived credentials stored in GitHub secrets. If GitHub is compromised, attacker has GCP access. Manual rotation required. Broad permissions (single SA key for all operations).
The Solution: Workload Identity Federation (WIF) — Zero static secrets.
Bootstrap Pattern (One-time setup):
// 00-bootstrap/index.ts (run ONCE from local machine)const githubOrg = "my-org";const githubRepo = "my-app-repo";// 1. Create WIF Poolconst pool = new gcp.iam.WorkloadIdentityPool("github-pool", { workloadIdentityPoolId: "github-actions-pool", displayName: "GitHub Actions WIF Pool",}, { protect: true });// 2. Create OIDC Provider (trust GitHub)const provider = new gcp.iam.WorkloadIdentityPoolProvider("github-provider", { workloadIdentityPoolId: pool.workloadIdentityPoolId, workloadIdentityPoolProviderId: "github-oidc-provider", oidc: { issuerUri: "https://token.actions.githubusercontent.com", }, attributeMapping: { "google.subject": "assertion.sub", "attribute.repository": "assertion.repository", }, // SECURITY: Restrict to specific repo attributeCondition: pulumi.interpolate`attribute.repository == "${githubOrg}/${githubRepo}"`,}, { protect: true });// 3. Create CI/CD Service Accountconst cicdSA = new gcp.serviceaccount.Account("cicd-sa", { accountId: "github-actions-cicd",});// 4. Allow WIF to impersonate SAnew gcp.serviceaccount.IAMBinding("cicd-wif-binding", { serviceAccountId: cicdSA.name, role: "roles/iam.workloadIdentityUser", members: [ pulumi.interpolate`principalSet://iam.googleapis.com/${pool.name}/attribute.repository/${githubOrg}/${githubRepo}`, ],});// Export for GitHub secretsexport const workloadIdentityProvider = provider.name;export const cicdServiceAccountEmail = cicdSA.email;
GitHub Actions Usage (Dual-OIDC):
# .github/workflows/deploy.ymlpermissions: contents: read id-token: write # ← CRITICAL for OIDCjobs: deploy: runs-on: ubuntu-latest steps: - uses: actions/checkout@v4 # 1. Authenticate to GCP (Dual-OIDC Part 1) - name: Authenticate to GCP uses: google-github-actions/[email protected] with: workload_identity_provider: ${{ secrets.WIF_PROVIDER }} service_account: ${{ secrets.WIF_SERVICE_ACCOUNT }} # 2. Authenticate to Pulumi Cloud (Dual-OIDC Part 2) - name: Authenticate to Pulumi uses: pulumi/auth-actions@v1 with: organization: 'my-org' requested-token-type: 'urn:pulumi:token-type:access_token:organization' # 3. Deploy (uses BOTH tokens) - name: Deploy uses: pulumi/actions@v6 with: command: up stack-name: 'my-org/cloud-run/prod'
What Just Happened (Dual-OIDC Explained):
GitHub generates ONE OIDC token for this workflow run. google-github-actions/auth trades it for GCP access. pulumi/auth-actions trades the SAME token for Pulumi access. Result: Authenticated to TWO systems with ZERO static secrets.
1. GitHub generates 1 OIDC token for this workflow run2. google-github-actions/auth exchanges token → GCP access token3. pulumi/auth-actions exchanges SAME token → Pulumi access token4. Result: Authenticated to TWO systems with ZERO static secrets
Now let’s tie everything together for production operations.
Part 9: Production Operations & Conclusion
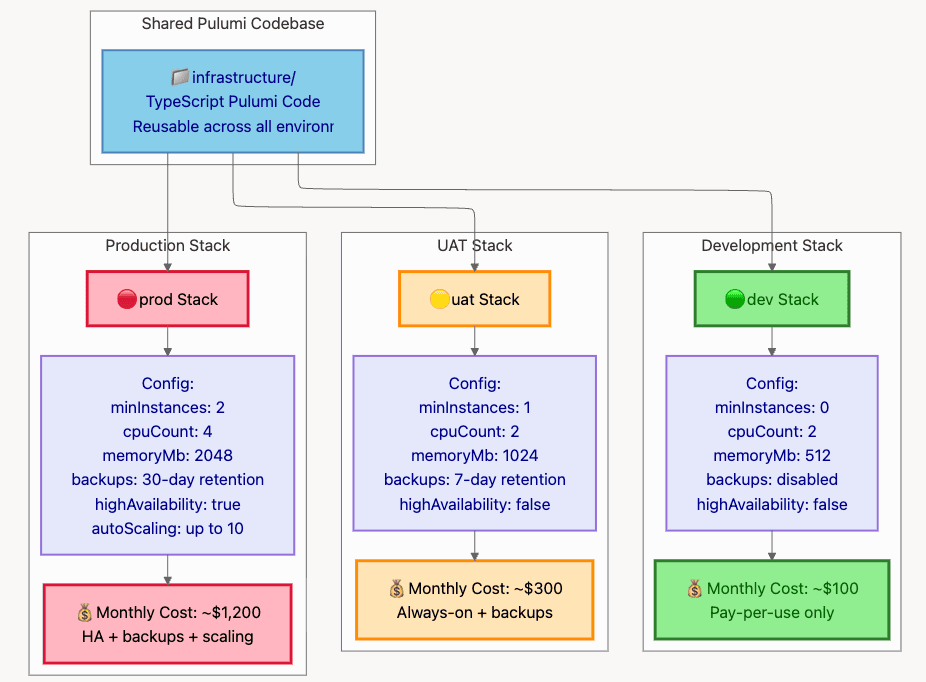
You’ve built the infrastructure. You’ve optimized deployments. You’ve locked down security. Let’s discuss running this in production across multiple environments.
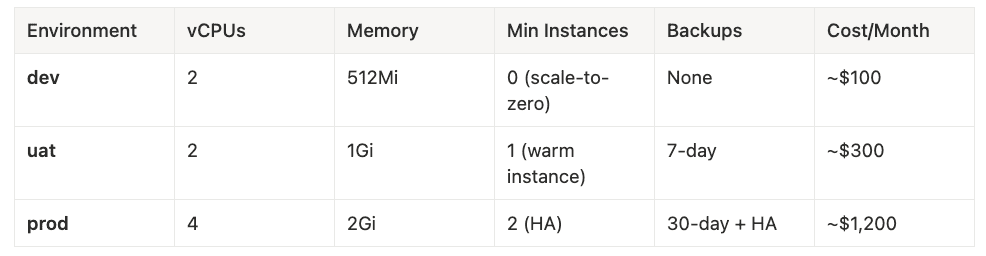
- dev: 2 vCPUs, 512Mi memory, 0 min instances (scale-to-zero), no backups, ~$100/month
- uat: 2 vCPUs, 1Gi memory, 1 min instance (warm instance), 7-day backups, ~$300/month
- prod: 4 vCPUs, 2Gi memory, 2 min instances (HA), 30-day backups + HA, ~$1,200/month
Diagram 9: Multi-Environment Stack Layout
9.2 Common Pitfalls & Solutions
Pitfall 1: Running Pulumi on Every Deploy
Problem: Wastes 2–3 minutes checking unchanged resources.
Solution: Path-based filtering in CI/CD. Only run on infrastructure changes.
Detection: If deployments take more than 2 minutes for app changes, you’re doing it wrong.
Pitfall 2: Hardcoding Secrets in Pulumi Config
Problem: CI/CD runner sees plaintext, violates least privilege.
Solution: Use GCP Secret Manager for ALL runtime secrets.
Detection: If you use pulumi config set --secret for database passwords, stop immediately.
Pitfall 3: Monolithic Pulumi Project
Problem: Frontend deploys require database state preview (slow, risky).
Solution: Multi-project structure with StackReference.
Detection: If pulumi preview takes more than 30 seconds, split into projects.
Pitfall 4: Missing dependsOn for AlloyDB
Problem: AlloyDB creation fails because VPC peering not ready.
Solution: Always use dependsOn: [vpcConnection] for cluster and instance.
Detection: Error message: “Network must be peered”
Pitfall 5: Exposing Ingestion via Load Balancer
Problem: Private service becomes public attack surface.
Solution: Use INGRESS_TRAFFIC_INTERNAL_ONLY, no Load Balancer route.
Detection: If Ingestion service has a public URL, fix immediately.
9.3 Performance Benchmarks
Deployment Times (Real-World Results):
- Monolithic Pulumi (all resources): 3m 45s
- Multi-project (cloud-run only): 32s
- Direct gcloud deploy: 18s
- Speed improvement: 12x faster (monolith → gcloud)
9.4 Conclusion: The Paradigm Shift
Your cloud infrastructure deserves the same level of quality, review process, and collaborative spirit as your flagship application.
When you start treating infrastructure like real software, you unlock:
Velocity: 10x faster deployments through smart routing (app changes bypass Pulumi entirely).
Security: Zero-trust patterns baked in from the start (Secret Manager, OIDC, WIF, IAP).
Maintainability: Reusable components, type safety, IDE support (update 100 services by changing one component).
Confidence: Test, review, and version infrastructure like application code (no more deploy anxiety).
The Core Principles:
- Don’t run Pulumi unless infrastructure changes — 10x faster deployments
- Multi-project architecture — Isolate by change frequency, not resource type
- ComponentResource pattern — Reusable, best-practice building blocks
- Zero-trust security — Secret Manager, OIDC, WIF, IAP
- Same codebase, multiple environments — Dev/UAT/Prod from one source
“Infrastructure isn’t something you configure anymore. It’s something youbuildwith the same care as your application code. When you make that shift, you gain a level of confidence and velocity that wasn’t possible before.”
Shifting from configuring infrastructure to building it has fundamentally changed how my teams operate, giving us a level of confidence and speed we didn’t think was possible. I hope these patterns help you achieve the same.
What’s the first principle from this guide you’re going to apply to your own projects? Let me know in the comments below!
About This Article: This comprehensive guide builds on real production patterns used to deploy enterprise applications on Google Cloud Platform. All code examples are tested and validated against:
- Pulumi CLI: 3.206.0
- @pulumi/gcp: 8.41.1 (November 2025)
- Node.js: 20.11.1 (LTS)
- TypeScript: 5.5.2
- Google Cloud SDK: 469.0.0
Meta Description for SEO: Tired of cloud chaos? Learn to build production-grade GCP infrastructure using Pulumi and TypeScript. This comprehensive guide covers architecture, security, keyless CI/CD, and a 10x deployment speed hack.
Next Steps:
- Pulumi GCP Getting Started
- AlloyDB Documentation
- Workload Identity Federation
- Cloud Run Best Practices
About the Author
I am Rick Hightower, a seasoned professional with experience as an executive and data engineer at a Fortune 100 financial technology organization. My work there involved developing advanced Machine Learning and AI solutions designed to enhance customer experience metrics. I maintain a balanced interest in both theoretical AI concepts and their practical applications in enterprise environments.
My professional credentials include TensorFlow certification and completion of Stanford’s Machine Learning Specialization program, both of which have significantly contributed to my expertise in this field. I value the integration of academic knowledge with practical implementation. My professional experience encompasses work with supervised learning methodologies, neural network architectures, and various AI technologies, which I have applied to develop enterprise-grade solutions that deliver measurable business value.
Connect with Richard on LinkedIn or Medium for additional insights on enterprise AI implementation.
Community Extensions & Resources
The Claude Code community has developed powerful extensions that enhance its capabilities. Here are some valuable resources from Spillwave Solutions:
Integration Skills
- Notion Uploader/Downloader: Seamlessly upload and download Markdown content and images to Notion for documentation workflows
- Confluence Skill: Upload and download Markdown content and images to Confluence for enterprise documentation
- JIRA Integration: Create and read JIRA tickets, including handling special required fields
Advanced Development Agents
- Architect Agent: Puts Claude Code into Architect Mode to manage multiple projects and delegate to other Claude Code instances running as specialized code agents
- Project Memory: Store key decisions, recurring bugs, tickets, and critical facts to maintain vital context throughout software development
- Claude Agents Collection: A comprehensive collection of 15 specialized agents for various development tasks
Visualization & Design Tools
- Design Doc Mermaid: Specialized skill for creating professional Mermaid diagrams for architecture documentation
- PlantUML Skill: Generate PlantUML diagrams from source code, extract diagrams from Markdown, and create image-linked documentation
- Image Generation: Uses Gemini Banana to generate images for documentation and design work
AI Model Integration
- Gemini Skill: Delegate specific tasks to Google’s Gemini AI for multi-model collaboration
**Explore more at **Spillwave Solutions — specialists in bespoke software development and AI-powered automation.
Tags for LinkedIn/Medium:
#GCP #Pulumi #InfrastructureAsCode #DevOps #TypeScript #CloudNative #PlatformEngineering #CloudRun #ServerlessArchitecture #GitHubActions