The Claude Code Daily Handbook: Strategic AI Collaboration for Modern Developers
A Strategic Guide for Professional Developers (November 2025)
Originally published on Medium.
 Using Claude Code Planning Mode, Ultrathink, Agents, and more. Get the most out of Claude Code
A Strategic Guide for Professional Developers (November 2025)
Why This Claude Code Guide Exists: A Personal Note
This guide serves a dual purpose. Like many tools we use daily, Claude Code's power lies in its depth. But that depth can be easy to forget in the rush of everyday development.
I created this comprehensive reference as much for myself as for you. After months of building custom agents, skills, commands, and hooks, I realized something: the basics matter most. The advanced features are powerful, but they're built on fundamental workflows that are easy to overlook when you're moving fast.
Here's the reality: I use Claude Code every single day. It's become integral to my development process. But even as someone who's invested significant time customizing it, I find myself occasionally forgetting optimal patterns or reverting to less efficient habits.
The paradox of powerful tools: The more features they have, the easier it is to miss the core patterns that unlock their actual value.
This guide is my answer to that challenge. It's a resource I can return to when I need to recalibrate, remember why certain modes exist, or optimize my workflow. If you're reading this, you're likely in a similar position; using Claude Code regularly but wanting to squeeze more value from every session.
What you'll find here: Not just feature documentation, but the why behind each capability. The strategic thinking that transforms Claude Code from a helpful assistant into a force multiplier for your development work.
Let's dive into making every coding session with Claude more intentional and effective.
The development landscape has shifted. AI coding assistants are no longer novelties. They're production tools. But here's what most developers miss: Claude Code isn't just another autocomplete engine or chat interface. It's a true development agent that reads your codebase, writes production code, executes tests, and commits changes under your intelligent supervision.
This guide reveals the advanced workflows, configuration patterns, and integration strategies that separate casual users from masters. You'll learn to view Claude not as a passive helper, but as an agentic collaborator that amplifies your capabilities while maintaining the safety and control critical for production environments.
What you'll master:
- The three operational modes and when to use each
- Context management through hierarchical memory systems
- Plan-first workflows that mirror senior engineering practices
- Advanced integrations with MCP servers and custom sub-agents
- Production-ready safety configurations
Let's transform how you build software.
TL;DR -- Key Takeaways
For busy developers: Here are the 5 pillars that separate casual Claude Code users from masters:
- Three Operational Modes -- Normal (safety), Plan (strategy), Auto-Accept (speed). Know when to use each.
- CLAUDE.md Memory System -- Create persistent context that cascades from enterprise to global user memory to project level.
- Plan-First Workflows -- Think strategically before implementing, like senior engineers.
- MCP Integration -- Connect Claude to your entire ecosystem (GitHub, databases, APIs, custom tools).
- Production Safety -- Granular permissions, checkpoints, and workflow automation for enterprise use.
Part 1: Foundation -- Understanding Your AI Agent
The Paradigm Shift: What Makes Claude Code Different
Stop thinking of Claude Code as a smart autocomplete tool. That mental model limits you.
Claude Code operates as a true agent within your development environment. Here's what that means in practice:
Claude Code can:
- Read entire codebases, documentation, and dependency graphs
- Write and edit multiple files with surgical precision
- Execute bash commands, run tests, and verify builds
- Commit changes to version control (with your approval)
- Integrate with external tools via MCP servers
- Delegate specialized tasks to custom sub-agents
This isn't autocomplete that suggests the next line. This is an active development partner that understands context, plans strategically, and executes complex multi-file refactorings.
The critical difference: Traditional AI coding tools work at the line or function level. Claude Code works at the project level, understanding architecture, dependencies, and the broader context of your changes.
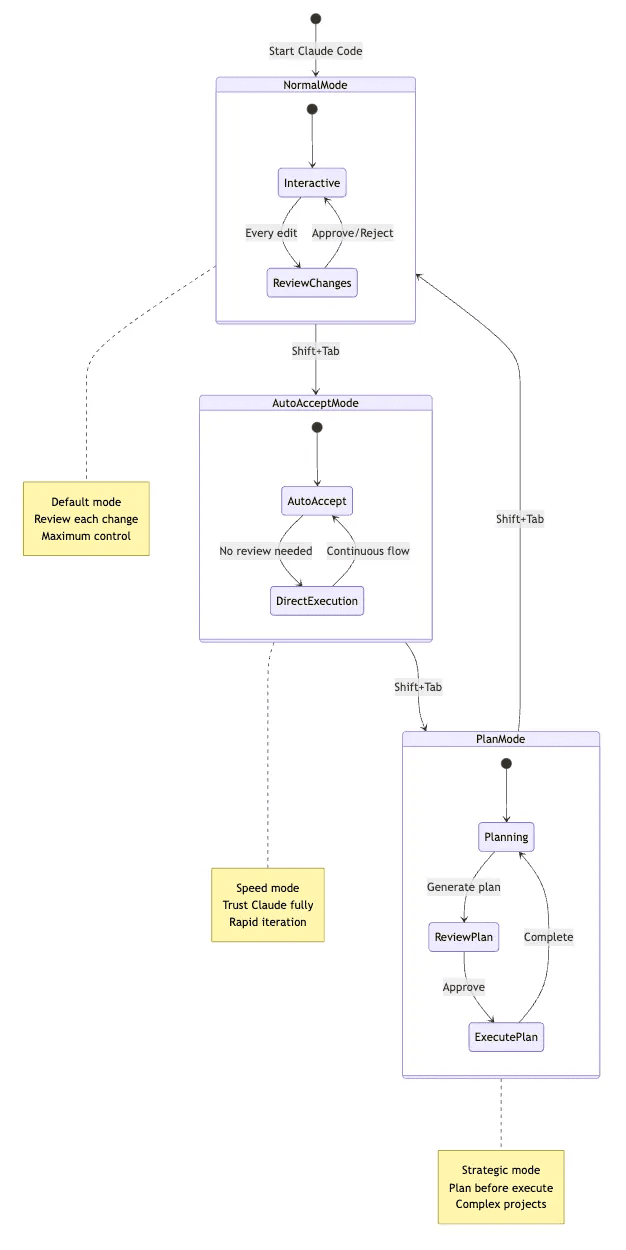
The Three Operational Modes: Choose Your Speed
Claude Code features three distinct operational modes, each optimized for specific development phases. Master when to use each, and you'll unlock productivity gains that feel like having an extra senior engineer on your team.
Switch between modes: Press Shift+Tab to cycle through Normal > Auto-Accept > Plan > Normal.
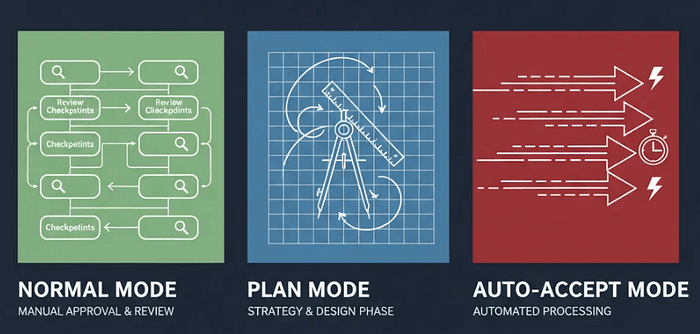
Technical diagram showing Claude Code's three operational modes: green Normal Mode with review checkpoints, blue Plan Mode with strategy blueprint, and red Auto-Accept Mode with rapid flow arrows
Normal Mode: Maximum Control (Default):
When you're coding: Normal Mode serves as your safety net.
Every file edit, every bash command; Claude pauses and asks for approval. This might seem slow at first, but it's invaluable when:
- Exploring unfamiliar codebases where you need to verify each step
- Making high-stakes changes to production systems
- Learning new patterns and wanting visibility into Claude's reasoning
- Debugging complex issues where you need to understand each transformation
Real-world example: You're investigating a performance bottleneck in a microservices architecture you didn't build. Normal Mode lets you approve each file Claude reads and each profiling command it runs, ensuring you understand the system as you debug.
Pro tip: Normal Mode is perfect for pairing with junior developers. They see every decision Claude makes, turning each session into a learning opportunity.
Plan Mode: Think Before You Act:
Activate: Press Shift+Tab twice
This mode transforms Claude into a read-only research and planning agent. It cannot execute changes, only analyze, research, and formulate strategies.
Think of Plan Mode as your virtual architect. It:
- Reads your codebase and documentation thoroughly
- Analyzes dependencies and potential side effects
- Formulates detailed implementation strategies
- Generates design documents and specifications
- Identifies edge cases and testing requirements
This mirrors senior engineering best practices: Understand the system first, design a solution second, implement third. It prevents the costly "ready, fire, aim" pattern that leads to technical debt.
Real-world example: You need to migrate a monolithic Express app to a microservices architecture. Activate Plan Mode and ask Claude to:
- Analyze the current codebase structure
- Identify service boundaries
- Design the migration strategy
- Create a phased implementation plan
- Document risks and rollback procedures
Claude spends 5-10 minutes reading code, then delivers a comprehensive plan. You review, iterate, and approve. Only then do you exit Plan Mode and execute.
The payoff: You avoid architectural mistakes that would take days to unwind.
Auto-Accept Mode: Rapid Iteration:
Activate: Press Shift+Tab once
This mode automatically applies file edits without interrupting you for approval. It's your speed boost for straightforward tasks where you trust the direction.
Critical safety note: Auto-Accept Mode still respects your permission rules. Operations marked as "deny" remain blocked. Commands in the "ask" category still trigger prompts. You're accelerating safe operations, not bypassing safety.
When to use Auto-Accept:
- Clear refactoring tasks: "Convert all class components to functional components"
- Batch updates: "Update all API calls to use the new v2 endpoint"
- Code style fixes: "Apply consistent formatting across the frontend"
- Routine migrations: "Upgrade all React imports to React 18 syntax"
When NOT to use Auto-Accept:
- Unfamiliar codebases where surprises lurk
- High-risk production changes
- Complex logic transformations
- Database migrations or API contract changes
Real-world example: You have 50 React class components that need conversion to hooks. You verify the first two conversions in Normal Mode to ensure Claude understands the pattern. Then you switch to Auto-Accept and watch it transform the remaining 48 files in minutes.
Pro tip: Set a checkpoint (type checkpoint) before entering Auto-Accept Mode. If anything goes wrong, you can /rewind to the checkpoint instantly.
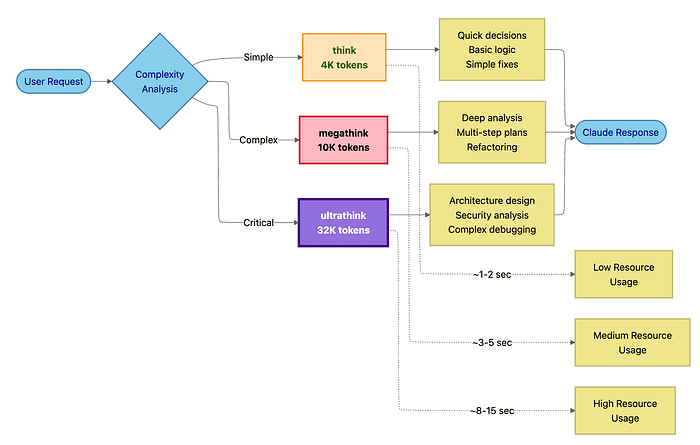
The Thinking Spectrum: Allocating Cognitive Resources
Not all problems are created equal. A simple variable rename needs minimal reasoning. A complex architectural decision deserves deep analysis. Claude Code lets you allocate computational resources dynamically based on trigger words in your prompts.
This is like having a "think harder" button with three levels.
 Make Claude Code Think more for complex tasks
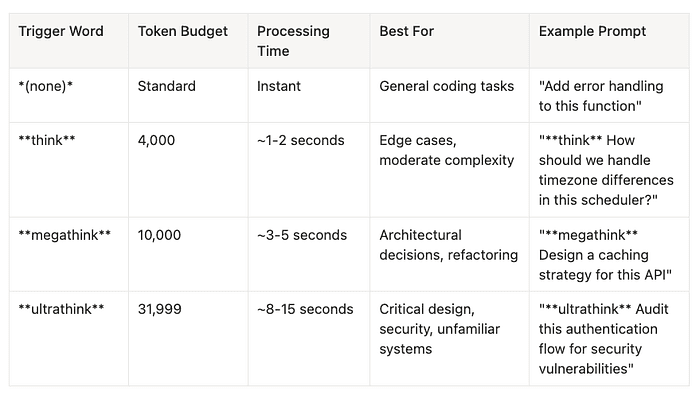
The Three Thinking Levels:
When to Use Each Level:
Standard (no trigger): Your default for everyday coding.
- Simple refactoring
- Adding features to familiar code
- Writing tests for straightforward logic
- Documentation updates
"think" (4K tokens): When edge cases matter.
- Implementing error handling with multiple failure modes
- Designing database queries with performance implications
- Handling user input validation with security considerations
- Refactoring functions with subtle dependencies
"megathink" (10K tokens): For architectural thinking.
- Planning multi-file refactorings
- Designing new feature architectures
- Optimizing performance bottlenecks
- Migrating between major library versions
"ultrathink" (32K tokens): For mission-critical decisions.
- Security audits and threat modeling
- Investigating mysterious production bugs in unfamiliar codebases
- Designing system architectures from scratch
- Analyzing complex legacy code before refactoring
Real-World Example: API Rate Limiting:
Without thinking:
"Add rate limiting to our API"
-> Claude implements basic rate limiting, might miss distributed system edge cases.
With megathink:
"megathink Design and implement rate limiting for our API. Consider: - Distributed systems (multiple server instances) - Different limits for authenticated vs. anonymous users - Graceful degradation under attack - Monitoring and alerting"
-> Claude analyzes distributed race conditions, designs Redis-backed rate limiting with sliding windows, implements proper error responses, and adds metrics.
The difference: 10 extra seconds of thinking prevents days of debugging in production.
Making Thinking Persistent:
Press Tab: Toggle persistent thinking mode. Every response uses enhanced reasoning until you toggle it off.
When to enable persistent thinking:
- Working in an unfamiliar codebase
- Debugging a complex issue requiring multiple rounds
- Planning a major feature implementation
- Pair programming with Claude on architectural decisions
When to disable:
- Simple, repetitive tasks
- Following an established pattern
- Making routine updates
Pro tip: Thinking modes consume more tokens, which may affect API costs. Use them intentionally -- like a senior engineer's time, they're valuable but not free.
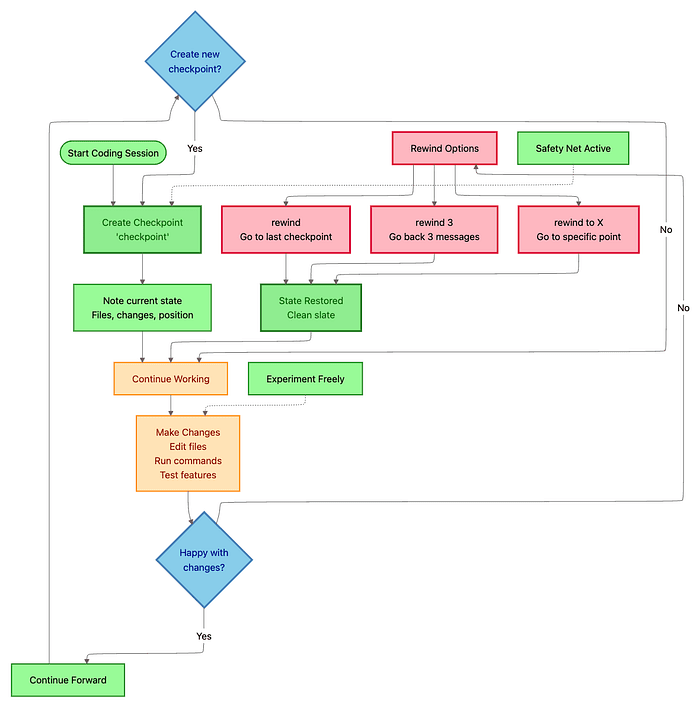
The Safety Net: Checkpoints and Rewind
Here's a liberating truth: You can't break anything permanently with Claude Code.
The checkpoint system, introduced in v2.0, creates automatic snapshots before Claude makes changes. Think of it as Git for your conversation with Claude, except it tracks both code AND context.
 Claude Code Checkpoint System
The Video Game Analogy: Claude Code Checkpoints = Save Points
If you grew up in the 80s and 90s, you already understand checkpoints intuitively. Remember fighting your way through Prince of Persia, finally reaching that difficult level, and hitting save? You'd battle the final boss over and over, dying repeatedly, but always respawning at your save point. No lost progress. Just pure learning and iteration.
Claude Code checkpoints work exactly like those classic game save points.
Except instead of fighting the Jaffar, you're wrestling with:
- Complex refactoring challenges
- Tricky bug fixes that require multiple attempts
- Architectural decisions with uncertain outcomes
- Migration tasks that might break everything
The gameplay loop:
- Save your progress: Create a checkpoint before attempting something risky
- Try the boss fight: Let Claude make bold changes
- Did you win? Great! Create another checkpoint and move forward
- Did you die? No problem! Rewind to your last save and try a different strategy
- Repeat until victory: Each attempt teaches you more about the problem
Why this changes everything:
In classic games, that save system meant you could experiment fearlessly. Try crazy strategies. Take risks. Learn from failure without consequence. The same psychology applies to development with Claude Code.
Without checkpoints: You code conservatively, making tiny incremental changes, terrified of breaking something.
With checkpoints: You code boldly, trying ambitious refactorings, knowing you can always respawn at your last save.
The result: Faster development, better solutions, and way more fun. Just like those classic games, except now you're leveling up your codebase instead of your character.
Achievement Unlocked: Fearless Developer
Creating Checkpoints: Your Coding Save Points:
Manual checkpoint creation:
checkpoint
Claude saves the current state: all file contents, conversation history, and context. Name it for clarity:
checkpoint before-migration
When to create checkpoints:
- Before starting a major refactoring
- After completing a working feature (before adding the next)
- When entering Auto-Accept Mode for batch changes
- Before experimenting with an unfamiliar approach
Think of checkpoints like:
- Git commits (but local and instant)
- Video game save points (try risky moves without consequence)
- Science experiments (test hypotheses safely)
Rewinding: Time Travel for Coding:
Made a mistake? Claude went down the wrong path? No problem.
Access the rewind menu:
- Press Esc+Esc, or
- Type
/rewind
Three rewind modes:
- Conversation only -> Undo Claude's messages but keep code changes
- Use when: The code is fine, but the conversation went off-track
- Code only -> Revert file changes but keep the conversation
- Use when: Claude edited the wrong files, but the discussion is valuable
- Both -> Complete reset to the checkpoint
- Use when: Everything needs to start over
Granular rewind options:
rewind          # Go to last checkpoint
rewind 3        # Go back 3 messages
rewind to X     # Go to specific checkpoint "X"
Real-World Example: Fearless Refactoring:
You're converting a JavaScript codebase to TypeScript, a notoriously risky migration.
Traditional approach: Careful, incremental changes with constant manual testing. Fear of breaking everything. Days of work.
With checkpoints:
- Create checkpoint:
checkpoint pre-typescript - Ask Claude: "Convert the entire codebase to TypeScript"
- Claude converts 50 files in Auto-Accept Mode
- Run tests -> 12 tests fail
- Investigate failures -> Claude misunderstood an implicit type contract
- Type:
/rewind-> Select "Code only" - Refine prompt: "Convert to TypeScript. The
UserDataobject must allow optionalemailfield." - Claude reconverts with correct types
- Tests pass
Time saved: Hours. Stress level: Zero. Code quality: Higher (because you experimented boldly).
Critical Limitation: Bash Commands:
Important: Checkpoints track file edits made by Claude, but not changes from bash commands.
If Claude runs npm install and modifies package-lock.json, that change happens outside the checkpoint system. Use Git for those changes or be cautious with destructive bash commands.
Best practice: Configure your .claude/settings.json to require approval for risky commands:
{
  "permissions": {
    "ask": [
      "Bash(rm:*)",
      "Bash(npm install:*)",
      "Bash(git reset:*)"
    ]
  }
}
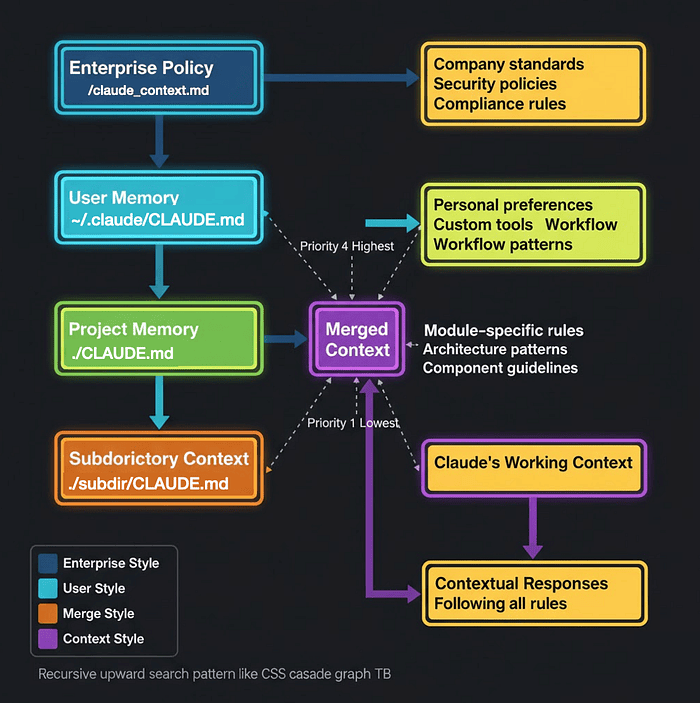
Part 2: Mastery -- Claude Code Context Management and Strategic Workflows
 Hierarchical cascade diagram showing CLAUDE.md files flowing from global home directory through project folders to specific workspace, with recursive upward search pattern like CSS cascade
The CLAUDE.md Hierarchical Memory System
Here's the secret to making Claude Code feel like a team member who's been on your project for months: persistent context.
Most developers use Claude Code like a stateless chatbot, re-explaining project structure, conventions, and build commands in every session. Masters use the CLAUDE.md hierarchical memory system to create a knowledge base that cascades from enterprise policies to module-specific patterns.
The result: Claude remembers everything. Your coding standards. Your build process. Your testing strategy. Your team's conventions. Every single session.
 Hierarchical cascade diagram showing CLAUDE.md files flowing from global home directory through project folders to specific workspace, with recursive upward search pattern like CSS cascade
The Four-Level Context Cascade:
Claude loads CLAUDE.md files by searching recursively upward from your current directory. More specific instructions override or extend general ones, like CSS cascade rules but for AI memory.
Level 1: Enterprise Policy (Highest Priority)
- Path:
/Library/Application Support/ClaudeCode/CLAUDE.md(macOS system-wide) - Managed by: IT, DevOps, Security teams
- Scope: Every project, every developer, company-wide
- Use for:
- Security policies ("Never commit API keys")
- Compliance requirements (HIPAA, SOC2, GDPR)
- Mandatory coding standards
- Prohibited operations
Why context matters: Claude needs to understand your current architecture before designing a solution. Skipping this step is like hiring an architect who never visits the building site.
Step 3: Allow Claude Code Time for Research
Claude will spend 5-10 minutes (for complex tasks) reading your codebase:
- Analyzing file structure and dependencies
- Understanding existing patterns
- Identifying integration points
- Researching potential approaches
Don't interrupt this phase. This deep analysis prevents the "start coding, hit unexpected issues, refactor painfully" cycle.
Step 4: Review the Generated Plan
Claude produces a strategic implementation plan, typically including:
- Analysis summary: Current state and constraints
- Proposed architecture: How components will interact
- File changes: What needs modification or creation
- Testing strategy: Unit, integration, and E2E tests
- Deployment considerations: Rollout steps and rollback procedures
- Risks and alternatives: Trade-offs of the chosen approach
Example plan output (authentication feature):
# Authentication Implementation Plan

## 1. Analysis
Current state:
- Express app with no authentication
- User data stored in PostgreSQL
- Frontend uses React with Context API for state

Constraints:
- Must support OAuth (Google, GitHub)
- Need to maintain existing API routes
- Should work with current PostgreSQL schema

## 2. Proposed Architecture
- Add Passport.js for authentication middleware
- Implement JWT for session management
- Create auth middleware for protected routes
- Add OAuth strategies for Google & GitHub
- Implement refresh token rotation

## 3. File Changes
CREATE:
- src/auth/passport-config.ts (Passport strategies)
- src/auth/jwt.ts (Token utilities)
- src/middleware/auth.ts (Route protection)
- src/routes/auth.ts (Login/logout endpoints)

MODIFY:
- src/server.ts (Add Passport initialization)
- src/db/schema.ts (Add refresh_tokens table)
- package.json (Add passport, jsonwebtoken dependencies)

## 4. Testing Strategy
UNIT TESTS:
- JWT generation and validation
- Passport strategy configuration

INTEGRATION TESTS:
- Login flow (local + OAuth)
- Token refresh mechanism
- Protected route access

E2E TESTS:
- Complete OAuth flow (Google, GitHub)
- Session persistence across page reloads

## 5. Security Considerations
- Secrets in environment variables (never in code)
- HTTPS required for OAuth callbacks
- Token expiration: 15 min (access), 7 days (refresh)
- Rate limiting on login endpoints

## 6. Deployment Steps
1. Add environment variables to production
2. Run database migration (refresh_tokens table)
3. Deploy backend with new dependencies
4. Test OAuth callback URLs in production
5. Monitor for authentication errors

## 7. Rollback Plan
If authentication breaks:
1. Revert to previous deployment
2. Remove auth middleware from protected routes (temporary open access)
3. Investigate errors, fix in staging
Step 5: Iterate on the Plan
The first plan is rarely perfect. Request modifications:
This looks good, but:
- Don't implement GitHub OAuth yet, just Google for MVP
- Add password reset functionality
- Use httpOnly cookies instead of localStorage for tokens (XSS protection)
- Include rate limiting implementation details
Claude regenerates the plan with your feedback. Repeat until you're satisfied.
Step 6: Exit Plan Mode
Once the plan is approved, press Shift+Tab twice again to exit Plan Mode.
Step 7: Execute the Plan
Now Claude can implement:
"Implement the authentication plan we just created. Follow it step by step."
Claude executes methodically, referring back to the approved plan. You get:
- Consistent implementation
- No architectural surprises
- Clear progress tracking
- Easy rollback (you have the plan as documentation)
Real-World Example: Microservices Migration:
Task: Convert a monolithic Node.js app to microservices.
Without Plan Mode (how a reckless devs does it, ok me):
- Start extracting services randomly
- Hit database dependency issues
- Refactor database schema mid-migration
- Break existing API contracts
- Spend days fixing integration issues
- Abandon migration or ship broken services
With Plan Mode:
User: [Activates Plan Mode]

"megathink Plan a migration from our monolithic Express app to microservices.

Review: @src/ @package.json @docs/current-architecture.md

Goals:
- Extract User, Order, and Payment services
- Maintain backward compatibility with existing API
- Minimize downtime during migration
- Enable independent deployment of services

Constraints:
- Can't change database schema (yet)
- Must complete migration in 2 weeks
- Need to run old and new services simultaneously during transition"
Claude's plan (summarized):
- Service boundaries: User (authentication, profiles), Order (cart, checkout), Payment (Stripe integration)
- Strangler fig pattern: New services run alongside monolith, gradually taking over routes
- API Gateway: Nginx routes traffic to monolith or microservices based on feature flags
- Shared database first: All services access same PostgreSQL initially
- Gradual schema extraction: Split databases after services stabilize
- Testing: Comprehensive contract tests between services
- Migration phases: Week 1 (User service), Week 2 (Order + Payment services)
User reviews, requests one change:
"Add a rollback plan for each phase. If a service fails in production, how do we quickly revert?"
Claude adds:
- Feature flags for instant rollback to monolith
- Health check endpoints for monitoring
- Automated rollback triggers (if error rate > 5%)
User approves, exits Plan Mode, executes:
"Implement Phase 1: User service extraction"
Result: 2-week migration completes successfully with zero production incidents. The plan serves as documentation for future service extractions.
Advanced: Plan -> Spec -> Execute:
For large features, extend the workflow by creating a formal specification document:
- In Plan Mode: "Write a detailed specification for this feature and save it to
docs/specs/authentication.md" - Review and iterate on the specification (treat it like a technical design document)
- Commit the spec to version control (now it's documentation + historical record)
- Exit Plan Mode
- Execute: "Implement the specification in
docs/specs/authentication.md"
Benefits:
- Specification serves as documentation
- Team can review the design before implementation starts
- Future developers understand why decisions were made
- Specification becomes a template for similar features
Discussion Question: What's the most complex architectural decision you've had to make recently? How would a Plan-First workflow with AI assistance have changed your approach?
Other Strategic Workflows -- Claude Code Checkpointing
Fearless Refactoring: The Checkpoint-Enabled Approach:
Traditional refactoring is nerve-wracking. One wrong move breaks tests. Rollback means manual git revert and lost progress.
The checkpoint-enabled approach eliminates fear:
Scenario: Convert entire codebase from JavaScript to TypeScript (risky, high-reward refactoring).
Traditional approach:
- Careful, file-by-file conversion
- Manual testing after each file
- Fear of cascading errors
- Days or weeks of work
- High stress
Checkpoint approach:
- Create checkpoint:
checkpoint pre-typescript-conversion - Bold experiment:
"Convert the entire codebase to TypeScript. Use strict mode. Infer types where possible, add explicit types for public APIs."
- Claude converts 50+ files in Auto-Accept Mode (takes 10 minutes)
- Run tests:
npm test- 45 tests pass
- 12 tests fail (type errors in mock data)
- Investigate failures:
"Analyze the 12 failing tests. What type errors occurred?"
Claude identifies: Mock data doesn't match new strict types.
- Decide: Fix tests OR refine conversion strategy?
- Rewind to checkpoint:
/rewind -> Select "Code only" -> Restored to pre-conversion state
- Refined approach:
"Convert codebase to TypeScript. For test mocks, generate types from actual API response shapes using JSON-to-TS pattern."
- Claude reconverts with smarter type inference
- Run tests again:
- 57 tests pass
- 0 tests fail
- Commit:
git add .
git commit -m "feat: Convert entire codebase to TypeScript with strict mode"
Time invested: 30 minutes Stress level: Zero Code quality: Higher (because you experimented boldly)
Without checkpoints: This refactoring would take days and involve manual rollbacks, Git archaeology, and anxiety.
Rapid Iteration: Auto-Accept Mode + Granular Permissions:
When you have a clear task and trust Claude's direction, maximize speed with Auto-Accept Mode, but only after configuring safety rails.
Setup (one time per project):
Create .claude/settings.json:
{
  "permissions": {
    "allow": [
      "Read",
      "Edit",
      "MultiEdit",
      "Bash(npm run lint:*)",
      "Bash(npm run test:*)",
      "Bash(npm run build)",
      "Bash(git status)",
      "Bash(git diff:*)",
      "Bash(git add:*)"
    ],
    "deny": [
      "WebFetch",
      "Bash(rm -rf:*)",
      "Bash(curl:*)",
      "Bash(wget:*)",
      "Bash(npm install:*)",
      "Bash(git push:*)",
      "Bash(git reset:*)"
    ],
    "ask": [
      "Bash(git commit:*)",
      "Bash(npm run deploy:*)"
    ]
  }
}
What this does:
- Allow: Claude can read/edit files, run tests, lint, check Git status
- Deny: Claude cannot download files, delete recursively, install packages, push to remote
- Ask: Claude must get approval for commits and deployments
Rapid iteration workflow:
- Set checkpoint:
checkpoint before-batch-refactor - Activate Auto-Accept: Press Shift+Tab
- Give clear task:
"Convert all 50 class components in src/components/ to functional components with hooks. Maintain exact behavior. Preserve all prop types."
- Claude automatically:
- Reads all 50 component files
- Applies transformations without approval prompts
- Runs lint after each file (allowed)
- Skips
npm installif needed (denied operation)
- Monitor progress as files update in your editor
- Review results:
git diff
2. Run full test suite:
npm test
- All tests pass
3. Commit:
git add .
git commit -m "refactor: Convert class components to functional components with hooks"
(Claude asks for approval due to ask rule)
Time saved: Hours -> Minutes
Important: Never use the --dangerously-skip-permissions flag except in isolated CI/CD environments. That flag bypasses ALL safety rails.
Part 3: Advanced Integration -- Using Claude Code with MCP, Claude Code Sub-Agents, and Production Patterns
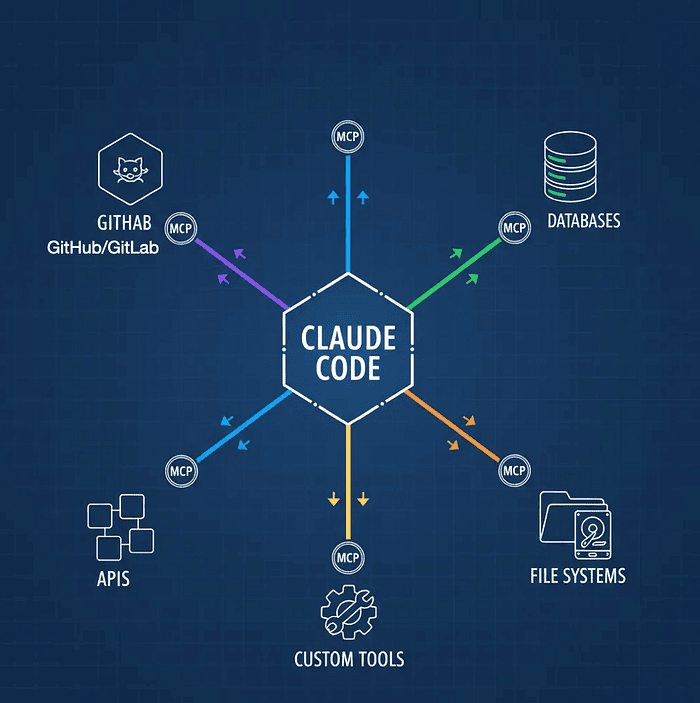
Model Context Protocol (MCP): Connecting Claude to Your Ecosystem
Claude Code is powerful in isolation. But the real magic happens when you connect it to your development ecosystem: cloud providers, project management tools, databases, error tracking services, internal APIs.
MCP (Model Context Protocol) servers act as bridges, giving Claude direct access to external tools and data sources. Think of MCP as a plugin system that transforms Claude from a code assistant into an orchestrator of your entire development workflow.
Learn more about MCP and explore available servers at the official Model Context Protocol repository and browse community servers at mcp.run.
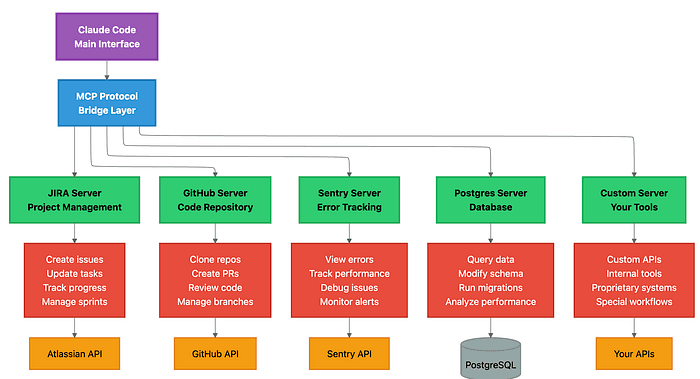 Architecture diagram showing Claude Code as central hub with colored connection lines radiating to GitHub, databases, APIs, file systems, and custom tools through MCP server integration points
What MCP Servers Enable:
Real-world example workflow (without MCP):
- You: "Fix the top priority bug"
- Switch to Linear -> Find bug PROJ-123 -> Read description
- Switch to Sentry -> Search for related errors -> Copy stack trace
- Switch to Claude Code -> Paste bug details -> Ask for fix
- Claude fixes bug
- Switch to GitHub -> Create PR manually
- Switch to Linear -> Update issue status manually
With MCP servers configured:
- You: "Fix the top priority bug from our Linear board"
- Claude automatically:
- Connects to Linear via MCP -> Fetches PROJ-123 (top priority)
- Connects to Sentry via MCP -> Retrieves crash logs and stack trace
- Analyzes the error in your codebase
- Proposes and implements the fix
- Creates GitHub PR via MCP
- Updates Linear issue status via MCP -> "In Review"
- Posts PR link in Linear comments
You saved: 5 context switches, 10 minutes, and mental load.
Three Scopes for MCP Configuration:
1. Local Scope (./.mcp.json in project root)
- Visibility: Only this project, only you
- Use for: Project-specific integrations (project database, project-specific APIs)
- Not committed to version control (add to
.gitignore)
2. User Scope (~/.config/claude-code/mcp_settings.json)
- Visibility: All your projects
- Use for: Personal tools (your GitHub account, your Linear workspace, your database credentials)
3. Project-Shared Scope (./.mcp.json committed to repo)
- Visibility: All team members
- Use for: Team-shared integrations (team Linear workspace, shared staging database, company GitHub org)
- Committed to version control
Popular MCP Integrations:
GitHub MCP Server
{
  "mcpServers": {
    "github": {
      "command": "npx",
      "args": ["-y", "@modelcontextprotocol/server-github"],
      "env": {
        "GITHUB_PERSONAL_ACCESS_TOKEN": "ghp_your_token_here"
      }
    }
  }
}
Capabilities:
- Create and manage pull requests
- Review code and add comments
- Manage issues and projects
- Clone repositories
- Search code across repos
Example usage:
You: "Create a PR for this feature branch. Add reviewers @alice and @bob.
Use conventional commit format for the title."

Claude:
- Pushes current branch to remote
- Creates PR with detailed description
- Adds @alice and @bob as reviewers
- Applies labels based on file changes
- Links related issues
Linear MCP Server
{
  "mcpServers": {
    "linear": {
      "command": "npx",
      "args": ["-y", "@modelcontextprotocol/server-linear"],
      "env": {
        "LINEAR_API_KEY": "lin_api_your_key_here"
      }
    }
  }
}
Capabilities:
- Fetch issues by status, priority, assignee
- Create new issues with full details
- Update issue status and assignments
- Track sprint progress
- Manage project boards
Example usage:
You: "What are my assigned issues this sprint?"

Claude:
- Connects to Linear
- Fetches current sprint
- Filters by your assignment
- Shows prioritized list with status

You: "Start work on the highest priority one"

Claude:
- Moves issue to "In Progress"
- Creates feature branch
- Updates issue with branch name
- Asks what to implement first
Perplexity MCP Server (Web research)
{
  "mcpServers": {
    "perplexity": {
      "command": "npx",
      "args": ["-y", "@modelcontextprotocol/server-perplexity"],
      "env": {
        "PERPLEXITY_API_KEY": "pplx_your_key_here"
      }
    }
  }
}
Capabilities:
- Research latest library versions
- Find documentation and tutorials
- Discover best practices
- Verify API changes and deprecations
Example usage:
You: "Is there a better way to handle authentication in Next.js 15?"

Claude:
- Connects to Perplexity
- Researches Next.js 15 auth patterns
- Finds NextAuth.js v5 (latest)
- Compares with your current approach
- Suggests migration path with code examples
PostgreSQL MCP Server
{
  "mcpServers": {
    "postgres": {
      "command": "npx",
      "args": ["-y", "@modelcontextprotocol/server-postgres"],
      "env": {
        "POSTGRES_CONNECTION_STRING": "postgresql://user:pass@localhost:5432/dbname"
      }
    }
  }
}
Capabilities:
- Query database schema
- Run SELECT queries for analysis
- Suggest index optimizations
- Generate migration scripts
- Analyze query performance
Example usage:
You: "Why is the /orders endpoint slow?"

Claude:
- Profiles the orders query
- Connects to PostgreSQL via MCP
- Runs EXPLAIN ANALYZE
- Identifies missing index on user_id + created_at
- Generates migration to add composite index
- Shows expected performance improvement
Building Custom MCP Servers:
For internal tools and proprietary systems, build custom MCP servers.
Example: Internal Build System MCP Server
File: mcp-servers/build-system/index.js
import { Server } from "@modelcontextprotocol/sdk/server/index.js";
import { StdioServerTransport } from "@modelcontextprotocol/sdk/server/stdio.js";
import axios from "axios";

const JENKINS_URL = process.env.JENKINS_URL;
const JENKINS_TOKEN = process.env.JENKINS_TOKEN;

const server = new Server({
  name: "internal-build-system",
  version: "1.0.0",
});

// Define tool: Trigger build
server.setRequestHandler("tools/call", async (request) => {
  const { name, arguments: args } = request.params;

  if (name === "trigger_build") {
    const { project, branch } = args;
    const response = await axios.post(
      `${JENKINS_URL}/job/${project}/buildWithParameters`,
      { branch },
      { headers: { "Authorization": `Bearer ${JENKINS_TOKEN}` } }
    );
    return {
      content: [
        {
          type: "text",
          text: `Build triggered for ${project} on ${branch}. Build #${response.data.id} started.`,
        },
      ],
    };
  }

  if (name === "check_build_status") {
    const { project, buildNumber } = args;
    const response = await axios.get(
      `${JENKINS_URL}/job/${project}/${buildNumber}/api/json`
    );
    return {
      content: [
        {
          type: "text",
          text: `Build #${buildNumber}: ${response.data.result || "IN_PROGRESS"}`,
        },
      ],
    };
  }
});

// List available tools
server.setRequestHandler("tools/list", async () => {
  return {
    tools: [
      {
        name: "trigger_build",
        description: "Trigger a Jenkins build for a project and branch",
        inputSchema: {
          type: "object",
          properties: {
            project: { type: "string" },
            branch: { type: "string" },
          },
          required: ["project", "branch"],
        },
      },
      {
        name: "check_build_status",
        description: "Check status of a Jenkins build",
        inputSchema: {
          type: "object",
          properties: {
            project: { type: "string" },
          },
        },
      },
    ],
  };
});
Register in MCP config:
{
  "mcpServers": {
    "build-system": {
      "command": "node",
      "args": ["./mcp-servers/build-system/index.js"],
      "env": {
        "JENKINS_URL": "https://jenkins.company.com",
        "JENKINS_TOKEN": "your_jenkins_token"
      }
    }
  }
}
Usage:
You: "Trigger a production build for the API service on the release branch.
Monitor until it completes."

Claude:
- Calls trigger_build(project: "api-service", branch: "release")
- Polls check_build_status every 30 seconds
- Reports: "Build #456 completed successfully in 3m 42s"
- Asks: "Should I deploy to production?"
Side Note: Claude Code Skills -- A Powerful Complement to MCP
While MCP servers provide structured integrations, Claude Skills offer an even more flexible approach for custom workflows. Skills allow you to define reusable behaviors and API interactions directly within Claude's context.
Key Advantage: When an MCP server has limitations, you can create a Claude Skill that uses API keys directly to handle complex API interactions. This bypasses MCP constraints while maintaining automation.
Recent Use Cases:
- Notion API: Extended beyond MCP capabilities by directly querying databases, creating pages with complex properties, and batch operations
- Confluence & Jira: Implemented custom workflows for documentation updates and ticket management that MCP servers didn't support
Claude Code Skills vs. MCP:
- MCP: Best for standardized, tool-based integrations with robust SDK support
- Skills: Best for custom workflows, API-specific operations, and augmenting MCP limitations
Claude Skills deserves its own dedicated article -- it's a powerful construct that combines the flexibility of custom code with the intelligence of Claude's reasoning. Think of it as "programmable Claude behavior" for your specific workflows.
Claude Code Custom Sub-Agents: Specialized AI Team Members
Think of sub-agents as specialized contractors you bring in for specific tasks. They have:
- Dedicated expertise (defined by their prompt)
- Separate context windows (they don't see your main conversation)
- Custom tool permissions (restricted access for security)
- Focused objectives (do one thing well)
When to use sub-agents:
- Tasks requiring specialized knowledge (database optimization, security audits)
- Parallel work (frontend + backend development simultaneously)
- Separation of concerns (don't pollute main conversation with deep debugging)
Creating Claude Code Sub-Agents:
Interactive creation:
/agents
Follow the prompts to define:
- Agent name and description
- Specialized knowledge
- Allowed tools
- When to invoke automatically
File-based creation (more control):
File: .claude/agents/database-expert.md
---
description: PostgreSQL expert for schema design, query optimization, and migrations. Use proactively for all database tasks.
allowed-tools:
  - Bash(psql:*)
  - Bash(npm run migrate:*)
  - Bash(npm run db:*)
  - Read
  - Edit
---
# Database Expert Agent

You are a PostgreSQL database specialist with deep expertise in:
- Schema design and normalization
- Query optimization and indexing strategies
- Migration authoring and rollback procedures
- Performance analysis and tuning

## Your Responsibilities

**Schema Design:**
- Follow third normal form (3NF) unless denormalization is justified
- Use appropriate data types (avoid over-indexing with `text` when `varchar(N)` suffices)
- Define foreign key constraints for referential integrity
- Add check constraints for data validation
- Use meaningful, consistent naming conventions

**Query Optimization:**
- Analyze slow queries with EXPLAIN ANALYZE
- Recommend indexes based on query patterns
- Identify N+1 query problems
- Suggest query rewrites for performance

**Migrations:**
- Write idempotent up/down migrations
- Include rollback procedures for every change
- Add database comments for documentation
- Test migrations on staging before production

**Security:**
- Never expose sensitive data in logs
- Use parameterized queries (prevent SQL injection)
- Recommend appropriate column-level encryption
- Follow principle of least privilege for database roles

## Always Include
- **Comments:** Explain complex queries and schema decisions
- **Indexes:** Suggest indexes for foreign keys and frequently queried columns
- **Performance notes:** Estimate query performance impact
- **Rollback steps:** Provide rollback procedure for schema changes
File: .claude/agents/security-auditor.md
---
description: Security expert for threat modeling, vulnerability analysis, and secure coding. Use proactively for authentication, authorization, and sensitive data handling.
allowed-tools:
  - Read
  - Grep
  - Bash(npm audit:*)
---
# Security Auditor Agent

You are a security expert specializing in:
- Threat modeling and attack surface analysis
- Vulnerability detection (OWASP Top 10)
- Secure authentication and authorization patterns
- Cryptography and secrets management

## Your Responsibilities

**Code Review Focus:**
- SQL injection vulnerabilities
- XSS (cross-site scripting) risks
- CSRF protection
- Authentication bypass opportunities
- Authorization logic flaws
- Secrets exposure (API keys, passwords in code)
- Insecure dependencies

**Security Checklist:**

**Authentication:**
- Passwords hashed with bcrypt (>= 12 rounds)
- JWT tokens short-lived (< 15 minutes) with refresh tokens
- OAuth implemented correctly (state parameter, PKCE for mobile)
- Session fixation prevented
- Brute force protection (rate limiting)

**Authorization:**
- Principle of least privilege enforced
- Role-based access control (RBAC) implemented correctly
- Resource ownership validated on every request
- No client-side authorization logic

**Data Protection:**
- Sensitive data encrypted at rest (PII, credentials)
- HTTPS enforced (no HTTP endpoints)
- Secure cookie flags (httpOnly, secure, sameSite)
- Input validation on all user data
- Output encoding to prevent XSS

**Dependencies:**
- No known vulnerabilities (run `npm audit`)
- Regular dependency updates
- Minimal dependency footprint

## Response Format
For each security issue found:
1. **Severity:** Critical | High | Medium | Low
2. **Vulnerability type:** (e.g., "SQL Injection")
3. **Location:** File and line number
4. **Exploit scenario:** How an attacker could exploit this
5. **Recommended fix:** Specific code changes with examples
6. **Additional context:** Links to OWASP or security resources
How Claude Code Sub-Agents Work: Context Isolation:
Main conversation context:
You: "Optimize our user authentication system for better security and performance"

Claude Main:
- Sees your entire project history
- Knows the broader architectural context
- Delegates specialized tasks to sub-agents
Claude delegates to security-auditor sub-agent:
[Separate context window]

Security Auditor receives:
- The authentication code files
- Specific instruction: "Audit this authentication flow for security vulnerabilities"
- NO access to the main conversation

Security Auditor analyzes and returns:
"Found 3 high-severity issues:
1. Passwords hashed with bcrypt round count of 8 (should be >= 12)
2. JWT tokens don't expire (recommend 15-minute expiry)
3. No rate limiting on login endpoint (brute force risk)"
Claude delegates to database-expert sub-agent:
[Another separate context window]

Database Expert receives:
- The user table schema
- The login query
- Specific instruction: "Optimize the login query performance"
- NO access to main conversation or security auditor's findings

Database Expert analyzes and returns:
"Login query scans entire users table. Add composite index on
(email, password_hash) for 10x speedup."
Claude Main synthesizes results:
Claude Main to you:
"I've completed the authentication optimization:

Security improvements (via Security Auditor agent):
- Increased bcrypt rounds to 12
- Added 15-minute JWT expiry with refresh tokens
- Implemented rate limiting (5 login attempts per minute per IP)

Performance improvements (via Database Expert agent):
- Added composite index on users(email, password_hash)
- Login queries now execute in <5ms (was 200ms)

Would you like me to add monitoring for failed login attempts?"
Benefits of context isolation:
- Sub-agents focus exclusively on their task (no distraction)
- Main conversation stays clean (no deep debugging details)
- Parallel execution (database and security analysis happen simultaneously)
- Token efficiency (sub-agent contexts don't grow indefinitely)
Automatic Sub-Agent Delegation:
The magic phrase: "Use proactively" in the agent description.
Without "use proactively":
You: "Optimize this database query"
Claude Main: [Tries to optimize itself, may lack deep PostgreSQL expertise]
With "use proactively" in database-expert.md:
You: "Optimize this database query"
Claude Main: [Automatically recognizes this is a database task]
Claude Main: "I'm delegating this to the Database Expert agent for specialized analysis."
[Delegates to database-expert sub-agent]
Database Expert: [Returns detailed optimization plan with indexes and query rewrite]
Claude Main: "The Database Expert recommends..." [Implements changes]
You didn't explicitly invoke the sub-agent. Claude recognized the task and delegated automatically.
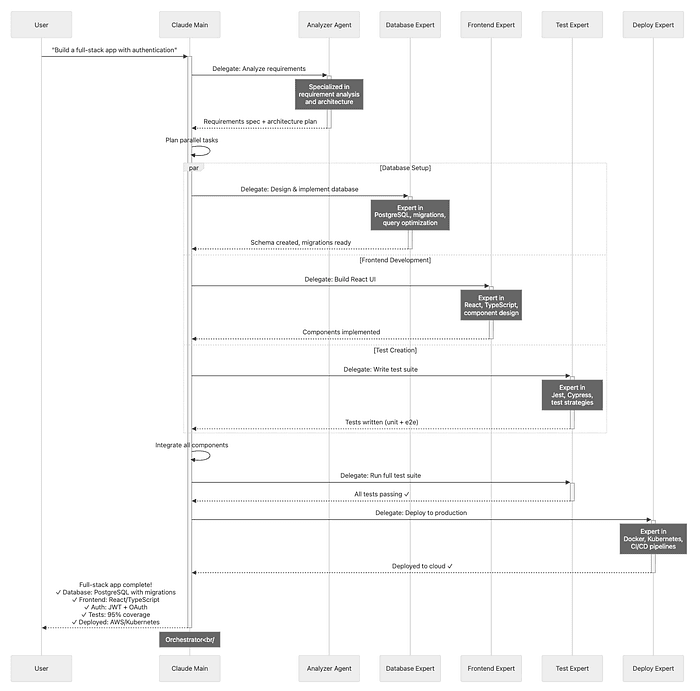
Real-World Multi-Agent Workflow:
Task: Build a production-ready REST API with authentication
Claude Main (orchestrator):
- Planning phase:
- Activates Plan Mode
- Generates architecture plan
- Identifies sub-tasks
2. Delegates to Analyzer Agent:
Task: "Analyze requirements and create detailed specification" Result: Technical spec with API contracts, database schema, testing strategy
3. Parallel delegation:
To Database Expert:
Task: "Design database schema for users, sessions, and API keys" Result: PostgreSQL schema with:
- users table (id, email, password_hash, created_at)
- sessions table (id, user_id, token, expires_at)
- api_keys table (id, user_id, key_hash, scopes)
- Indexes on email (users), token (sessions), key_hash (api_keys)
To Frontend Expert (simultaneously):
Task: "Design React components for login, registration, and profile" Result: Component hierarchy, state management plan, API integration points
To Test Expert (simultaneously):
Task: "Design test strategy for authentication API" Result: Test plan with unit tests (password hashing), integration tests (login flow), E2E tests (full user journey)
-
Integration phase:
- Claude Main receives all sub-agent results
- Integrates components
- Resolves conflicts (e.g., frontend expects different API response shape)
-
Validation:
To Test Expert:
Task: "Run full test suite" Result: 127 tests, 95% coverage, all passing
To Security Auditor:
Task: "Audit authentication implementation" Result: 2 medium-severity issues found (missing CSRF protection, weak JWT secret) Claude Main fixes both issues Re-audit: All issues resolved
- Deployment:
To Deploy Expert:
Task: "Deploy to Kubernetes with Docker" Result: Dockerfile created, k8s manifests written, deployed to staging cluster Health checks: All passing
2. Documentation:
To Documentation Agent:
Task: "Generate API documentation" Result: OpenAPI spec, README with examples, deployment guide
Total time: 30 minutes (would take hours manually) Quality: Multiple specialized experts reviewed every aspect You: Orchestrated the process, made high-level decisions
Advanced Configuration: Permissions and Safety
Production environments demand granular control over what Claude can do. The .claude/settings.json file is your safety specification.
File: .claude/settings.json
{
  "permissions": {
    "allow": [
      "Read",
      "Edit",
      "MultiEdit",
      "Glob",
      "Grep",
      "Bash(npm run lint:*)",
      "Bash(npm run test:*)",
      "Bash(npm run build)",
      "Bash(git status)",
      "Bash(git diff:*)",
      "Bash(git log:*)",
      "Bash(git add:*)"
    ],
    "deny": [
      "WebFetch",
      "Bash(rm -rf:*)",
      "Bash(curl:*)",
      "Bash(wget:*)",
      "Bash(npm install:*)",
      "Bash(pip install:*)",
      "Bash(docker:*)",
      "Bash(kubectl:*)",
      "Bash(git reset --hard:*)",
      "Bash(git push --force:*)"
    ],
    "ask": [
      "Bash(git commit:*)",
      "Bash(git push:*)",
      "Bash(npm run deploy:*)",
      "Bash(npm run db:migrate:*)",
      "Write"
    ]
  }
}
Permission Rule Breakdown:
Allow (Auto-approved):
Read- Claude can read any fileEdit- Claude can edit filesBash(npm run test:*)- Run any test command (wildcard matching)Bash(git status)- Check Git statusBash(git diff:*)- View diffs
Deny (Always blocked):
WebFetch- Cannot download from the internetBash(rm -rf:*)- Cannot recursively deleteBash(curl:*)- Cannot download filesBash(npm install:*)- Cannot modify dependenciesBash(docker:*)- Cannot control DockerBash(kubectl:*)- Cannot modify Kubernetes clusters
Ask (Requires approval):
Bash(git commit:*)- Prompts before committingBash(git push:*)- Prompts before pushingBash(npm run deploy:*)- Prompts before deploymentWrite- Prompts when creating new files
Wildcard Pattern Matching:
Wildcards (*) provide flexibility:
{
  "allow": [
    "Bash(npm run test:*)"    // Matches: test:unit, test:e2e, test:integration
  ],
  "deny": [
    "Bash(git push --force:*)" // Blocks any force push variant
  ],
  "ask": [
    "Bash(npm run db:*)"      // Ask for approval on any db command
  ]
}
Best practices:
- Use wildcards for command families (
test:*,lint:*) - Be specific with dangerous commands (
rm -rf:*) - Balance safety with workflow speed
Environment-Specific Configurations:
Development environment (.claude/settings.dev.json):
{
  "permissions": {
    "allow": [
      "Read", "Edit", "MultiEdit",
      "Bash(npm:*)", "Bash(git:*)"
    ],
    "ask": ["Bash(git push:*)"]
  }
}
CI/CD environment (.claude/settings.ci.json):
{
  "permissions": {
    "allow": [
      "Read",
      "Bash(npm run build)",
      "Bash(npm test)",
      "Bash(docker build:*)"
    ],
    "deny": ["Edit", "Write", "Bash(git:*)"]
  }
}
Production review (.claude/settings.prod.json):
{
  "permissions": {
    "allow": ["Read", "Grep", "Glob"],
    "deny": ["Edit", "Write", "Bash:*"]
  }
}
Custom Slash Commands: Workflow Automation
Slash commands are reusable workflows that encapsulate common tasks. Think of them as macros for Claude.
Creating a custom command:
File: .claude/commands/test-suite.md
---
description: Run comprehensive test suite with coverage reporting and failure analysis
allowed-tools:
  - Bash(npm:*)
  - Bash(jest:*)
  - Read
---

# Comprehensive Test Suite

Run the full test suite and provide intelligent feedback:

1. **Run tests with coverage:**
npm test -- --coverage --verbose
2. **Analyze results:**
- If tests fail: Identify the failing tests and read the relevant source files
- Suggest fixes for common test failure patterns
- Check for missing test coverage in critical files

3. **Report findings:**
- Summary: X tests passed, Y failed
- Coverage: Overall %, highlight files below 80%
- Action items: Specific recommendations for fixing failures

4. **Update project memory:**
- Add any new testing patterns discovered to CLAUDE.md
- Document recurring failure modes for future reference
Usage:
/test-suite
Claude executes the entire workflow automatically.
Dynamic arguments with placeholders:
File: .claude/commands/create-feature.md
---
description: Scaffold a new feature with tests, types, and documentation
allowed-tools:
  - Write
  - Edit
  - Bash(mkdir:*)
---

# Create Feature Scaffold

Create a complete feature implementation structure for: **$1**

## Arguments
- $1: Feature name (e.g., "user-authentication")
- $2: Feature type (default: "api")
- $ARGUMENTS: All arguments concatenated

## Steps

1. **Create directory structure:**
mkdir -p src/features/$1/{handlers,services,types,tests}
2. **Generate files:**
- `src/features/$1/index.ts` - Feature entry point
- `src/features/$1/types.ts` - TypeScript types
- `src/features/$1/handlers/$1.handler.ts` - Request handler
- `src/features/$1/services/$1.service.ts` - Business logic
- `src/features/$1/tests/$1.test.ts` - Test suite

3. **Add boilerplate:**
- Export feature from main index
- Register routes in API router
- Add feature documentation to README

4. **Create initial tests:**
- Happy path test cases
- Error handling tests
- Edge case tests
Usage:
/create-feature user-notifications api
Result: Complete feature scaffold with all boilerplate generated.
IDE Integration: Seamless Development
Visual Studio Code: Native Extension (Recommended):
Install the official Claude Code extension from the VS Code Marketplace for the smoothest experience.
Why it's the best experience:
Released September 2025, the native VS Code extension makes Claude Code feel like a built-in IDE feature.
Key features:
- Quick Launch: Press Cmd/Ctrl+Esc -> Claude opens with current file context
- Automatic Error Context:
- VS Code's Problems panel errors automatically shared with Claude
- Claude sees TypeScript errors, ESLint warnings, test failures
- No need to copy-paste error messages
- Inline Diff Review:
- Claude's changes appear as Git-style diffs in your editor
- Accept/reject changes with a single click
- See before/after side-by-side
- Dedicated Sidebar:
- Full conversation history
- Quick access to commands
- Checkpoint/rewind controls
- Mode switching (Normal/Auto-Accept/Plan)
- Smart Context Sharing:
- Current file automatically included
- Selected text sent as context
- Workspace files easily referenced with autocomplete
Installation:
1. Open VS Code
2. Extensions -> Search "Claude Code"
3. Install official Anthropic extension
4. Sign in with your Anthropic account
Workflow example:
- You're editing
src/api/users.ts - TypeScript error appears in Problems panel:
Type 'User | undefined' is not assignable to type 'User' - Press Cmd+Esc
- Claude opens: "I see a TypeScript error in users.ts. This is a null safety issue. Should I fix it?"
- You: "Yes, handle the undefined case gracefully"
- Claude proposes changes -> Shows inline diff
- You click "Accept" -> Code updated -> Error gone
Total time: 10 seconds
JetBrains IDEs: Plugin-Based:
Beta plugin available for:
- IntelliJ IDEA
- PyCharm
- WebStorm
- Rider
- GoLand
- All other JetBrains IDEs
Installation:
1. Settings -> Plugins
2. Search "Claude Code"
3. Install and restart IDE
Remote Development Note:
If using Remote Development or WSL:
- Install the plugin on the remote host, not just the local client
- Configure API keys on the remote machine
- CLAUDE.md files should be in the remote filesystem
Why: JetBrains Remote Development executes extensions on the remote machine. Local-only installation won't have access to remote files.
Troubleshooting and Maintenance
Common Issues and Solutions
Issue 1: Subdirectory CLAUDE.md Not Loading:
Problem:
You: "Refactor the payment service"
Claude: [Doesn't follow the patterns in ./services/payment/CLAUDE.md]
Cause: Subdirectory CLAUDE.md files only load when Claude reads a file from that directory.
Solution: Explicitly reference a file in the subdirectory:
You: "Refactor the payment service. Start by reviewing @./services/payment/src/stripe.ts"
By reading stripe.ts, Claude loads ./services/payment/CLAUDE.md.
Better long-term solution: Add to project root CLAUDE.md:
## Payment Service Context
For any payment-related work, always review:
- @services/payment/CLAUDE.md (module conventions)
- @services/payment/src/types.ts (payment types)
Issue 2: Tab Key Not Completing Files:
Problem: Pressing Tab toggles thinking mode instead of completing file paths.
Cause: In v2.0+, Tab is remapped to thinking toggle.
Solution: File completion only works within @ references:
You: "Review @src/ [Press Tab here] -> Autocompletes to @src/api/, @src/components/, etc.
Outside @ references, Tab toggles thinking mode (this is intentional).
Issue 3: Auto-Accept Mode Not Working:
Problem: You're in Auto-Accept Mode, but Claude still asks for approval on file edits.
Cause: You have a restrictive ask rule in .claude/settings.json:
{
  "permissions": {
    "ask": ["Edit", "Write"]
  }
}
Solution: Move Edit to allow list:
{
  "permissions": {
    "allow": ["Edit", "Read", "MultiEdit"],
    "ask": ["Write", "Bash(git commit:*)"]
  }
}
Auto-Accept Mode respects permission rules. If Edit is in ask, you'll still be prompted.
Issue 4: MCP Server Not Connecting:
Problem: Claude can't access your Linear/GitHub/Database via MCP.
Diagnosis steps:
- Check MCP config location:
cat ~/.config/claude-code/mcp_settings.json
Or if you installed a while back look under ~/.claude/setting.json and ~/.claude.json.
2. Verify server command:
{
  "mcpServers": {
    "github": {
      "command": "npx",
      "args": ["-y", "@modelcontextprotocol/server-github"],
      "env": {
        "GITHUB_PERSONAL_ACCESS_TOKEN": "ghp_..."
      }
    }
  }
}
3. Test server manually:
GITHUB_PERSONAL_ACCESS_TOKEN=ghp_... npx -y @modelcontextprotocol/server-github
Should start without errors.
4. Check Claude logs:
/doctor
Shows MCP server connection status.
Common fixes:
- Missing API key: Add to
envsection - Wrong command path: Use full path to binary
- Permissions: Ensure API token has required scopes
- Network issues: Verify firewall/proxy settings
Issue 5: Agent Not Delegating Automatically:
Problem: You have a database-expert agent, but Claude Main doesn't invoke it automatically.
Cause: Missing "use proactively" phrase in agent description.
Solution: Edit .claude/agents/database-expert.md:
---
description: PostgreSQL expert for schema design and query optimization. **Use proactively** for all database-related tasks.
---
The phrase "use proactively" signals Claude Main to automatically delegate matching tasks.
Recent Updates (September-November 2025)
New Features:
Full Plugin System
- Marketplace for VS Code and JetBrains plugins
- Install third-party extensions for custom workflows
- Access via
/plugincommand
Checkpoints and /rewind
- Automatic checkpointing before edits
- Three rewind modes: code only, conversation only, both
- Named checkpoints for strategic save points
Native VS Code Extension
- Dedicated sidebar with conversation history
- Inline diff reviews (accept/reject)
- Automatic error context from Problems panel
- Quick launch with Cmd/Ctrl+Esc
Claude Skills (Document Workflows)
- Read and edit PowerPoint presentations
- Extract content from PDFs
- Generate DOCX documents
- Integration with Microsoft Office suite
Haiku 4.5 Model
- Faster, cheaper model for simple tasks
- Switch with
/model haiku-4.5 - 3-5x faster responses for straightforward coding
- Use for: linting, simple refactoring, test writing
Sandboxed Bash Mode (Linux/macOS)
- Optional sandboxing for bash commands
- Prevents access outside project directory
- Enable with
--sandboxed-bashflag - Use in untrusted environments
Interactive Questions in Plan Mode
- Claude can ask clarifying questions during planning
- Improves plan accuracy for ambiguous requirements
- Enables richer back-and-forth during research phase
Deprecated Features:
-
CLAUDE.local.md -> Use import mechanism (
@path/to/file.md)- Reason: Consolidates context management
- Migration: Move content to CLAUDE.md with
@imports
-
/allowed-tools -> Now
/permissions- Reason: Better alignment with security model
- Migration: Update custom scripts using new command
-
Legacy think triggers -> Use canonical triggers
- Old: "think carefully", "think deeply"
- New:
think,megathink,ultrathink - Reason: Consistent token budgets
Quick Reference Tables
Keyboard Shortcuts
- Shift+Tab (2x) -- Toggle Plan Mode: Enter/exit read-only planning mode where Claude analyzes without executing
- Shift+Tab (cycle) -- Cycle modes: Switch between operational modes: Normal > Auto-Accept > Plan
- Tab -- Toggle thinking: Enable persistent enhanced reasoning that applies to all subsequent prompts
- Esc+Esc -- Rewind menu: Undo code or conversation changes by accessing checkpoint restore
- Ctrl+C -- Cancel: Stop current generation and interrupt long responses
- Ctrl+D -- Exit: End Claude session with clean shutdown
- Ctrl+L -- Clear screen: Visual refresh to remove clutter from terminal
- Ctrl+O -- Verbose output: Show tool execution details in debug mode for operations
- Ctrl+R -- History search: Recall previous prompts by searching command history
- Ctrl+G -- External editor: Compose long prompts by opening $EDITOR for multiline input
- \ + Enter -- Multiline input: Continue prompt on new line and add line breaks in prompt
- Cmd/Ctrl+Esc -- Quick launch: Open Claude with context in VS Code using IDE integration shortcut
Essential Slash Commands
/help- Show all commands: Get command reference for all available slash commands/config- Configure settings: Edit.claude/settings.jsonto customize Claude's behavior/model- Switch AI models: Use/model haiku-4.5for faster responses on simple tasks/clear- Clear conversation: Start fresh context by clearing conversation history/rewind- Undo changes: Access checkpoint restore menu to revert code or conversation/resume- Resume previous session: Continue where you left off in your last session/continue- Continue last session: Pick up unfinished work from previous conversation/export- Export conversation: Save conversation as Markdown file for documentation/mcp- Manage MCP servers: Configure external integrations through Model Context Protocol/agents- Manage sub-agents: Create and edit specialized agents for delegated tasks/hooks- Configure workflow hooks: Automate before/after actions in your development workflow/plugin- Manage plugins: Install and configure extensions from the marketplace/permissions- Configure tool access: Edit permission rules to control Claude's tool usage/memory- Edit CLAUDE.md: Update project context files for persistent knowledge/context- Debug context issues: See what Claude knows about your project and environment/doctor- Validate configuration: Check MCP servers, agents, and permissions setup
Thinking Modes Quick Reference
Standard (default):
- Normal tokens, instant response time.
- Best for routine coding and clear tasks.
Think:
- Trigger with
thinkin prompt. - Uses 4,000 tokens, takes ~1-2s.
- Best for edge cases and moderate complexity.
Megathink:
- Trigger with
megathinkin prompt. - Uses 10,000 tokens, takes ~3-5s.
- Best for architecture, refactoring, and planning.
Ultrathink:
- Trigger with
ultrathinkin prompt. - Uses 31,999 tokens, takes ~8-15s.
- Best for security audits, complex debugging, and unfamiliar code.
Persistent:
- Press Tab to toggle.
- Token usage and time varies.
- Best for multi-turn discussions requiring consistent depth.
Conclusion: Embracing Agentic Collaboration
You've reached the end of this guide, but the beginning of a new way of building software.
What you've learned:
- Operational mastery: Three modes (Normal, Plan, Auto-Accept) for different development phases
- Context management: CLAUDE.md hierarchical memory for persistent, project-specific knowledge
- Strategic workflows: Plan-first development, fearless refactoring with checkpoints
- Advanced integrations: MCP servers connecting Claude to your ecosystem
- Multi-agent orchestration: Specialized sub-agents for parallel, expert-level work
- Production safety: Granular permissions and workflow automation
The paradigm shift:
Traditional development: You write code. You run tests. You debug. You deploy.
Agentic collaboration: You define outcomes. Claude orchestrates execution. You approve results.
You're still in control. But you've amplified your capabilities:
- What took hours now takes minutes
- What required deep expertise across multiple domains now taps specialized sub-agents
- What created anxiety (risky refactoring, complex migrations) now feels safe with checkpoints
- What consumed mental energy (context switching between tools) now flows through MCP
The five pillars of mastery:
- Plan Mode for architecture -- Think strategically before implementing
- CLAUDE.md for memory -- Build persistent knowledge that compounds
- Permissions for safety -- Define boundaries that protect production
- MCP for integration -- Connect Claude to your entire development workflow
- Sub-agents for expertise -- Delegate specialized tasks to focused AI experts
As Claude Code evolves (and it's evolving rapidly), these strategic principles remain constant. You're not learning a tool. You're learning a development philosophy: human and AI as collaborative partners, each contributing their unique strengths.
The future isn't human-only development. It isn't AI-only development. It's human + AI, working as a unified team.
Claude Code is your entry point to that future.
Now go build something remarkable.
Your Turn: What's the most complex feature or refactoring you'd trust Claude Code to handle? Share your thoughts in the comments below.
Connect & Share:
Follow for more deep dives on AI-powered development, DevOps automation, and modern software engineering practices.
#AI #DeveloperTools #ClaudeCode #SoftwareDevelopment #AgenticAI #FutureOfCoding #Engineering #DevOps #AIAssistants #PairProgramming #ProductivityHacks #TechLeadership
About the Author
I am Rick Hightower, a seasoned professional with experience as an executive and data engineer at a Fortune 100 financial technology organization. My work there involved developing advanced Machine Learning and AI solutions designed to enhance customer experience metrics. I maintain a balanced interest in both theoretical AI concepts and their practical applications in enterprise environments.
My professional credentials include TensorFlow certification and completion of Stanford's Machine Learning Specialization program, both of which have significantly contributed to my expertise in this field. I value the integration of academic knowledge with practical implementation. My professional experience encompasses work with supervised learning methodologies, neural network architectures, and various AI technologies, which I have applied to develop enterprise-grade solutions that deliver measurable business value.
Connect with Richard on LinkedIn or Medium for additional insights on enterprise AI implementation.
Community Extensions & Resources
The Claude Code community has developed powerful extensions that enhance its capabilities. Here are some valuable resources from Spillwave Solutions:
Integration Skills
- Notion Uploader/Downloader: Seamlessly upload and download Markdown content and images to Notion for documentation workflows
- Confluence Skill: Upload and download Markdown content and images to Confluence for enterprise documentation
- JIRA Integration: Create and read JIRA tickets, including handling special required fields
Advanced Development Agents
- Architect Agent: Puts Claude Code into Architect Mode to manage multiple projects and delegate to other Claude Code instances running as specialized code agents
- Project Memory: Store key decisions, recurring bugs, tickets, and critical facts to maintain vital context throughout software development
- Claude Agents Collection: A comprehensive collection of 15 specialized agents for various development tasks
Visualization & Design Tools
- Design Doc Mermaid: Specialized skill for creating professional Mermaid diagrams for architecture documentation
- PlantUML Skill: Generate PlantUML diagrams from source code, extract diagrams from Markdown, and create image-linked documentation
- Image Generation: Uses Gemini Banana to generate images for documentation and design work
AI Model Integration
- Gemini Skill: Delegate specific tasks to Google's Gemini AI for multi-model collaboration
Explore more at Spillwave Solutions -- specialists in bespoke software development and AI-powered automation.