Why Your First Hour With Claude Code Decides Everything
Your first hour with Claude Code, built on one rule: verify before you trust.
A clean install, five prompts, and one keystroke separate the developers who fly from the ones who click "approve" forever
In this article: Most complaints about Claude Code trace back to a rushed first hour: the wrong installer, a missed trust dialog, prompts that burn the context window on overview questions. This is the unrushed version. You will install cleanly, run a first session, learn the five prompts that work on any codebase, memorize five commands, and master the one keystroke that runs the entire permission system. The theme underneath all of it is a single rule: verify before you trust.
A surprising number of "Claude Code isn't working for me" stories are really first-hour stories. People install with the wrong package manager and never get the auto-updater. They click past the project-trust dialog without reading it. They open with "tell me everything about this project" and watch the context window crater on the first prompt. They never learn the four-keystroke habits that make every later session faster.
None of this is hard. It is just not obvious, and most introductions skip it to reach the interesting parts. This one does not. Spend a real hour here and your first hour with Claude Code becomes the foundation for everything after it, instead of the reason you bounce off the tool in week one.
There is one idea threaded through the whole hour, so name it now: verify before you trust. Verify your install before you assume it works. Read the trust dialog before you accept it. Review every diff before you approve it. Claude Code is an agent that takes real actions on your machine, and the developers who get the most out of it are the ones who built the verification habit on day one.
Install the modern way, then prove it worked
Anthropic's recommended path is the native installer. Not npm. There is a reason, and it matters.
On macOS, Linux, and WSL:
curl -fsSL https://claude.ai/install.sh | bash
On Windows PowerShell:
irm https://claude.ai/install.ps1 | iex
The native installer drops a single signed binary at ~/.local/bin/claude (or %USERPROFILE%\.local\bin\claude.exe on Windows). No Node.js dependency. No shell-wrapper indirection. Most important, it auto-updates in the background. Open Claude Code tomorrow and you are silently on the latest release. That alone is worth choosing the native path over every alternative.
The other install routes all work. They are worth knowing mostly so you understand what you trade away. Homebrew (brew install --cask claude-code) and WinGet give a clean install and uninstall, but no auto-update: you run the upgrade by hand. The apt, dnf, and apk repositories use signed Anthropic packages with documented GPG fingerprints, the right answer for fleet deployments. And npm (npm install -g @anthropic-ai/claude-code) still works; it pulls the same native binary. Two warnings on the npm path: never run sudo npm install -g, because it creates permission errors that are annoying to clean up, and never run npm update -g, because update respects the original semver range and can strand you on an old version. Use npm install -g @anthropic-ai/claude-code@latest instead.
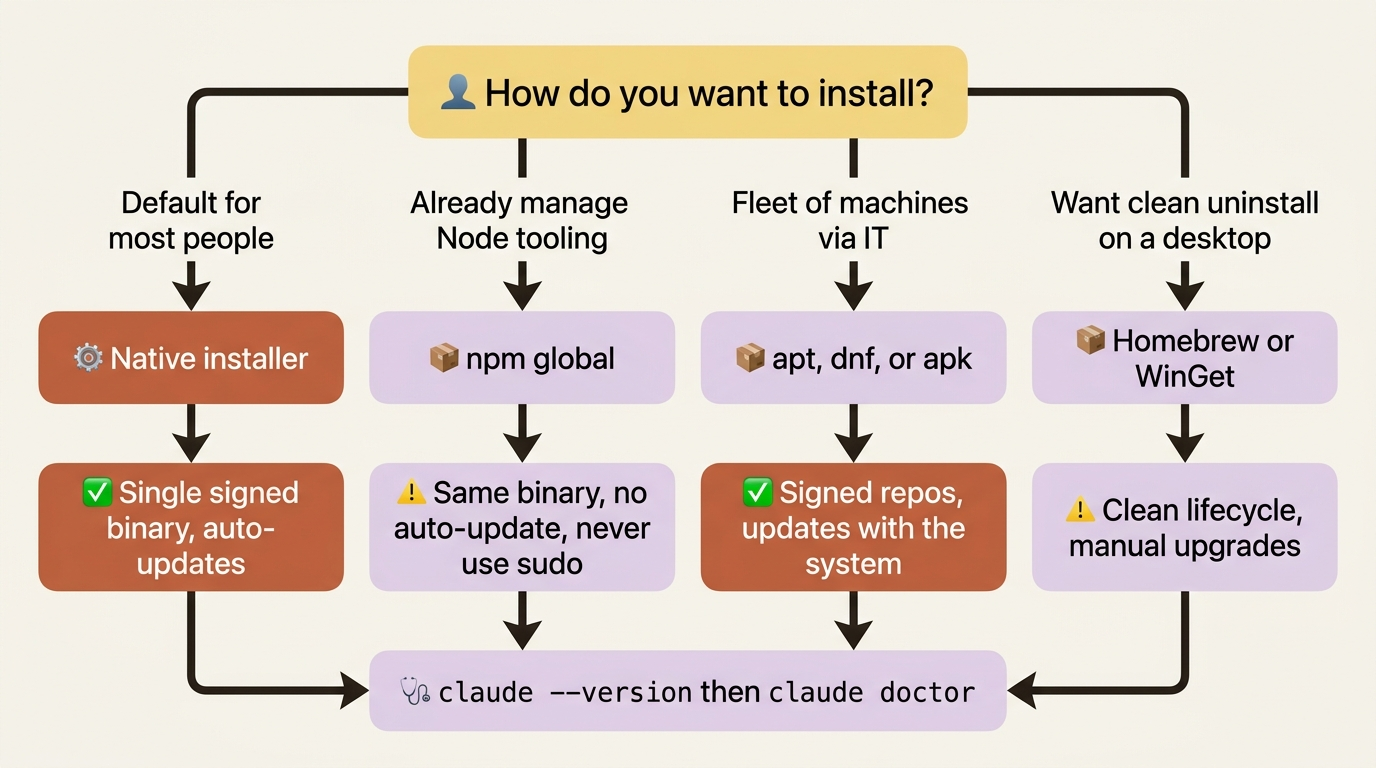
If you used Claude Code in the past, check what you actually have on disk before assuming:
which -a claude
More than one line of output means you have conflicting installs. The native binary at ~/.local/bin/claude is the keeper. Uninstall the rest.
A few requirements bite people. You need macOS 13.0 or later; the native binary uses load commands older macOS cannot handle. You need 4 GB of RAM, which matters on small cloud VPS instances: if the install prints Killed, the OOM killer ate it, so add swap or size up. On Windows native, the Bash tool relies on Git for Windows; without it, Claude Code falls back to a PowerShell tool.
Now the verification step that the rule demands. Do not assume the install worked. Prove it:
claude --version
claude doctor
claude --version confirms the binary is on your PATH. claude doctor runs the real check: auth status, terminal compatibility, plugin marketplace connectivity, the works. Run it once after install. Run it again any time something feels off.
You do not have to live in the terminal. The same engine and configuration power extensions for VS Code, Cursor, Windsurf, and Zed, a JetBrains plugin, and a desktop app with a dedicated Code tab. Your sessions, project memory, skills, and settings follow you across all of them, so the choice does not lock you in.
Read the trust dialog before you accept it
The very first time you run claude in a directory, two things happen, and both deserve your attention.
First, authentication. Claude Code requires a Pro, Max, Team, Enterprise, or Console account. The free Claude.ai plan does not include Claude Code. If you only have a free account, the browser prompt hands you a sign-up flow. Bedrock, Vertex, and Foundry work as third-party providers for enterprises already set up on one of them.
Second, the project-trust dialog. Claude Code asks whether to trust this directory. This is not a formality to click past. Trust gates the auto-installation of marketplace plugins and the execution of project-defined hooks. Accepting trust means files like .claude/settings.json and .mcp.json take effect on your machine.
So apply the rule. Accept trust for repositories you own and understand. Do not accept trust for an arbitrary directory you cloned five minutes ago and have not read. That is exactly how a malicious project's .claude/settings.json would land hooks that run on your machine. Verify before you trust, literally, at the dialog box. Trust acceptance is saved per directory, so you answer once per project.
One footgun: if you start Claude Code in your home directory, trust acceptance is not saved to disk, and you get the prompt on every launch. Start it inside a project subdirectory instead.
Your first session, and how not to lose it
There are three ways to invoke Claude Code:
# Interactive, what you'll do 95% of the time
claude

# One-shot interactive, interactive but seeded with a task
claude "explain how authentication works in this project"

# Headless, for scripts and CI
claude -p "what's the test command for this repo?"
Interactive is the default: you type, Claude responds, you keep going. The one-shot form opens an interactive session pre-loaded with your prompt. The headless form, with -p or --print, runs a single prompt and exits with no conversation, which is the form you wrap in shell scripts, GitHub Actions, or pre-commit hooks.
When you step away mid-task, your session saves automatically to disk under ~/.claude/projects/. To pick it up again, claude --continue (or claude -c) resumes the most recent session in the current directory, and claude --resume (or claude -r) opens a picker of past sessions. --continue is the daily driver: same project, keep going.
Build one small habit here. Once a project has more than a few sessions, the picker fills with auto-generated titles that all sound alike. Name your sessions instead: run /rename mid-session, or pass --name at launch with claude -n "auth-migration". Future you, scrolling the picker on Monday for Thursday's work, will thank present you for the thirty seconds it cost.
Your first ten prompts: bounded, not boundless
The hardest part of starting on a codebase you do not know is asking the right thing first. An open-ended prompt like "tell me about this project" makes Claude read everything in sight and crater your context window. Remember the framing here: context is the operating system for an agentic coding tool. Everything Claude knows about your project lives in a finite window, and the moment you fill it with noise, the agent gets worse at everything. A too-narrow prompt has the opposite problem and misses the big picture. The middle path is a handful of patterns that work on any codebase, in any language.
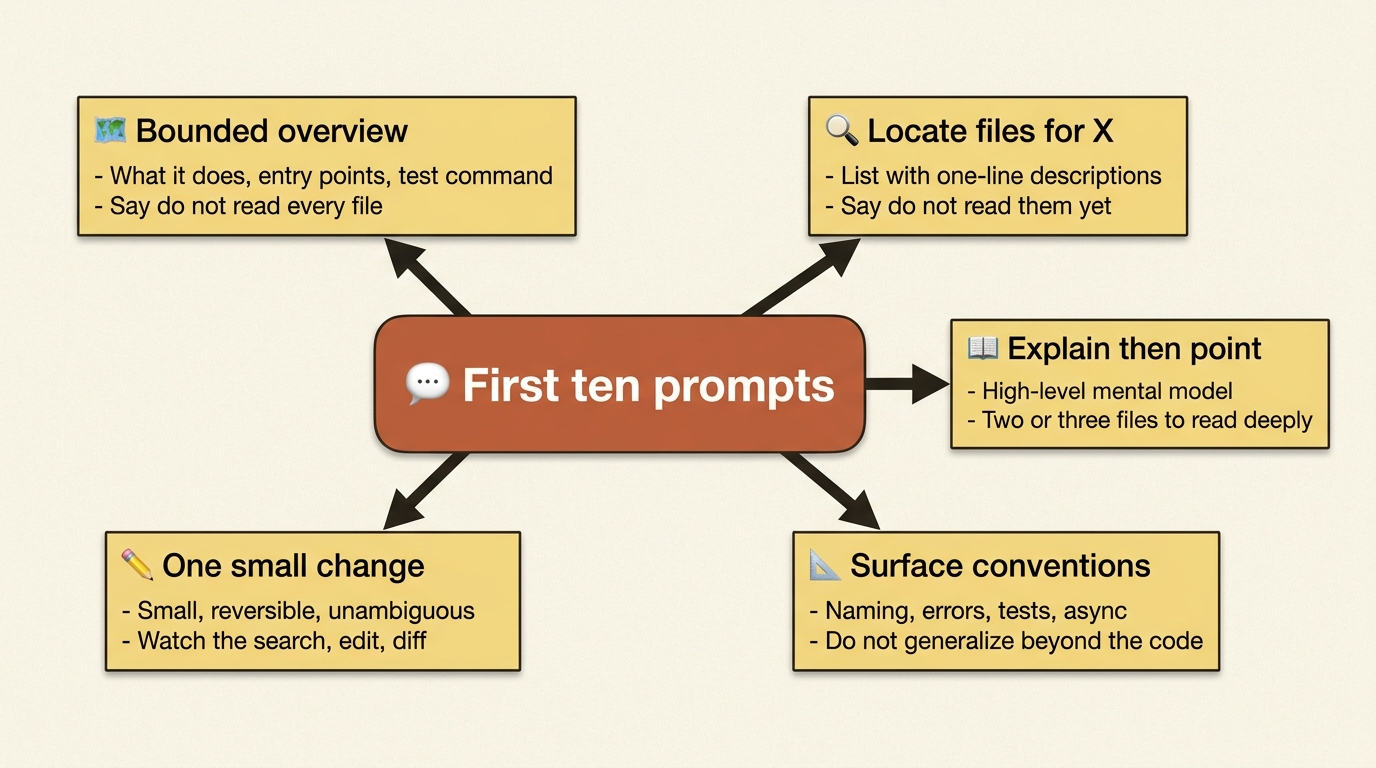
Here are five prompts that earn their place on day one.
1. Overview, but bounded. Ask for a one-page overview: what the codebase does, the main entry points, the major directories, the test command. Then add the load-bearing instruction: don't read every file; use directory listings and the README. Without that line, Claude happily reads fifty files to be "thorough." With it, you get a useful summary that cost 5,000 tokens instead of 50,000.
2. Find the files that handle X. Ask Claude to find the files that handle, say, session timeout, list them with one-line descriptions, and not read them yet. This narrows the search cheaply. You read the ones you actually need on the next prompt.
3. Explain X, then point at the key files. Ask for a high-level explanation of how authentication works, then ask Claude to point you at the two or three files to read deeply. Explanation plus pointers beats either one alone: the explanation gives you the mental model, the pointers give you the next move.
4. What conventions does this project use? Ask Claude to look at three or four recent commits and a couple of source files in different directories, then describe the conventions for naming, error handling, test structure, and async patterns. Add the guardrail: don't generalize beyond what you can actually see in the files. That line keeps Claude honest instead of inventing plausible conventions.
5. Make a small, isolated change. Ask Claude to add a logging statement when a session expires: find the spot, make the change, show the diff, touch nothing else. Your first change should be small, reversible, and unambiguous. This is the prompt that teaches you what edits feel like, and if anything surprises you, it surprises you now, while one keystroke reverts it.
Five more are worth running to stretch different muscles. Ask Claude to run the test suite and name the slowest tests. Ask for README improvements. Ask for a summary of recent commit history. Ask it to flag obvious dead code. Ask it to scan the dependency list for anything unmaintained. Together they exercise shell commands, prose, git history, search, and dependency inspection. After ten prompts you have watched Claude use every category of tool it has.
Five commands to memorize before lunch
Most slash commands you learn over time. Five you should know by the end of your first hour.
/help lists every slash command in the current session, including ones added by plugins and skills. Do not memorize commands; memorize /help.
/clear starts a fresh session in the same directory. The context window resets, your project memory and skills reload. Run it when you finish one task and start a different one. Do not let a single conversation grow forever; a crowded context makes the agent worse.
/context shows what is in the window right now, broken down by category with token counts. This is your diagnostic when something feels slow or Claude seems to be ignoring earlier instructions. It is verification, applied to the agent's own memory.
/memory lists every project memory file and rule file actually loaded for this session, with toggles for auto memory. Where /context shows what is in the window, /memory shows which of your config files made it in. The two together answer almost any "why is Claude doing this?" question.
/rewind restores files to an earlier checkpoint. Claude Code snapshots your files before every edit, so you can always roll back; the shortcut is pressing Esc twice. The first time something goes sideways and you /rewind to recover instantly is the moment Claude Code stops feeling like an experiment and starts feeling like a tool.
The Shift+Tab habit: telling Claude how much to trust it with
The single most important keystroke to learn in week one is Shift+Tab. It cycles through permission modes, and a permission mode is how you tell Claude Code, in effect, "I trust you with this much autonomy right now." This is the verify-before-you-trust rule turned into a control you can press.
There are four modes in the cycle. default asks before every tool call that could change anything; it is the safest, slowest mode, and where you start. acceptEdits auto-approves file edits but still asks before shell commands, for confident editing without a Bash free-for-all. plan is read-only: Claude can search, read, and explore, but cannot edit or run shell commands, which is the mode for thorough investigation before touching anything. auto uses a separate classifier model to review each action in the background, with no interactive prompts unless something looks suspicious.
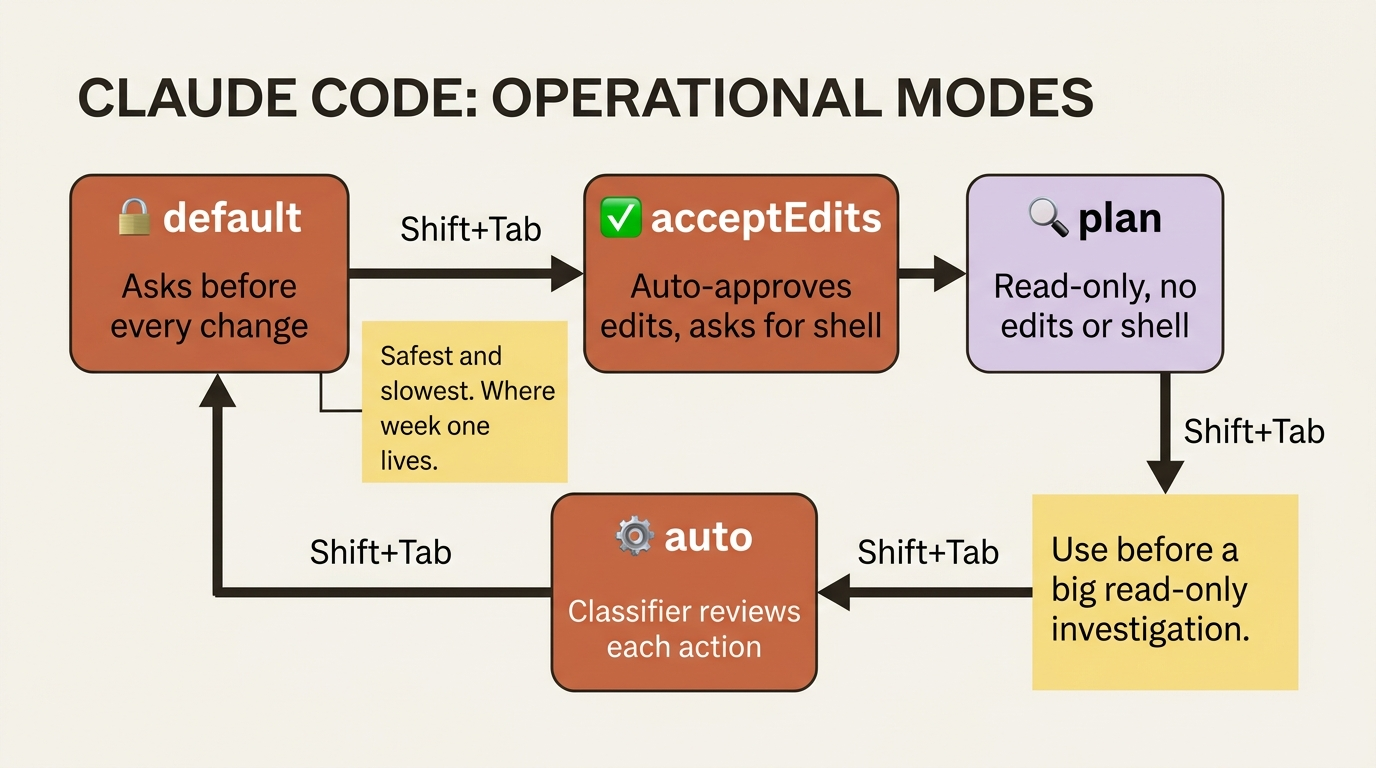
Press Shift+Tab and the status bar at the bottom of your prompt shows the current mode. Press again to advance. The muscle to build now is small but compounding: check the status bar before you send a non-trivial prompt. Glance, decide, send.
Most of week one will live in default, and that is fine. The goal is not to live in auto from day one. The goal is to know the keystroke and the four modes, so that on day three, when you are about to ask Claude to read forty files and explain the architecture, you have the instinct to press Shift+Tab until the status bar says plan first. People who never learn that instinct spend their whole Claude Code career one approve-click at a time, wondering why everyone else moves faster.
That instinct connects back to the central rule. Whatever mode you choose, the loop stays the same: you send a bounded prompt, Claude gathers context and proposes an action, and you verify the diff before it lands. Approve when it is right. Press Esc twice and /rewind when it is not.

Do this today
Your first hour, condensed into six concrete moves:
- Install with the native installer. Skip npm unless you have a specific reason. Run
claude doctorafterward and read its output. - Log in. If you only have a free Claude.ai plan, upgrade, because Claude Code is not included free.
- Accept project trust for the repo you actually own, not your home directory, and read the dialog before you click.
- Run the five overview prompts on a project you know well. Watch how Claude moves, and notice what lands in context.
- Run
/contextand/memoryand compare what loaded against what you expected. Surprises here are almost always fixable. - Press
Shift+Tabuntil you have seen all four mode names in the status bar, then return todefault.
That is the hour. If you skipped the install advice and you are on an older npm-with-Node path, things will mostly work, but you will be missing the auto-updater and the cleaner single-binary lifecycle. It is worth five minutes to switch.
The habit that compounds
Almost everything that goes wrong in someone's first week with Claude Code is a verification step that got skipped. An unverified install. An unread trust dialog. An approved diff nobody actually looked at. A context window nobody checked with /context.
So make the rule your default posture, not a chore. Verify before you trust is not caution for its own sake; it is the habit that lets you safely hand an agent more and more autonomy over time, because you always know how to check its work and how to undo it. The developers who fly with Claude Code are not the ones who trust it blindly. They are the ones who built the verification reflex in the first hour, and then never had to think about it again.
Install it cleanly. Read the dialog. Watch the diff. Glance at the status bar. Do that, and your first hour stops being the reason Claude Code did not work for you. It becomes the reason it does.
This is Part 2 of "Claude Code, Day-to-Day," a 19-part guide to mastering Claude Code for working engineers.