You Are Keyboard-Mashing 'y'. Here Is How to Stop.
Five (really six) permission modes: calibrating exactly how much an AI agent can do without asking you first.
Claude Code permission modes let you calibrate exactly how much an AI agent can do without asking you first. Master them, and "approve, approve, approve" stops being part of your day.
In this article: Claude Code, Anthropic's agentic coding tool, asks before it edits a file or runs a command. That safety check is correct in principle and exhausting in practice. This article walks through all six Claude Code permission modes, the permission rules that sit underneath them, and Auto Mode, the 2026 feature that finally lets you walk away from a long task. By the end you will know which mode to reach for, when, and how to wire your project so you almost never click approve again.
The thing that breaks more Claude Code users than anything else is not context windows or model quality. It is clicking approve. Over and over. Every file edit. Every shell command. Every test run. The novelty wears off in the first hour. By the end of the first week you are mashing y like a video game, and you have made one of three choices: you gave up and flipped everything to the no-checks mode (bad), you turned the tool off in frustration (worse), or you learned Claude Code permission modes properly (the right answer).
This article is the third path. The headline is Auto Mode, the biggest unlock of 2026 and the reason "I have to approve every tool call" is no longer a complaint a serious user needs to have. But Auto Mode only earns its place once you understand the modes underneath it, when to reach for which, and how permission rules layer on top to make any mode behave the way you want.
Why permission modes exist at all
Claude Code is an agent. It works in a three-phase loop: gather context, take action, verify. The "take action" phase is where it edits files, runs your test suite, makes commits, and calls out to the network. Every one of those actions can, in principle, do something you did not want.
Permission modes are the dial that controls how much of that action phase happens without your sign-off. Think of it as a trust spectrum. At one end, Claude reads but never touches anything without asking. At the other end, it runs the entire tool surface unrestricted. Every mode between is a different trade of convenience for oversight.

There are six modes. Here they are at a glance.
| Mode | What runs without asking | Best for |
|---|---|---|
default |
Reads only | Getting started, sensitive work |
acceptEdits |
Reads, file edits, common filesystem commands | Iterating on code you are reviewing |
plan |
Reads only | Exploring a codebase before changing anything |
auto |
Everything, with background safety checks | Long tasks, reducing prompt fatigue |
dontAsk |
Only pre-approved tools | Locked-down CI and scripts |
bypassPermissions |
Everything | Isolated containers and VMs only |
Two rules apply across every mode except bypassPermissions, and they matter enough to state up front.
First, writes to protected paths are never auto-approved, no matter the mode. Your .git, .claude, .vscode, .idea, and .husky directories are guarded. Repository state and Claude's own configuration cannot be corrupted by accident.
Second, permission rules sit underneath the mode. The mode is a baseline. Specific allow and deny rules in .claude/settings.json refine it. Mode plus rules together produce the behavior you actually see. We will come back to rules, because they are the real lever.
A quick tour of the six modes
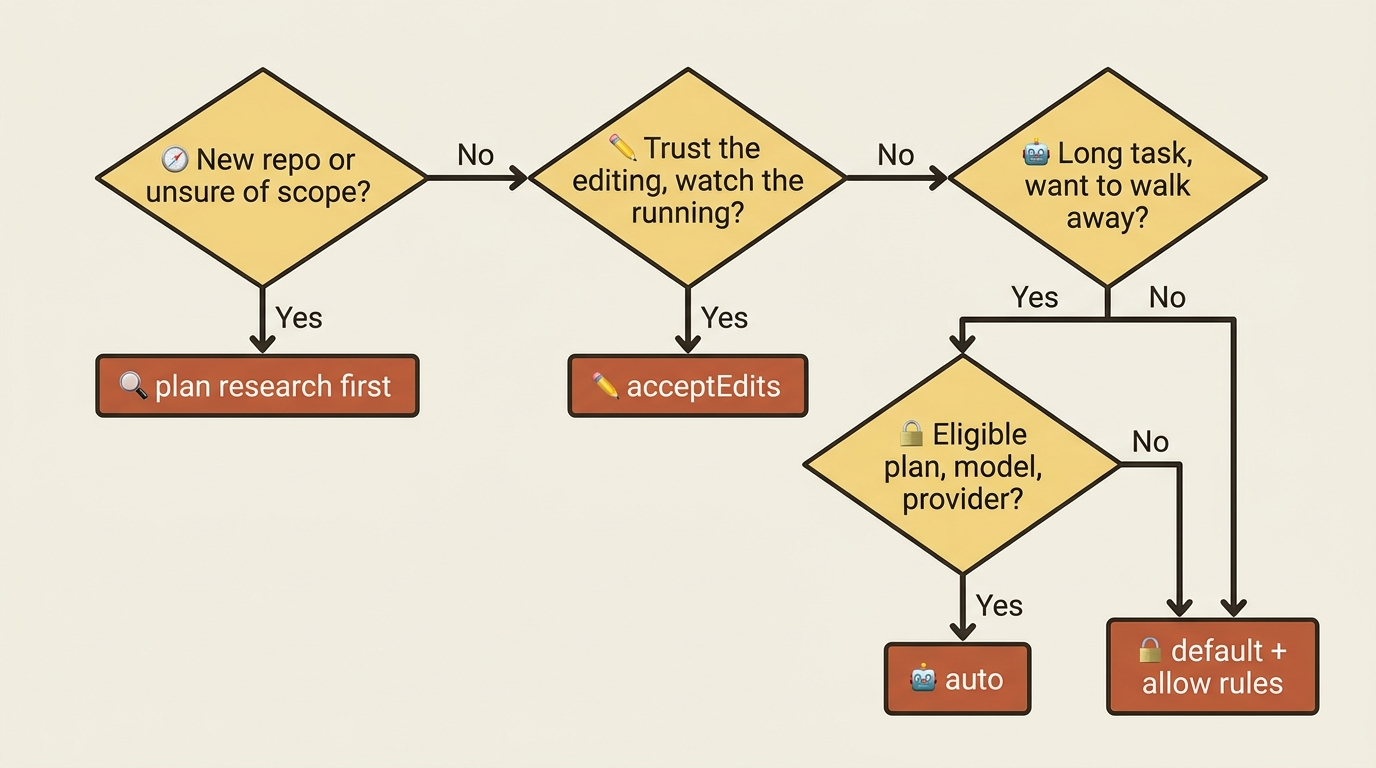
default is where you start. Claude reads anything, but any edit, shell command, or network call asks first. It is the right answer for unfamiliar territory: a repo you just cloned, a codebase you are still learning, a feature you cannot yet scope.
acceptEdits is the iteration mode. Edits land in your working directory without prompting, and you review them afterward in your editor or with git diff. Common filesystem commands (mkdir, touch, mv, cp, rm, rmdir, sed) auto-approve when scoped to your working directory. Everything else still prompts: git push, npm install, anything outside the working directory, anything touching protected paths. Use this when you have decided to trust Claude with the editing but want to keep an eye on the running.
plan is read-only research with a deliverable. Claude searches, reads, and runs exploration commands, but it cannot edit or run anything that mutates state. At the end it proposes a plan. We will dig into this one shortly.
auto is the unlock. A classifier model reviews every action before it runs, blocks the dangerous and the destructive, and runs everything else without prompting you. The deep dive is coming.
dontAsk is the inverse of auto. It auto-denies anything not explicitly on the allow list. This is the mode for CI workflows where you know exactly which tools are needed and want everything else hard-stopped. It never appears in the mode-cycling shortcut. You opt in with --permission-mode dontAsk.
bypassPermissions is the "I know what I am doing" mode. No checks. Root-level deletions like rm -rf / still prompt as a last-resort circuit breaker, but otherwise the whole tool surface runs unrestricted. Use it only in disposable environments: containers, ephemeral VMs, sandboxed worktrees. Not on your dev machine. Not on a workstation that holds your SSH keys. Administrators can lock it off entirely with permissions.disableBypassPermissionsMode: "disable" in managed settings.
How to switch modes, and how to set a default
There are three places you set the mode: mid-session, at startup, and as a persistent default.
Mid-session. Press Shift+Tab to cycle through default → acceptEdits → plan. The current mode shows in the status bar at the bottom of the prompt box. That is the default three-mode cycle. Optional modes slot in after plan when enabled. auto appears once your account is eligible, with a one-time opt-in prompt. bypassPermissions appears only after you started with --allow-dangerously-skip-permissions. dontAsk never appears in the cycle at all. One quirk worth knowing: if both auto and bypassPermissions are enabled, the cycle hits bypassPermissions first, so do not blow past auto on the way.
At startup. The --permission-mode flag overrides the default for one session:
claude --permission-mode plan
claude --permission-mode acceptEdits
claude --permission-mode auto
The same flag works with -p for non-interactive runs:
claude -p "refactor this module" --permission-mode auto
As a default. Set defaultMode in .claude/settings.json for the project, or ~/.claude/settings.json for personal use across all projects:
{
  "permissions": {
    "defaultMode": "acceptEdits"
  }
}
One footgun deserves a bold warning. defaultMode: "auto" is ignored when it lives in .claude/settings.json or .claude/settings.local.json, as of Claude Code v2.1.142. The reason is security: a repository cannot grant itself Auto Mode. If you want Auto Mode as your default, set it in ~/.claude/settings.json, your personal user settings. The --permission-mode auto flag still works for a single session no matter where the setting lives.
Plan mode: the cure for the most common mistake
The most common Claude Code mistake is jumping into implementation before the plan is right. A five-minute investigation up front saves the hour of rewinding the wrong implementation later.
In plan mode, Claude does three things. It researches the request using a built-in Plan subagent, reading files and running read-only shell commands. It writes a plan: what it intends to change, in which files, in what order. Then it presents the plan and asks how to proceed.
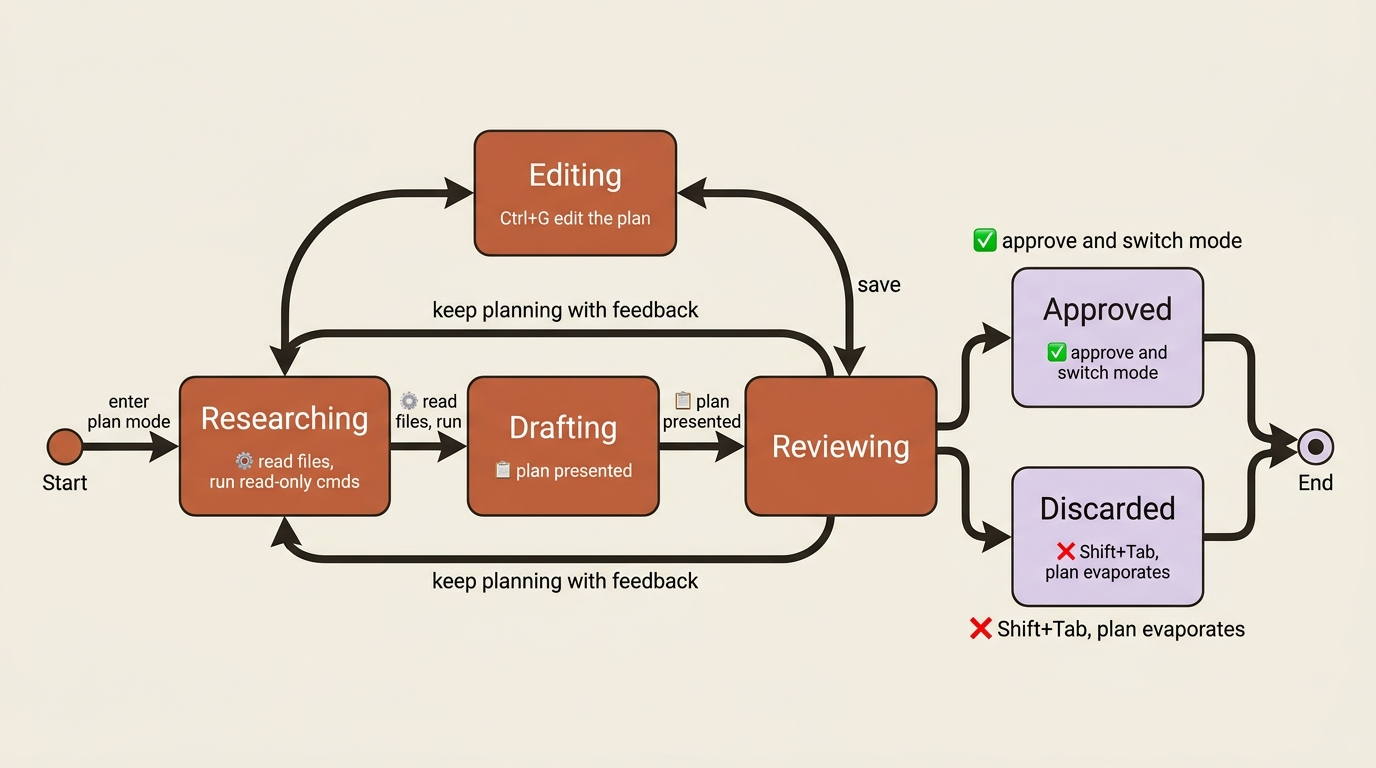
You can enter plan mode three ways: press Shift+Tab until the status bar says plan, prefix a single prompt with /plan to run just that one prompt in plan mode, or start the session with claude --permission-mode plan. Press Shift+Tab again to leave without approving anything. The plan evaporates and you are back where you started.
When the plan is ready, Claude offers explicit approve-and-switch options. You can approve and start in auto mode, approve and accept edits, approve and review each edit manually, keep planning with feedback, or refine with Ultraplan in a browser-based review. Approving exits plan mode and switches the session to whichever mode the option specifies.
Here is the power move most people miss. Ctrl+G opens the proposed plan in your editor before you approve it. The plan is plain markdown. Open it, strike the parts you disagree with, add what is missing, save, then approve. That single keystroke turns plan mode from "Claude proposed something" into "we agreed on something." If you learn nothing else from this section, learn that keystroke.
You can also ask Claude to save the plan to disk before approving, with a prompt like Write this plan to docs/plans/auth-migration.md before exiting plan mode. That gives you a written record, which is plenty for many features.
If your work is mostly cautious, or you are new to a codebase, set plan mode as the project default with "defaultMode": "plan". Every prompt then enters plan mode, and approval explicitly switches you to an editing mode for the implementation.
Auto Mode: the biggest unlock of 2026
Auto Mode is the feature that makes Claude Code feel like a real agent instead of a tool you babysit. Turning it on is the moment "approve, approve, approve" stops being a meaningful part of your day.
Here is what it actually is. A separate classifier model, running on its own context rather than the one Claude is working in, reviews every tool call before it executes. The classifier blocks three categories of action: scope escalation (anything beyond what you asked for), untrusted infrastructure (pushes to repositories it does not recognize as yours, writes to cloud buckets outside your environment, network calls to unknown domains), and anything driven by injected content (instructions Claude read in a file or web page that try to redirect it).
The design detail that makes this trustworthy: the classifier never sees tool results, only the proposed call. Injected text inside a file Claude reads cannot influence the classifier's decision. It is a check that cannot be steered by the very content it is protecting you from.
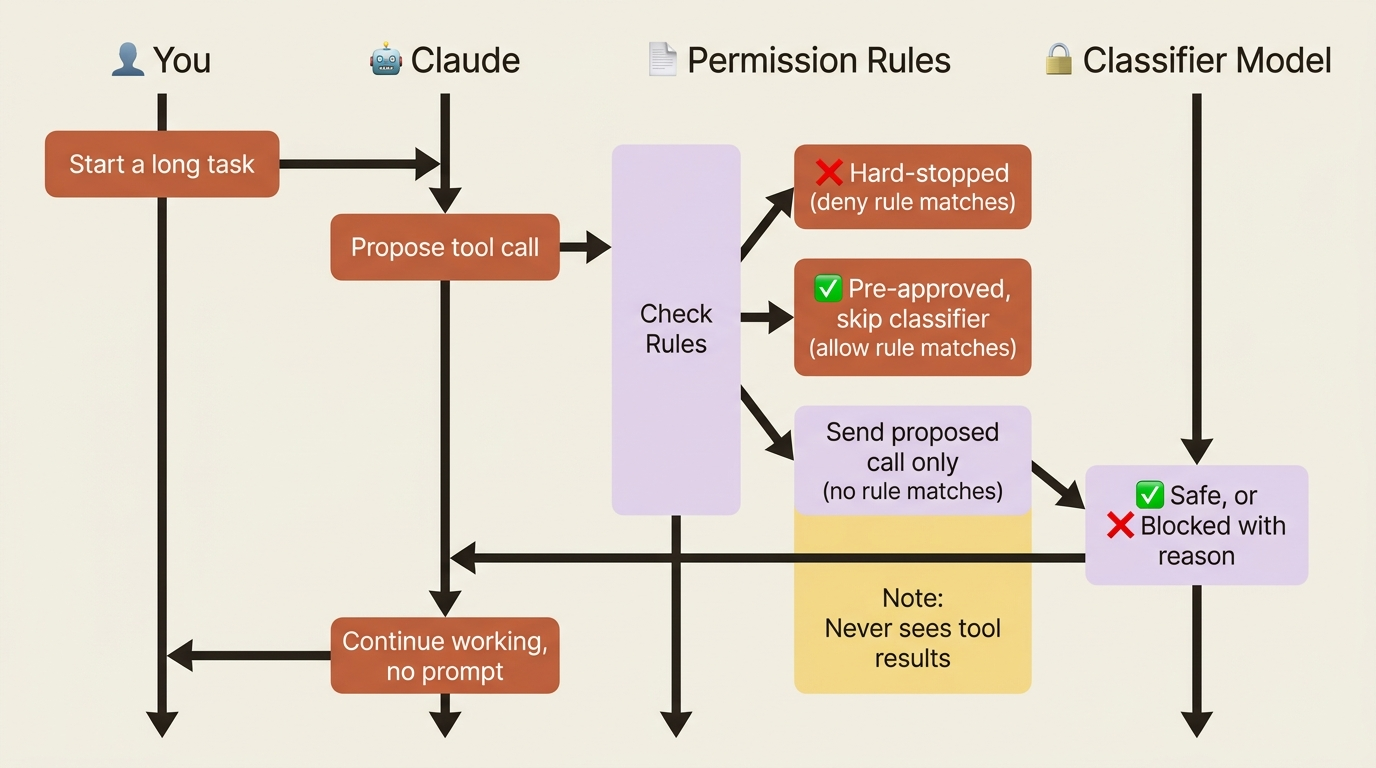
Why does this matter in daily use? Before Auto Mode, your options were default (approve every action, slow but safe), acceptEdits (faster, still prompts for every shell command), or bypassPermissions (no checks, safe only in disposable environments). Auto Mode is the middle path that did not exist: the speed of bypass with a real safety check in front of every action. It lets you start a task against a spec, walk away for coffee, and come back to finished work, with nothing destructive that you will regret.
Auto Mode also tells Claude to execute immediately and minimize clarifying questions. You wanted go, and you get go.
The honest eligibility list
Hitting "Auto Mode is unavailable" without knowing why is frustrating, so here is the full list:
- Plan: Max, Team, Enterprise, or API. Not available on Pro.
- Admin: on Team and Enterprise, an admin must enable Auto Mode in Claude Code admin settings first.
- Model: Claude Sonnet 4.6, Opus 4.6, or Opus 4.7 on Team/Enterprise/API. Opus 4.7 on Max plans. Haiku and older models are not supported.
- Provider: Anthropic API only. Not available on Bedrock, Vertex, or Foundry.
If you see "Auto Mode is unavailable," one of those is unmet. A different message, "cannot determine the safety of an action," means a transient classifier outage. Just retry in a few seconds.
How to turn it on
In the current release, Auto Mode is in the Shift+Tab cycle by default once your account is eligible. No flag needed. Cycle to it until the status bar shows auto, accept the one-time opt-in prompt, and it stays in the cycle from then on. For one-off runs, use claude --permission-mode auto. For a default, set "defaultMode": "auto" in your user settings file at ~/.claude/settings.json, not the project file.
One note for anyone reading older posts: the --enable-auto-mode flag was removed in v2.1.111. It is no longer the right way.
What Auto Mode does not do
Auto Mode is powerful, not magic. Keep four things in mind. It is not a substitute for permission rules: allow, deny, and ask rules still apply underneath, and deny rules in particular still hard-stop things the classifier might have let through. It is not a substitute for review: the classifier lowers the false-positive rate on dangerous actions, but it does not replace reading a diff when the work matters. It is still labeled a research preview in 2026, so do not run it against production credentials. And it needs context: the classifier reads your CLAUDE.md, so an instruction like never force push to main steers both Claude and the classifier at once. That is one of the most underused leverage points in the whole system.
When Auto Mode refuses an action
The classifier will block things. That is the point. When it blocks something you genuinely want done, you have three good moves.
Read the block reason first. The classifier states what tripped it. Often the action was right but described badly. "Push to origin" might trip the classifier when it does not recognize the remote. "Push to origin/feature-branch on the company GitHub org" gives it the context to approve. Rephrasing with specifics is often enough.
Switch modes for that turn. Press Shift+Tab back to acceptEdits or default, run the action with explicit approval, then return to auto. This is the path for the moments where the classifier is right to be cautious but you have context it does not.
Add a permission rule. If the same safe action keeps getting blocked, write an explicit allow rule for the pattern. Allow rules sit beneath the mode, so a pre-approved tool call does not even reach the classifier.
You can review past denials with /permissions, under the "Recently denied" tab. Each row shows the action and reason; press r to mark it for retry. The pattern to internalize: Auto Mode plus a small set of allow rules covers most of the day. Drop to acceptEdits for the genuinely irreversible operations you want to eyeball. That combination handles roughly 95% of the work without prompts, and the deletions, production deploys, and irreversible writes still get your attention.
Permission rules: the layer underneath every mode
Modes set the baseline. Rules refine it. Rules live in .claude/settings.json (project, committed), .claude/settings.local.json (project, gitignored), or ~/.claude/settings.json (user-wide). There are three lists: deny, ask, and allow.
They are evaluated in a strict order: deny, then ask, then allow, then the mode default. First match wins. A deny rule beats an allow rule for the same pattern. A pattern that hits no rule falls through to the mode.

The pattern syntax takes about a minute to learn. Bash matches all uses of the Bash tool. Bash(npm run build) matches that exact command. * is a wildcard, and the space before it enforces a word boundary: Bash(ls *) matches ls -la but not lsof, while Bash(ls*) matches both. File patterns follow gitignore semantics. MCP tools follow mcp__<server>__<tool>. Memorize the one rule that catches everyone: space before star, word boundary; no space, no boundary.
Choosing a mode is mostly a matter of asking yourself a few questions about the task in front of you.
Here is a realistic starter .claude/settings.json for a typical project:
{
  "permissions": {
    "defaultMode": "acceptEdits",
    "allow": [
      "Bash(npm run *)",
      "Bash(npm test *)",
      "Bash(npm install)",
      "Bash(git status *)",
      "Bash(git diff *)",
      "Bash(git log *)",
      "Bash(git add *)",
      "Bash(git commit *)",
      "Bash(git checkout *)",
      "Bash(git branch *)"
    ],
    "deny": [
      "Bash(git push * main)",
      "Bash(git push * master)",
      "Bash(git push --force *)",
      "Read(./.env)",
      "Read(./.env.local)",
      "Read(./.env.production)"
    ]
  }
}
That setup auto-approves the common test, build, and git operations, blocks the things you genuinely do not want auto-running, and sits in acceptEdits so edits land without prompting. From there, switch to auto mid-session when you want speed, or /plan a single prompt when you want caution. For most readers, that config plus Shift+Tab covers everything you need for the first month.
Do this today
Twenty minutes of setup that pays back every hour of work for the rest of the year:
- Press
Shift+Tabin your current session. Cycle through the modes, watch the status bar, and land on the one that matches what you are doing right now. - Check whether you have Auto Mode. Cycle to
auto. If you get the opt-in prompt, you are eligible. If you get "Auto Mode is unavailable," check your plan and provider against the eligibility list above. - Write five
allowrules for the build, test, and git commands you run constantly. Drop them in.claude/settings.json, commit them, and stop approvingnpm testfor the rest of the project's life. - Add
defaultMode: "acceptEdits"to that same file if you are tired of approving every edit. Or adddefaultMode: "auto"to your user file at~/.claude/settings.jsonif you have Auto Mode and want it as your baseline.
The real lesson: calibration, not surrender
The mistake almost every new user makes is treating permissions as a binary. Either Claude asks about everything and you are slow, or it asks about nothing and you are nervous. Neither is right.
Permission modes are a dial, not a switch. The skilled move is calibration: read-only plan mode when you are exploring, acceptEdits when you trust the editing and want to watch the running, auto when you want to walk away from a long task, default for the genuinely sensitive work. Layer a small set of allow and deny rules underneath, and the dial becomes precise. You decide, once, exactly how much an AI agent can do without asking you first, and then you stop thinking about it.
That is the difference between fighting the tool and flying it. Stop mashing y. Set the dial.
This is Part 5 of "Claude Code, Day-to-Day," a 19-part guide to mastering Claude Code for working engineers.