Your Claude Code Setup Is Trapped in One Repo. Plugins Set It Free.
Stop re-deriving the same Claude Code setup for every repo: package it into a plugin your whole team installs in one command.
How to package the skills, subagents, hooks, and MCP servers you have already built into a Claude Code plugin your whole team installs in a single command.
In this article: If you have spent real time tuning Claude Code for a project, that work is stranded in one
.claude/directory. Claude Code plugins fix that. You will learn what a plugin actually is (the same files you already write, just packaged), how to install plugins from the official marketplace today, how to build and test your own with--plugin-dir, and how to distribute it from a local folder to a team repo to a public marketplace.
You did the work. You wrote a /ship skill that runs your project's verification chain. You built a code-reviewer subagent that catches what the first-draft writer misses. You wired up a PostToolUse hook that formats every file on save, and an MCP server that lets Claude check migrations against the live database. Every one of those pieces earns its keep.
And every one of them is trapped. They live in exactly one project's .claude/ directory. Start a new repo, and you are back to a blank setup. Onboard a teammate, and they get none of it. Consult for a client, and you are copy-pasting twelve files and hoping nothing drifts.
Claude Code plugins are the way out. A plugin is a directory with a particular shape that bundles your skills, subagents, hooks, and MCP servers into one installable unit. Package your setup once, and it installs on any repo with a single command. This article walks through what a plugin is, what you can install off the shelf today, and how to build and ship your own.
What a Claude Code plugin actually is
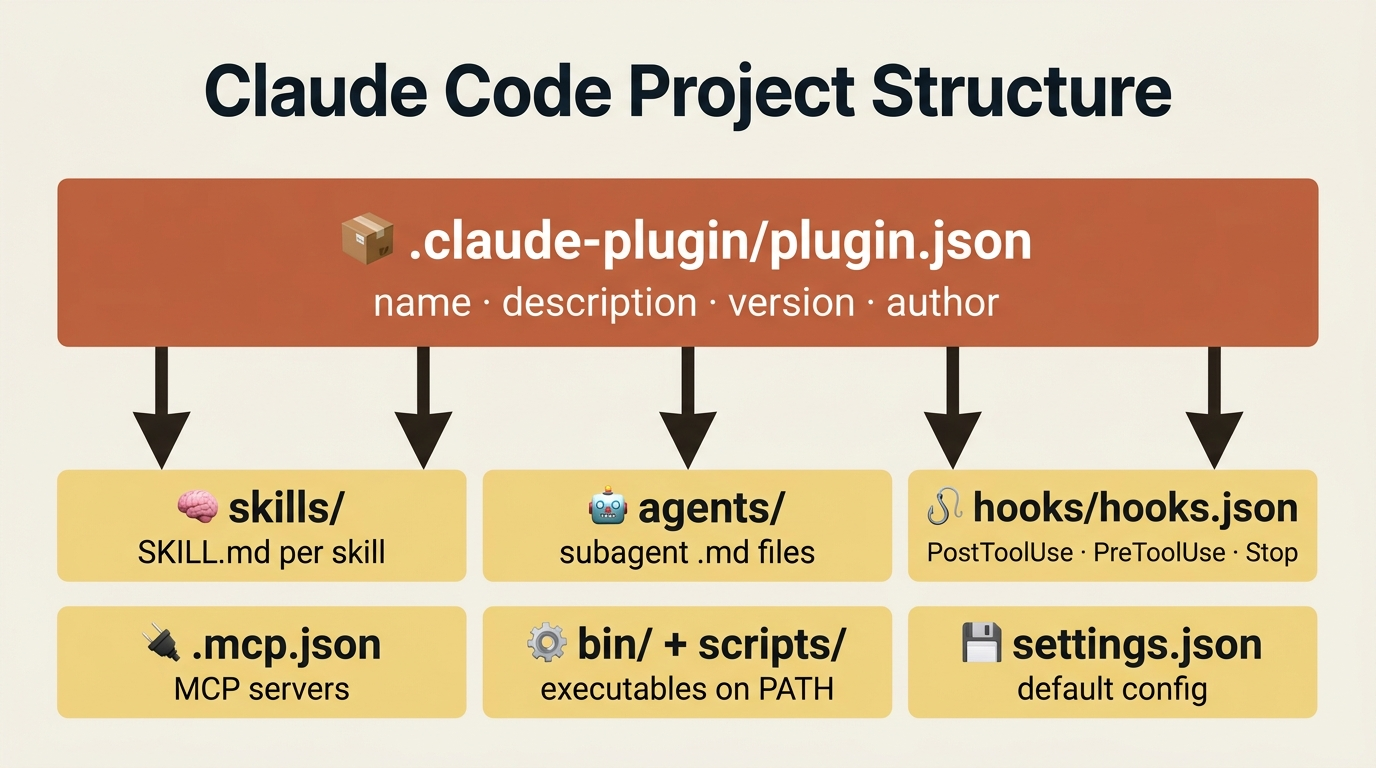
There is nothing exotic here. A plugin is a directory containing some combination of components you have probably already written by hand:
- Skills in
skills/<name>/SKILL.md: reusable instructions Claude can invoke. - Subagents in
agents/<name>.md: specialized agents with their own system prompts. - Hooks in
hooks/hooks.json:PostToolUse,PreToolUse, andStopautomation. - MCP servers in
.mcp.jsonat the plugin root: external tool integrations. - LSP server configs in
.lsp.json: for code-intelligence plugins. - Binaries in
bin/: executables added to the Bash tool's$PATHwhile the plugin is enabled. - Settings defaults in
settings.json: default config applied when the plugin turns on.
Hold all of that together with a manifest, .claude-plugin/plugin.json, that gives the plugin a name and identity. That is the whole idea. The same building blocks, gathered under one name.
Two properties of plugins are worth knowing before you go further, because both will bite you if you do not.
Plugins are namespaced. A skill from a plugin called my-toolkit is invoked as /my-toolkit:skill-name, not /skill-name. The namespace prevents collisions when two plugins ship a skill with the same name. The same applies to agents and other components.
Plugins are copied, not linked. When you install a plugin, Claude Code copies the directory to a cache location. Any path that points outside the plugin, such as ../shared-utils or an absolute path on disk, breaks after install, because those files were never part of the copy. Inside scripts and configs, use the ${CLAUDE_PLUGIN_ROOT} environment variable instead. It resolves to the real cache path at runtime. Remember this one sentence and you will avoid most plugin bugs.
Start by installing, not building
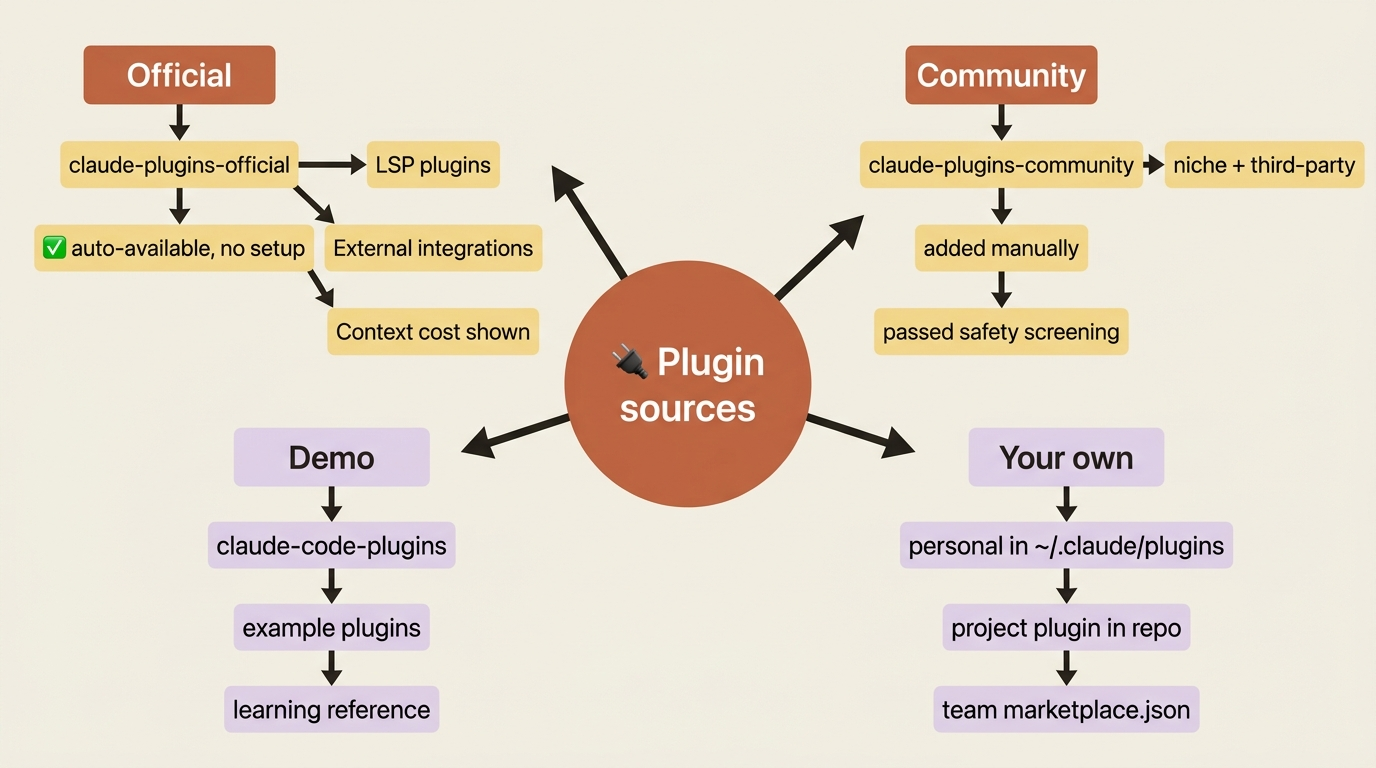
The fastest way to understand why plugins matter is to feel the value before you build anything. Claude Code ships with the official Anthropic marketplace, claude-plugins-official, available automatically with no setup and no add step. Run /plugin to open the tabbed UI (Discover, Installed, Marketplaces, Errors), or browse the catalog at claude.com/plugins.
Installing from the official marketplace is one line:
/plugin install <name>@claude-plugins-official
A few categories are worth knowing on day one.
Code intelligence, the LSP plugins. This is the single highest-leverage category for most projects. LSP plugins enable Claude Code's built-in Language Server Protocol tool, which gives Claude real-time diagnostics after every edit (type errors and lint warnings) plus proper jump-to-definition and find-references, the same way VS Code does. They exist for TypeScript (typescript-lsp), Python (pyright-lsp), Rust (rust-analyzer-lsp), Go (gopls-lsp), Java (jdtls-lsp), C/C++ (clangd-lsp), and more. Install the one matching your language, install the language-server binary it depends on, and you are done.
External integrations. Pre-configured MCP servers for the tools your team already uses: github and gitlab, linear, atlassian, asana, and notion, figma, vercel, firebase, supabase, slack, and sentry. Each one is one command plus an OAuth flow. If you have ever pasted a Linear issue URL into chat for Claude to interpret, the Linear plugin replaces that with a real mcp__linear__list_issues call.
Development workflows. Skill-and-agent bundles: commit-commands for git commit, push, and PR workflows; pr-review-toolkit for specialized review agents; code-review for a four-agent review with confidence scoring; and plugin-dev, the meta-plugin that helps you build your own plugins.
As of v2.1.143, the Discover tab shows a Context cost estimate for each plugin before you install. That matters because every skill a plugin ships contributes its description to your startup context. If a plugin's cost feels high relative to how often you would use it, ask whether you need the whole bundle or just one skill you could copy out.
Two more marketplaces worth knowing
Beyond the official catalog, two public marketplaces fill in the gaps.
The community marketplace holds third-party plugins that passed Anthropic's automated review and safety screening. Unlike the official one, you add it manually:
/plugin marketplace add anthropics/claude-plugins-community
Then install from it with the claude-community namespace. This is where most third-party innovation shows up first: specialized review agents, niche language plugins, and integrations the official marketplace does not carry. Check it when you need something specific.
The demo marketplace, claude-code-plugins, lives in the anthropics/claude-code repo. It is less for daily use and more for learning what is possible. If you are about to build your own plugin, it is a useful reference; most patterns you will need are demonstrated there.
Installation scopes: who gets the plugin
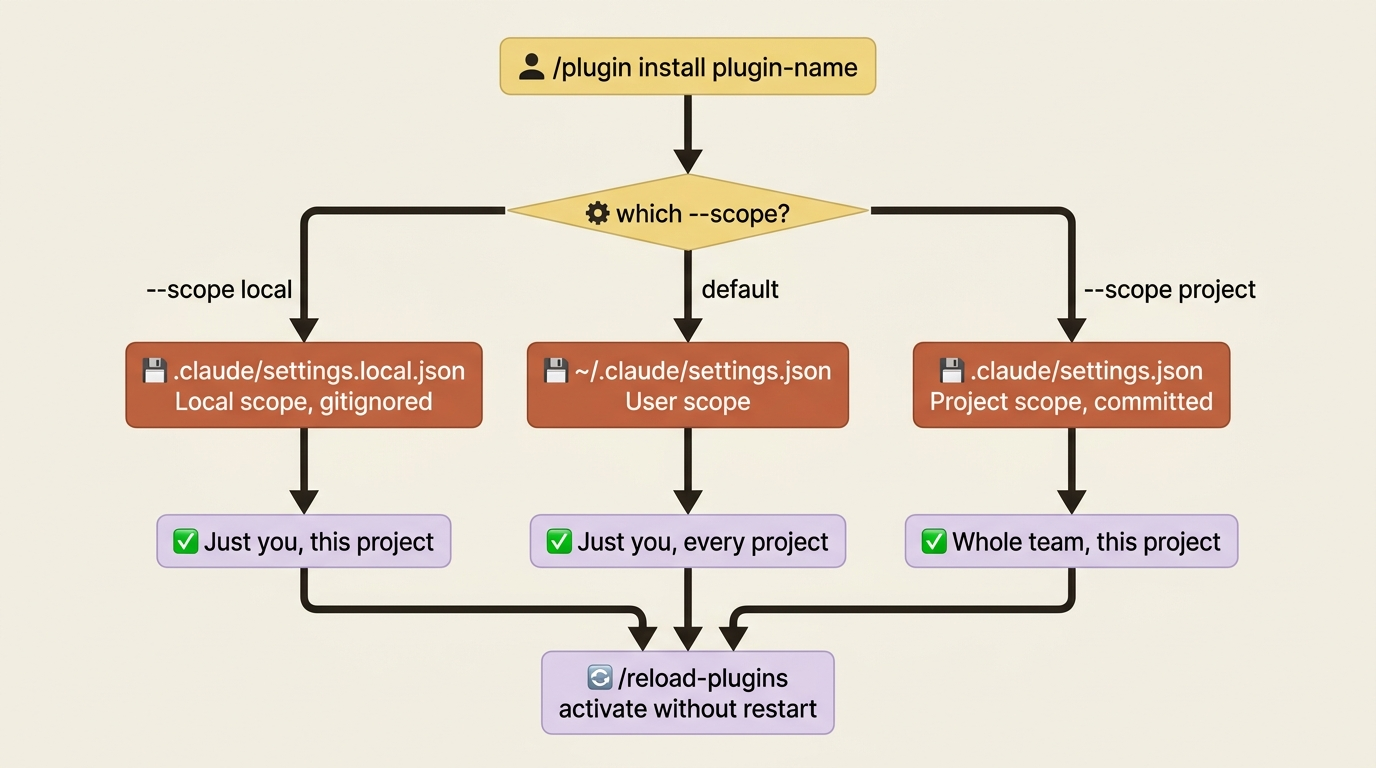
Installation scope follows the same idea as everything else in Claude Code: where the enabled setting lives controls who the plugin applies to.
- User scope writes to
~/.claude/settings.json. The plugin follows you across every project. Best for things you want everywhere, such as code intelligence and your personal/ship. - Project scope writes to
.claude/settings.json, which is committed. The plugin applies to the whole team on this project. Best for shared language LSPs and project-specific MCP integrations. - Local scope writes to
.claude/settings.local.json, which is gitignored. The plugin applies only to you on this project. Best for experiments and personal credentials.
The --scope flag on /plugin install picks the file:
# Just you, every project (default)
/plugin install playwright@claude-plugins-official

# The whole team, committed to .claude/settings.json
/plugin install playwright@claude-plugins-official --scope project

# Just you, this project, in .claude/settings.local.json
/plugin install playwright@claude-plugins-official --scope local
After installing, run /reload-plugins to activate the plugin in your current session without restarting.
When it is worth building your own
Honest answer: most readers will not need to build a plugin for a while. The trigger is one of these situations.
You have a second repo that needs the same setup. The most common reason. You spent two weeks tuning skills, hooks, and MCP configs for project A. Now project B is starting. Either you copy twelve files and watch them drift, or you package the work once.
Your team is bigger than just you. Five developers should all run the same /ship skill, the same code-reviewer subagent, and the same formatting hook. A project-scoped plugin is the deterministic way to guarantee that.
You work across many client codebases. Your setup is your edge. Package it once and drop it into every new client repo.
You built something genuinely shareable. A skill that solves a problem other teams have, or an integration the official marketplace does not cover. The community marketplace is the path.
If none of these apply yet, skip the build sections and come back when one does.
Building a plugin: the local-project quickstart
The fastest way to build and test a plugin is to start in a project subdirectory and load it from disk. No marketplace, no publishing, no version numbers, just a folder you iterate on. The minimum structure:
my-plugin/
├── .claude-plugin/
│   └── plugin.json          # Required: the manifest
├── skills/
│   └── my-skill/
│       └── SKILL.md
├── agents/
│   └── my-agent.md
└── hooks/
    └── hooks.json
Two rules will save you an afternoon of confusion.
Only plugin.json belongs in .claude-plugin/. Every other directory (skills/, agents/, commands/, hooks/) lives at the plugin root, not inside .claude-plugin/. This is the single most common new-plugin mistake. Put skills/ inside .claude-plugin/ and the plugin loads, but nothing shows up.
Component directories are auto-discovered. Drop a SKILL.md into skills/my-skill/ and Claude Code finds it. You do not enumerate components in plugin.json unless you want non-default paths.
The minimum manifest is short:
{
  "name": "my-toolkit",
  "description": "My personal Claude Code setup",
  "version": "0.1.0",
  "author": {
    "name": "Your Name"
  }
}
name is required (kebab-case, no spaces) and description is recommended. version is optional: omit it and the git commit SHA becomes the version, which means every commit counts as a release. For early iteration, leave it off. Once the plugin stabilizes, set it explicitly so users only get updates when you bump it.
Add a skill by dropping a SKILL.md into skills/my-first-skill/SKILL.md:
---
description: Run my project's verification chain
---

Run the project's verification chain in order:

1. `pnpm test`
2. `pnpm lint`
3. `pnpm typecheck`

Stop on first failure and report it with relevant output.
With the plugin loaded, that skill is invokable as /my-toolkit:my-first-skill.
Now test it without installing anything. Load the plugin straight from disk:
claude --plugin-dir ./my-toolkit
The plugin loads for that session only. Edit files in my-toolkit/, run /reload-plugins, and changes apply without restarting. You can chain multiple --plugin-dir flags to test several plugins together. A --plugin-dir plugin with the same name as an installed marketplace plugin takes precedence for the session, so you can test changes to something you have already published without uninstalling it.
Adding hooks and MCP servers without breaking paths
A skill is one component type. Real plugins bundle more, and this is where ${CLAUDE_PLUGIN_ROOT} earns its keep.
A hook file, hooks/hooks.json, uses the same JSON shape as the hooks block of .claude/settings.json:
{
  "hooks": {
    "PostToolUse": [
      {
        "matcher": "Edit|Write",
        "hooks": [
          {
            "type": "command",
            "command": "\"${CLAUDE_PLUGIN_ROOT}\"/scripts/format-on-edit.sh"
          }
        ]
      }
    ]
  }
}
Two details matter. First, use ${CLAUDE_PLUGIN_ROOT} for any path inside the plugin, because the install location is unknowable in advance and the double-quotes protect against spaces in paths. Second, hook scripts must be executable. If you bundle scripts/format-on-edit.sh, run chmod +x before you ship it. Plugin install does not set permissions for you.
An MCP server config, .mcp.json at the plugin root, follows the same pattern:
{
  "mcpServers": {
    "my-tool": {
      "command": "${CLAUDE_PLUGIN_ROOT}/servers/my-tool-server",
      "args": ["--config", "${CLAUDE_PLUGIN_ROOT}/config.json"],
      "env": {
        "DB_URL": "${DB_URL}"
      }
    }
  }
}
Note the distinction. ${CLAUDE_PLUGIN_ROOT} points at files bundled with the plugin. ${DB_URL} is a user environment variable that expands from the user's shell, which is exactly right for credentials and per-machine config. And for state that should survive plugin updates, such as caches and accumulated logs, use ${CLAUDE_PLUGIN_DATA}, which persists across installs while ${CLAUDE_PLUGIN_ROOT} gets replaced every time.
Validate before you ship
Two commands catch most problems before users do.
# Validate structure and manifests
claude plugin validate ./my-toolkit

# Run with debug logging to watch the plugin load
claude --plugin-dir ./my-toolkit --debug
The first checks plugin.json, all frontmatter, and hooks/hooks.json syntax. The second shows which directories were detected, which components registered, and any initialization errors.
Here is the pattern behind nearly every plugin bug: most plugin bugs are path bugs. During development, the plugin lives in your project and paths work because the working directory happens to be the plugin's directory. Once installed, the plugin is copied to a cache, and any path not written as ${CLAUDE_PLUGIN_ROOT} becomes invalid. Test with --plugin-dir from a different working directory to catch the breakage before users hit it.
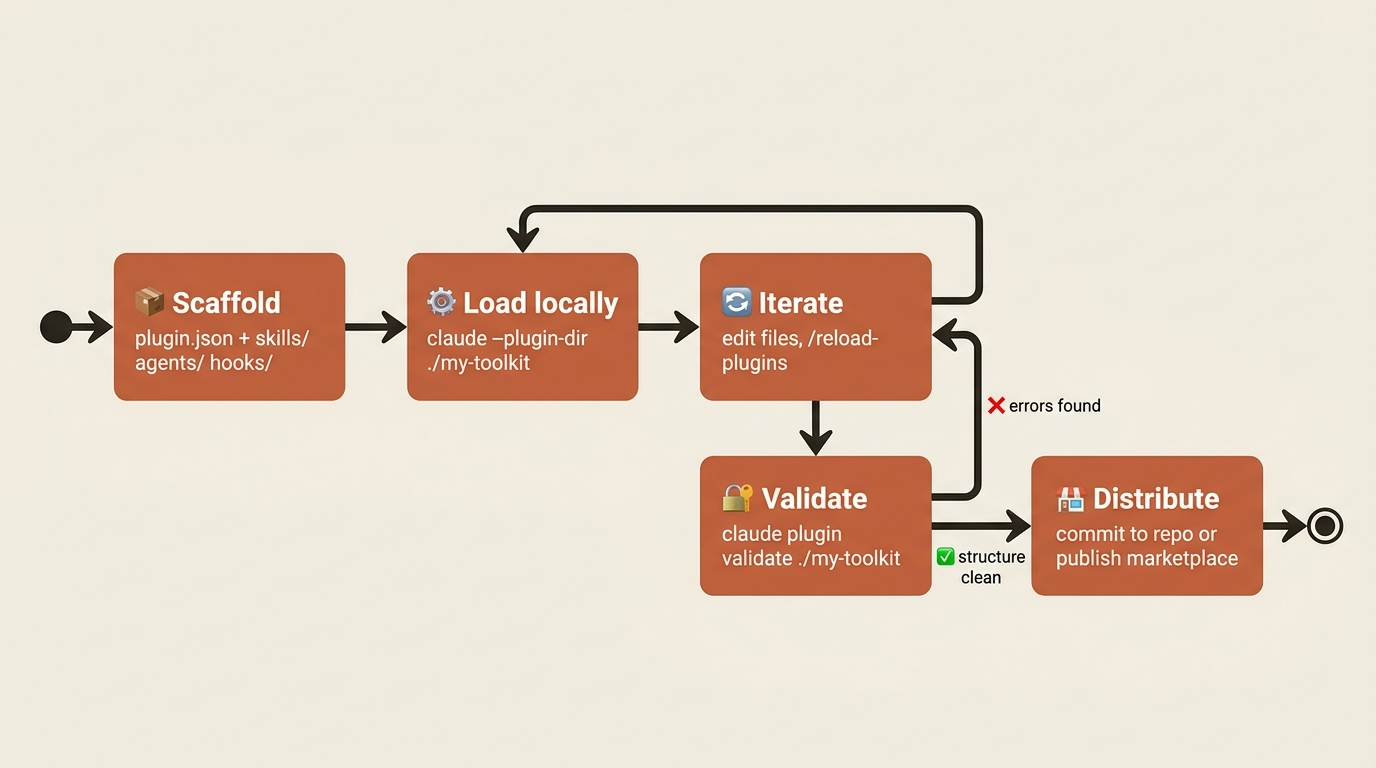
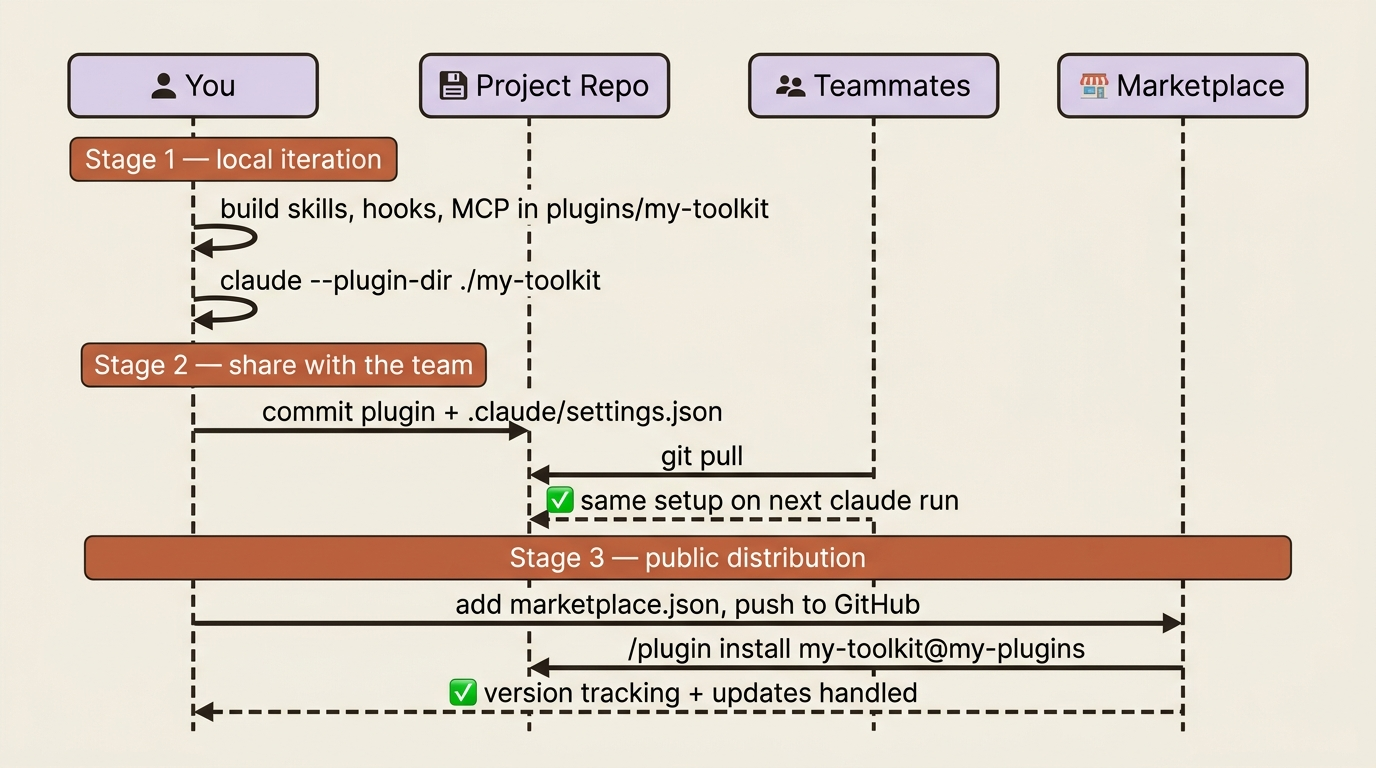
Distribution: from a local folder to the whole world
There are three distribution paths, in increasing order of audience.
Just for you, just this project. Drop the plugin into your repo and load it with --plugin-dir. This is the "still iterating, will formalize later" mode. Skip the marketplace entirely.
For your team, project-scoped. The lowest-friction option: commit the plugin directory into the repo, document claude --plugin-dir ./my-toolkit in the README, and your team has it on the next git pull. For more than one plugin, a marketplace.json at the project root lets the team install plugins by name instead of by path.
For everyone, via a public marketplace. A marketplace is just a marketplace.json file pointing at plugins:
{
  "name": "my-plugins",
  "owner": { "name": "Your Name" },
  "plugins": [
    {
      "name": "my-toolkit",
      "source": "./plugins/my-toolkit",
      "description": "Personal Claude Code setup"
    }
  ]
}
Push the repo to GitHub, and users add it with /plugin marketplace add username/my-marketplace-repo, then install with /plugin install my-toolkit@my-plugins. The marketplace handles version tracking, updates, and discovery for you. To go further, submit the plugin at claude.ai/settings/plugins/submit for the community marketplace, where it goes through automated claude plugin validate plus safety screening before appearing in anthropics/claude-plugins-community.
The team setup pattern most worth adopting
Here is where it all ties together. The recommended way to set up a new project for a team is a project-scoped plugin checked into the repo. The shape:
your-project/
├── .claude/
│   ├── settings.json         # enables the plugin
│   └── CLAUDE.md             # project conventions
├── plugins/
│   └── project-setup/
│       ├── .claude-plugin/
│       │   └── plugin.json
│       ├── skills/
│       │   ├── ship/SKILL.md
│       │   └── deploy/SKILL.md
│       ├── agents/
│       │   └── code-reviewer.md
│       ├── hooks/
│       │   └── hooks.json
│       └── .mcp.json
└── ...your code...
With .claude/settings.json enabling it:
{
  "enabledPlugins": {
    "project-setup": {
      "source": "./plugins/project-setup"
    }
  }
}
The payoff: anyone who clones the repo and starts Claude Code automatically gets the same skills, agents, hooks, and MCP configuration. A new teammate, on day one, with zero setup ceremony, runs git clone, runs claude, and is working with the exact machinery everyone else has. Improve the plugin, commit it, and the whole team's setup updates on next pull. The problem "everyone has slightly different Claude Code setups" collapses into "Claude Code setup is part of the repo."
For a setup that should follow you across all your own projects regardless of team, the same plugin lives in ~/.claude/plugins/<name> and is enabled in ~/.claude/settings.json. Personal, portable, never committed.
Do this today
Three concrete moves, in order.
1. Install one plugin from the official marketplace. Pick the one that matches your stack: a language LSP if you write code (the highest-leverage install for almost any project), playwright if you build web UIs, or commit-commands for better git workflows.
/plugin install <name>@claude-plugins-official
Use it for a week. The point is to feel the value of plugins before you build one.
2. Browse /plugin interactively. Even if you install nothing else, spend a few minutes in the Discover tab. As of v2.1.143 it shows context cost estimates, which is useful awareness of what each plugin costs you in startup context.
3. Package your current project's setup as a plugin. Take your /ship skill, your code-reviewer subagent, your format-on-edit hook, and any MCP servers you have added. Drop them into plugins/project-setup/ in your repo and load it with --plugin-dir. Once it works, commit it.
The compounding payoff
The leverage here is not the convenience of one install command. It is what stops happening. Every plugin you build is one piece of your Claude Code judgment that you never re-derive again. You stop rebuilding the same /ship skill for every new repo. You stop watching twelve copy-pasted files drift apart. You stop onboarding teammates into a blank setup.
Six months in, your ~/.claude/plugins/ directory and your team's plugins/project-setup/ directory mark a real shift: from "I have Claude Code set up the way I like it" to "anyone I work with has Claude Code set up the way I like it." That is the leverage plugins exist to create.
Your setup is not a personal artifact stuck in one repo. It is infrastructure. Package it like you mean it.
This is Part 14 of "Claude Code, Day-to-Day," a 19-part guide to mastering Claude Code for working engineers.