
Install Claude Code, Then Make It Prove Its First Change
Your first day with Claude Code should not end with a demo; it should end with a CLAUDE.md on disk and one change that you proved yourself with a passing test.
A tested first day: the native installer, a five-step setup, a CLAUDE.md from /init, and one small change that four passing tests confirm before you commit it.
You installed an AI coding agent, it said everything worked, and you had no way to know if that was true.
In this article: Day 1 of a day-by-day guide to Claude Code. Start here: install Claude Code, run
/init, and make one change to a tiny Node.js service that four passing tests prove. Going deeper: other ways to install, model choice and session resume, and the permission modes behindShift+Tab.
Tested on Claude Code 2.1.326.
This is Day 1 of a 28-day guide to Claude Code. Each day is one part. Each part opens with a Start here section of 20 to 40 minutes that ends in a result you can check. A Going deeper section follows with the details, the alternatives, and the edge cases. You can skip it until you want it.
The whole roadmap, one part per day, with what you can do at the end of each day:
- Install and a first safe session. Install, run
/init, make one change with tests. - The daily loop. Start, steer, run tests, rewind.
- Plan before you code. Get a plan in plan mode, then a spec file on disk.
- Permissions and auto mode. Add an allow rule so
npm teststops prompting. - Memory that loads every time. Run
/memory, add a rule to CLAUDE.md, check Claude follows it. - What Claude can see. Read
/context, watch one turn add tokens, clear it. - Remote Control. Steer a session from a browser or your phone.
- Scheduled tasks. Run one
/loopwith a check. - Subagents. Delegate a search to Explore.
- Skills. Write
/shipand run it. - Hooks. Add a format-on-edit hook.
- Verification. Feed a failed test back to Claude. Run
/code-review. - MCP. Add one MCP server and prove it was called.
- Plugins. Install one plugin and confirm it loaded.
- Where Claude Code runs. Open the same session in Desktop.
- Worktrees. Run two sessions in two worktrees and merge one.
- Parallel sessions. Message one session from another.
- Autonomous runs. Run a short
/goalthat finishes. - Channels. Send a message into a session with fakechat.
- Dispatch and Claude Tag. Start a task away from the desk.
- Routines. Create a routine and run it once.
- Team scale. Run one dynamic workflow on a small Ticket Triage task.
- Share results. Publish one test report as an artifact.
- Headless Claude Code. Run
claude -pfrom a script as a test gate. A GitHub Action is in Going deeper. - Loop engineering. Build a retry loop that shows the agent what the gate grades.
- The software factory. Chain loops from a ticket to a reviewed change.
- Pitfalls and personas. Run the pitfall checklist. Pick your next habit.
- Reference and glossary. Look up any term from Days 1 to 27.
You do not need to know the terms in this list yet. Each day teaches its own.
It is easy to get stuck using Claude Code the way you first learned it. Claude Code keeps adding features, and some of them are a big step up in productivity. This guide keeps you current, in bite-sized daily chunks, so you pick up a few new techniques every day, do not get left behind, and use Claude Code the way it is meant to be used.
Start here
At the end of today, you can start Claude Code in a project, give it a small task, and check its work with the project's tests.
You need git, a terminal, Node.js 22 or later, and a paid Claude account (Pro, Max, Ultra, Team, or Enterprise). An Anthropic Console account, which bills API use by the token, also works. A token is the unit of text that the model reads and writes, about three quarters of an English word. The free Claude.ai plan does not include Claude Code.
Build Ticket Triage
Every day in this guide changes one small repository, Ticket Triage. It is a Node.js support-ticket service that sorts a ticket into refund, shipping, or other. Restarting the guide on a new machine? Check your tools below, install Claude Code, and use the shortcut in Get Ticket Triage.
Check your tools first:
node --version
git --version
Node prints v22 or a later number, such as v22.22.1. Git prints its version. If either command is not found, install it before you go on. On Windows, use WSL (Windows Subsystem for Linux) and run every command in this guide inside it.
Create the folder and three files:
mkdir -p ~/code/ticket-triage/src ~/code/ticket-triage/test
cd ~/code/ticket-triage
package.json declares ES modules and points npm test at Node's built-in test runner:
{
  "name": "ticket-triage",
  "type": "module",
  "scripts": { "test": "node --test" }
}
src/classify.js holds the classify() function. The checks run in order, and the first match wins:
// Classifies a support ticket as refund, shipping, or other.
export function classify(text) {
  const t = text.toLowerCase()
  if (t.includes("refund") || t.includes("money back")) return "refund"
  if (t.includes("shipping") || t.includes("delivery") || t.includes("package")) return "shipping"
  return "other"
}
test/classify.test.js holds one test per category:
import { test } from "node:test"
import assert from "node:assert/strict"
import { classify } from "../src/classify.js"

test("refund", () => assert.equal(classify("I want my money back"), "refund"))
test("shipping", () => assert.equal(classify("Where is my package?"), "shipping"))
test("other", () => assert.equal(classify("Hello"), "other"))
Commit the starting point, then run the tests:
git init
git add -A
git commit -m "Ticket Triage: first three tests"
npm test
The output lists each test with a check mark, then a summary. Look for these lines:
✔ refund
✔ shipping
✔ other
ℹ tests 3
ℹ pass 3
ℹ fail 0
Each test name also shows a time. Your times differ.
Install Claude Code
Use the native installer. It installs one program, claude, and updates it in the background.
On macOS, Linux, or WSL, run:
curl -fsSL https://claude.ai/install.sh | bash
This guide was tested on macOS. On Windows, run the same command inside WSL. Going deeper has the native Windows command.
The installer shows no progress while it downloads. When it finishes, open a new terminal window and check the install:
claude --version
The command prints a version number, such as 2.1.326 (Claude Code). A later version is fine. If your shell says claude is not found, Going deeper explains the fix.
Get Ticket Triage
Ticket Triage is the small Node.js ticket classifier from Build Ticket Triage, and this guide grows it one day at a time. It has no dependencies, and its tests use the test runner built into Node.js. The code for every day is in the SpillwaveSolutions/ticket-triage-day-by-day repository, on the claude-code-daily branch, a named line of commits. The branch has one tag, a fixed name for one commit, for each day, from claude-code/day-00 to claude-code/day-28. Building Ticket Triage by hand is the recommended route on a first read.
If you built Ticket Triage by hand above, run these once in ~/code/ticket-triage, so that the catch-up line on each later day works. A remote is git's name for another copy of the repository.
git remote add upstream https://github.com/SpillwaveSolutions/ticket-triage-day-by-day.git
git fetch upstream --tags
If you are restarting the guide on a new machine and skipped the build, let Claude Code get the Day 0 starter. Typing claude followed by a quoted prompt starts a session with that prompt as the first message. Run it from ~/code, not from your home folder:
mkdir -p ~/code && cd ~/code
claude "Clone https://github.com/SpillwaveSolutions/ticket-triage-day-by-day into ~/code/ticket-triage. In that folder, check out the claude-code-daily branch, run git switch -C main claude-code/day-00 and git branch --unset-upstream main, rename the remote origin to upstream, then run npm test and show me the summary."
(tested on November 19, 2026, with Claude Code 2.1.328)
The prompt clones (copies) the repository and renames its remote to upstream, the name that the hand-built route uses. git switch -C main claude-code/day-00 makes your main branch point at the Day 0 code, replacing what main held. git branch --unset-upstream main stops your main from following the Spillwave copy. The first run asks the setup questions from Start your first session, the next step, so answer them as that step says. At the trust question, the folder is ~/code. Choose Yes, I trust this folder, because you clone the guide's own repository into it on purpose. Manual mode: choose 1. Yes at each git and npm test permission prompt.
When Claude finishes, type /exit, then check the result yourself:
cd ~/code/ticket-triage
npm test
git status -sb
Look for ℹ pass 3 and ℹ fail 0, then ## main with nothing after it, not ## main...upstream/main. Continue at Start your first session, and skip any setup question that it does not ask again.
Start your first session
Start Claude Code inside the project folder:
cd ~/code/ticket-triage
claude
The first time you run claude, it walks you through a short setup:
- Pick a text style. A list of color themes appears, with
Auto (match terminal)selected. PressEnterto keep it. - Pick a login method. Three choices appear. Keep
1. Claude account with subscriptionif you have a Pro, Max, Ultra, Team, or Enterprise plan, and pressEnter. Pick2. Anthropic Console accountonly if you pay for the API by the token. - Log in. Claude Code opens your browser. Sign in with your Claude account, then return to the terminal. If the browser does not open, press
cto copy the sign-in link and paste it into your browser. If the browser shows a code, paste it into thePaste code here if promptedbox. - Read the security notes. Two notes say that Claude can make mistakes and that you should use it only with code you trust. Press
Enter. - Trust the folder. Claude Code shows the folder path and asks whether this is a project you created or trust. The highlighted choice is
No, exit. Press the down arrow to selectYes, I trust this folder, then pressEnter. Trust lets Claude read, edit, and run files in this folder. Ticket Triage is your own code or the guide's own repository, cloned on purpose, so trust it. Do not trust a folder that you cloned and did not read.
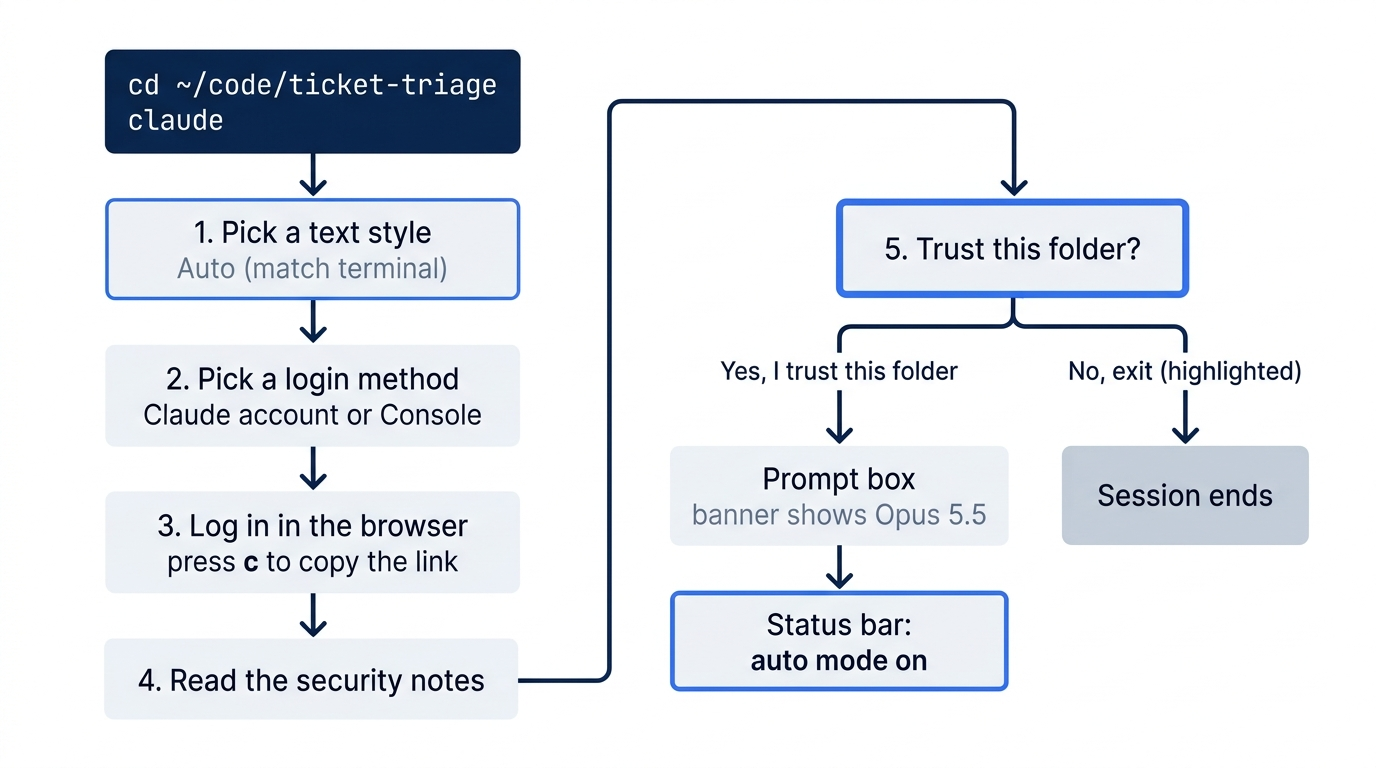
You now see a prompt box with the Claude Code banner above it. The banner shows the version and the model, Opus 5.5. A session is one conversation with Claude Code in one folder.
Look at the status bar under the prompt box. It shows the permission mode, which controls what Claude may do without asking you. A new session starts in auto mode, and the status bar says ⏵⏵ auto mode on (shift+tab to cycle). In auto mode, Claude does safe actions such as editing project files and running tests, and a background check blocks risky ones. Leave it in auto mode today. The status bar can also show an effort level, such as ◐ medium, which sets how much Claude thinks before it answers. Leave it as it is.
Some organization accounts start in Manual mode instead, and the status bar says ⏸ manual mode on. In Manual mode, Claude asks before each edit and each command, in a permission prompt. In this guide, a line that starts with Manual mode: names the prompts that a step shows. Choose 1. Yes at each one. The other Yes options save a permission rule or change the mode, and today you want to see each request.
Everything you type in the prompt box goes to Claude, and Claude can read files, edit files, and run commands in this folder. Claude does each of these with a tool: a built-in action that Claude Code runs for Claude, such as Read for a file, Edit for a change to a file, and Bash for a shell command.
Run /init
Commands that start with a slash, such as /init, are slash commands. You type them in the prompt box. Type:
/init
Claude reads the project and writes a file named CLAUDE.md at the project root. CLAUDE.md is the project's instruction file. Claude Code loads it at the start of every session, so Claude knows the project's commands and rules without you repeating them.
Manual mode: run npm test, create CLAUDE.md.
When Claude finishes, open CLAUDE.md in your editor. Check for two things:
- A Commands section with
npm test. - A note that the first keyword match wins in
classify(). It can use other words, such as "Because refund is checked first, a ticket that mentions both categories is classified as refund."
If either item is missing, type: "Add the test command and the first-match-wins rule to CLAUDE.md." If both are already there, Claude says so and changes nothing. When both are there, commit the file. Run the git commands in a second terminal window, in the same folder, and keep Claude Code open in the first one:
git add CLAUDE.md
git commit -m "Add CLAUDE.md from /init"
Make the first change
Now give Claude a real task. A support agent reports that tickets about broken items get the wrong label. Type this prompt:
Add a fourth category, damaged, for tickets that mention broken, damaged,
or crushed. Check it before the refund check. Add one test for it. Then run
the tests and tell me if anything broke.
The last sentence is the most important habit in this guide: end the prompt with a check. Claude edits the code, runs npm test, reads the result, and fixes its own mistakes before it reports back.
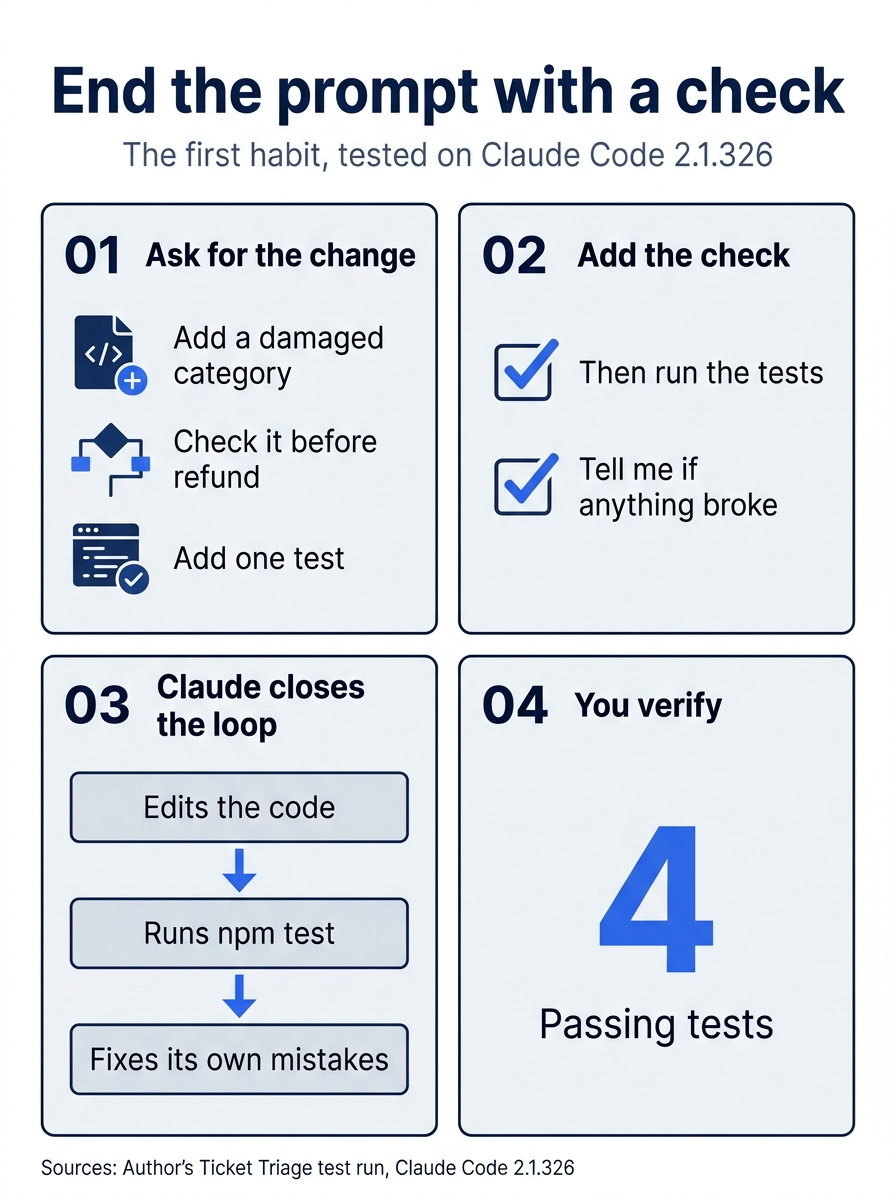
The habit has four steps: the request, the check sentence you add to it, the loop Claude runs on its own, and your own verification of the 4 passing tests at the end.
In auto mode, Claude edits the files and runs the tests without asking.
Manual mode: edit classify.js, edit classify.test.js, one or two edits to CLAUDE.md, run npm test.
When Claude finishes, its reply ends with a short report, such as "Nothing broke. All 4 tests pass."
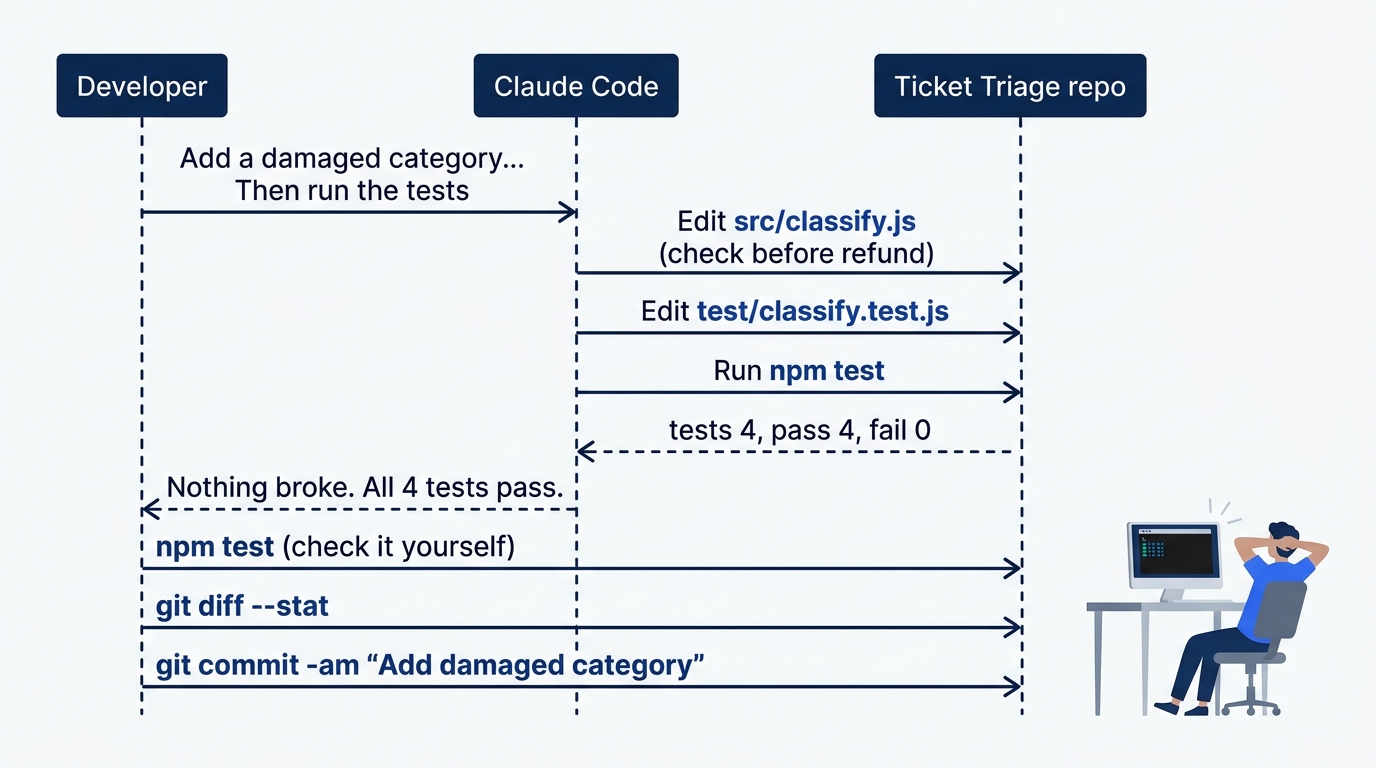
Check the win
Do not take Claude's word for it. Run the tests yourself:
npm test
Look for four passing tests in the output. Claude names the new test, so its name can differ from damaged. The check is ℹ pass 4 and ℹ fail 0:
✔ refund
✔ shipping
✔ other
✔ damaged
ℹ tests 4
ℹ pass 4
ℹ fail 0
Then look at what changed:
git diff --stat
On the tested runs, in auto mode and in Manual mode, the summary was:
 CLAUDE.md             | 4 ++--
 src/classify.js       | 3 ++-
 test/classify.test.js | 1 +
 3 files changed, 5 insertions(+), 3 deletions(-)
Claude often updates CLAUDE.md too, because it lists the categories. Your line counts can differ. Run git status --short to check that no other file changed or appeared. It lists only those files, each with an M for modified.
Read the diff with git diff. The new line in src/classify.js returns "damaged" for the three words, and it sits above the refund check. If you like the change, commit it:
git commit -am "Add damaged category"
If you do not like it, press Esc twice with an empty prompt box, or type /rewind. A Rewind menu lists your prompts, each with the files it changed. Select the damaged prompt, press Enter, and choose 3. Restore code. The files go back to how they were before that prompt. Rewind tracks Claude's file edits, not shell commands such as sed. If the menu says Can't restore N files (changed while a command ran), run git restore . in your second terminal instead. It puts every tracked file back to your last commit. Then send the prompt again, so that you end the day with the change.
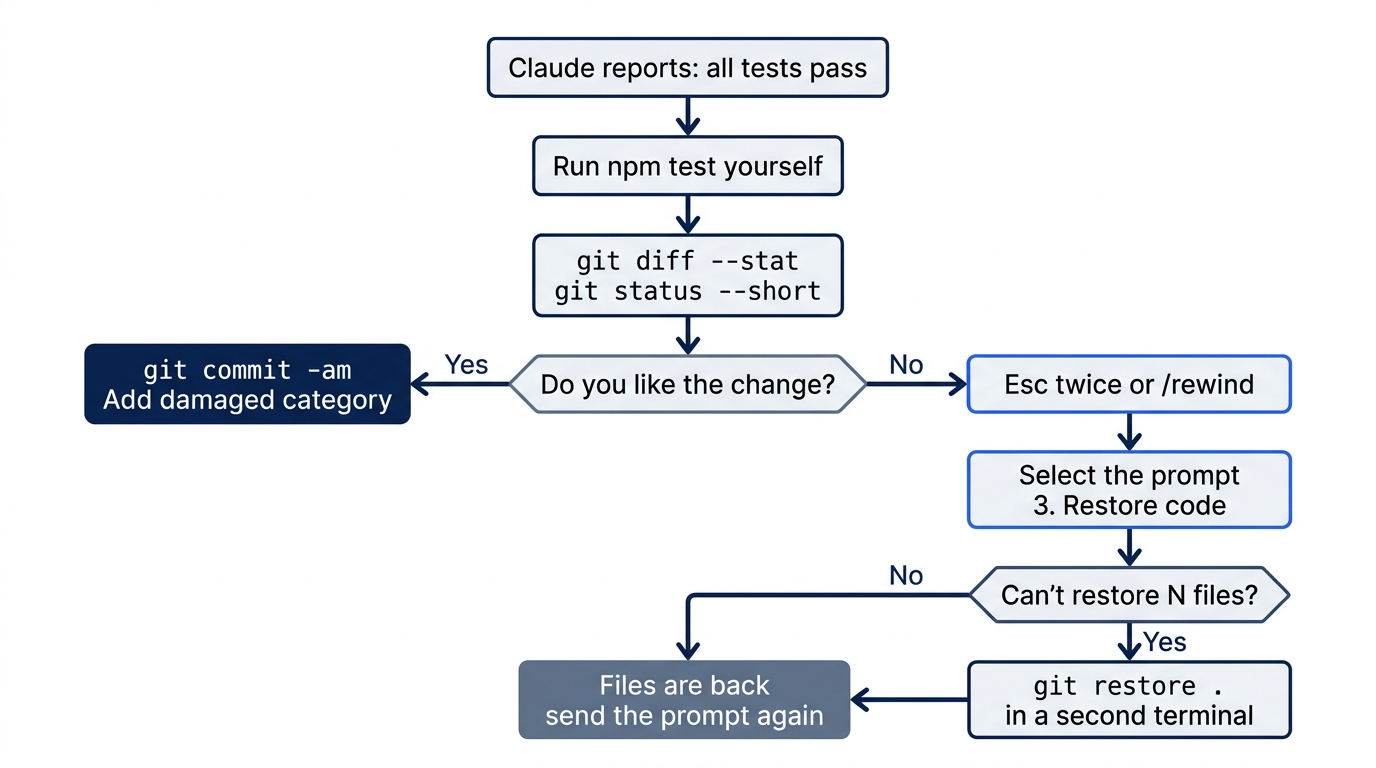
You installed Claude Code, gave a project a CLAUDE.md, and made one change that four passing tests prove. Write down the pass count, 4.

The scene captures the payoff of the day: the relief of a result you checked yourself rather than a report you had to trust.
You can stop here. Going deeper explains why this works and where it breaks.
Going deeper
This section is for readers who want the install alternatives, the first-hour habits, and the details behind today's steps. It assumes you finished Start here.
This is the second edition of the guide. The first edition, from May 2026, used a different order and stays online, so some Going deeper notes say what changed since then.
Other ways to install
On native Windows, run the native installer from PowerShell:
irm https://claude.ai/install.ps1 | iex
From CMD, use curl -fsSL https://claude.ai/install.cmd -o install.cmd && install.cmd && del install.cmd. The Windows steps were not part of this guide's test run.
The native installer drops one signed binary at ~/.local/bin/claude on macOS and Linux, or %USERPROFILE%\.local\bin\claude.exe on Windows. It needs no Node.js, and it updates itself in the background. Open Claude Code tomorrow and you are on the latest release. Automatic updates alone are a reason to choose it.
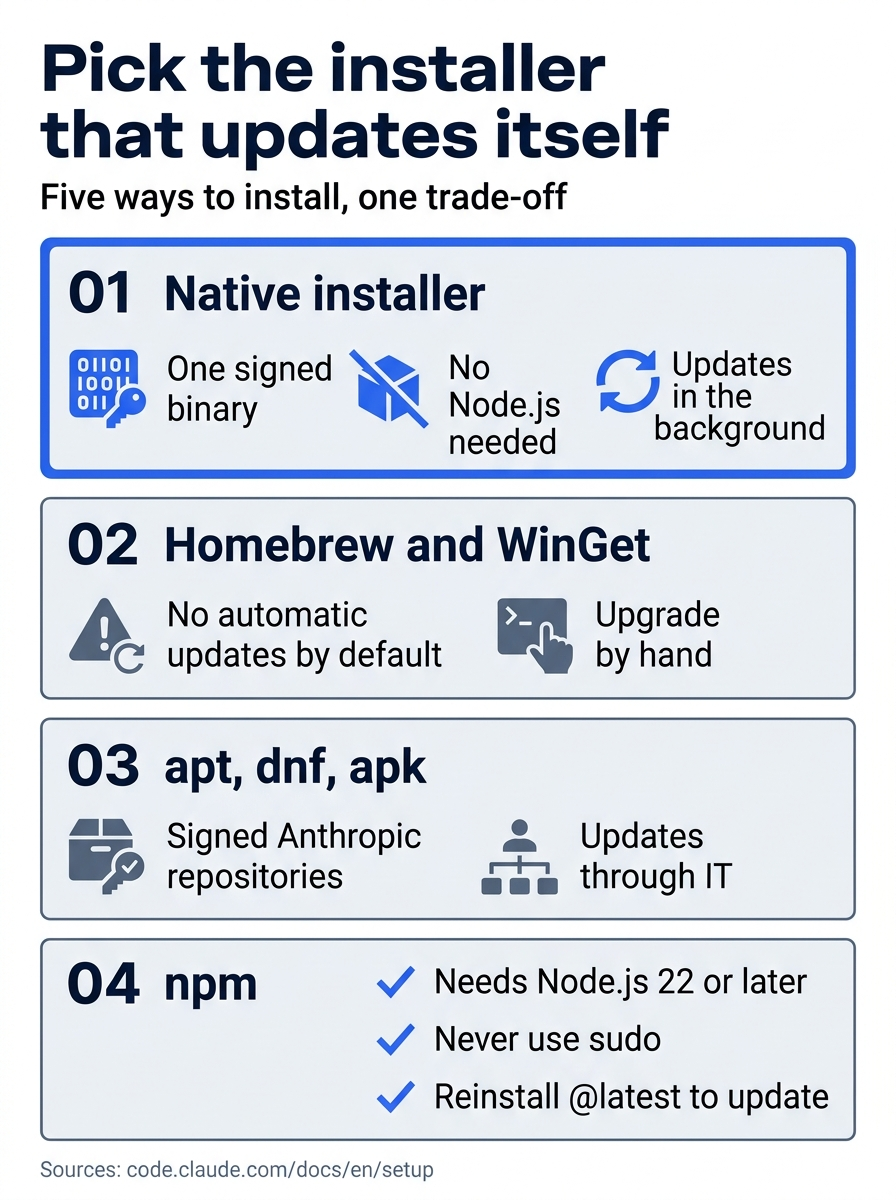
The install choice comes down to one rule. Pick the native installer unless your company manages updates through a package manager, because it is the only method that keeps you current with no action on your part.
The other ways all work. This section lists them so that you know what you trade away:
- Homebrew (
brew install --cask claude-code). Two casks:claude-codetracks the stable channel, about a week behind, andclaude-code@latesttracks every release. Homebrew installs do not update automatically by default. Runbrew upgrade claude-codeby hand, or setCLAUDE_CODE_PACKAGE_MANAGER_AUTO_UPDATE=1so Claude Code runs the upgrade for you. - WinGet (
winget install Anthropic.ClaudeCode). It has the same trade-off. Upgrade withwinget upgrade Anthropic.ClaudeCode. - apt, dnf, and apk on Debian and Ubuntu, Fedora and RHEL, and Alpine. These are signed Anthropic repositories with
stableandlatestchannels. Updates come through your system package manager. This is the right answer for fleets where IT wants every update to go throughapt-get update. - npm (
npm install -g @anthropic-ai/claude-code@latest). It installs the same native binary through per-platform optional packages, and it needs Node.js 22 or later. Never usesudo npm install -g: it causes permission errors, and an install that needssudocannot update itself. Do not runnpm update -geither. It keeps the original version range and can leave you on an old release. Install@latestagain instead.
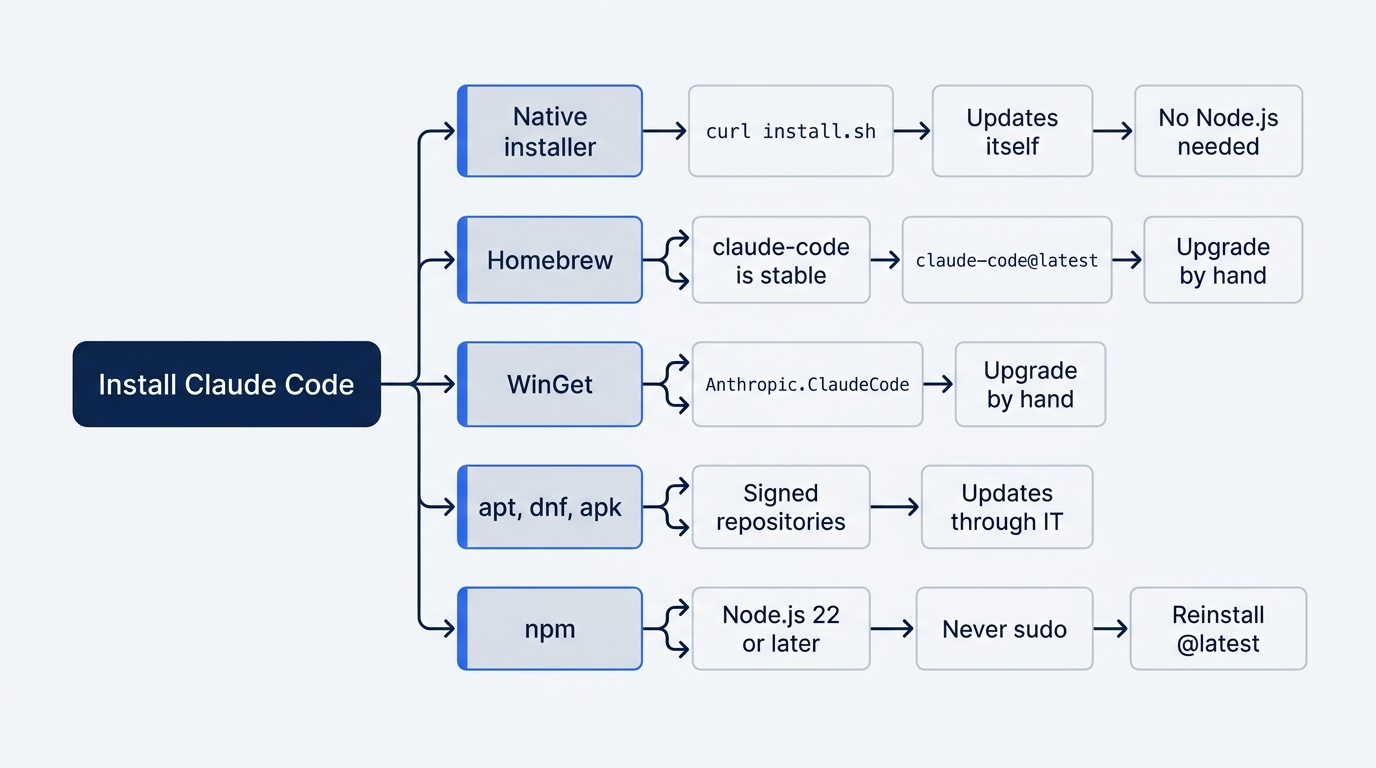
The install docs are at code.claude.com/docs/en/setup.
When claude is not found
If a new terminal says claude: command not found, the install folder is not on your PATH. The troubleshooting page has the fix for each shell.
If you used Claude Code before, check for more than one install:
which -a claude
More than one line means conflicting installs. Keep the native binary at ~/.local/bin/claude and remove the others: npm uninstall -g @anthropic-ai/claude-code or brew uninstall --cask claude-code. A very old release also left a ~/.claude/local folder, which you can delete.
System requirements
- macOS 13.0 or later, Windows 10 1809 or later, Ubuntu 20.04 or later, Debian 10 or later, or Alpine 3.19 or later. Homebrew and WinGet download the same binary, so they do not help on an older macOS.
- 4 GB of RAM or more. This matters on small cloud servers. If the install prints
Killed, the system ran out of memory. Add swap or use a larger instance. - Windows: Git for Windows gives Claude Code its Bash tool. Without it, Claude Code uses PowerShell for shell commands. In WSL, install the Linux binary inside WSL and skip Git for Windows.
After any install, two commands check your setup:
claude --version
claude doctor
claude --version proves the binary is on your PATH. claude doctor prints install health, settings-file errors, and the result of the last update attempt, without starting a session. Run it once after install, and again if anything seems wrong.
Accounts and providers
Claude Code needs a Pro, Max, Ultra, Team, Enterprise, or Console account. The test run for this guide did not complete the browser sign-in. The test stopped at the sign-in link, and step 3 of Start here follows the authentication docs. Companies that already use Amazon Bedrock, Google Cloud's Agent Platform, or Microsoft Foundry can run Claude Code through those providers instead. Some features differ by provider. Later days say when.
The trust dialog, in more detail
Trust controls whether project-level configuration runs: .claude/settings.json, .mcp.json, and project hooks. A hostile repository could put a hook in .claude/settings.json that runs commands on your machine. Trust is how you say no. Claude Code saves your answer per folder.
One trap: if you start Claude Code in your home folder, it does not save the trust answer, and it asks again at every launch. Start it in a project folder instead.
Pick a model
Run /model in a session to open the model picker. A new account starts on Opus 5.5, the default on every plan. Keep it for your first week. The other choices, by alias:
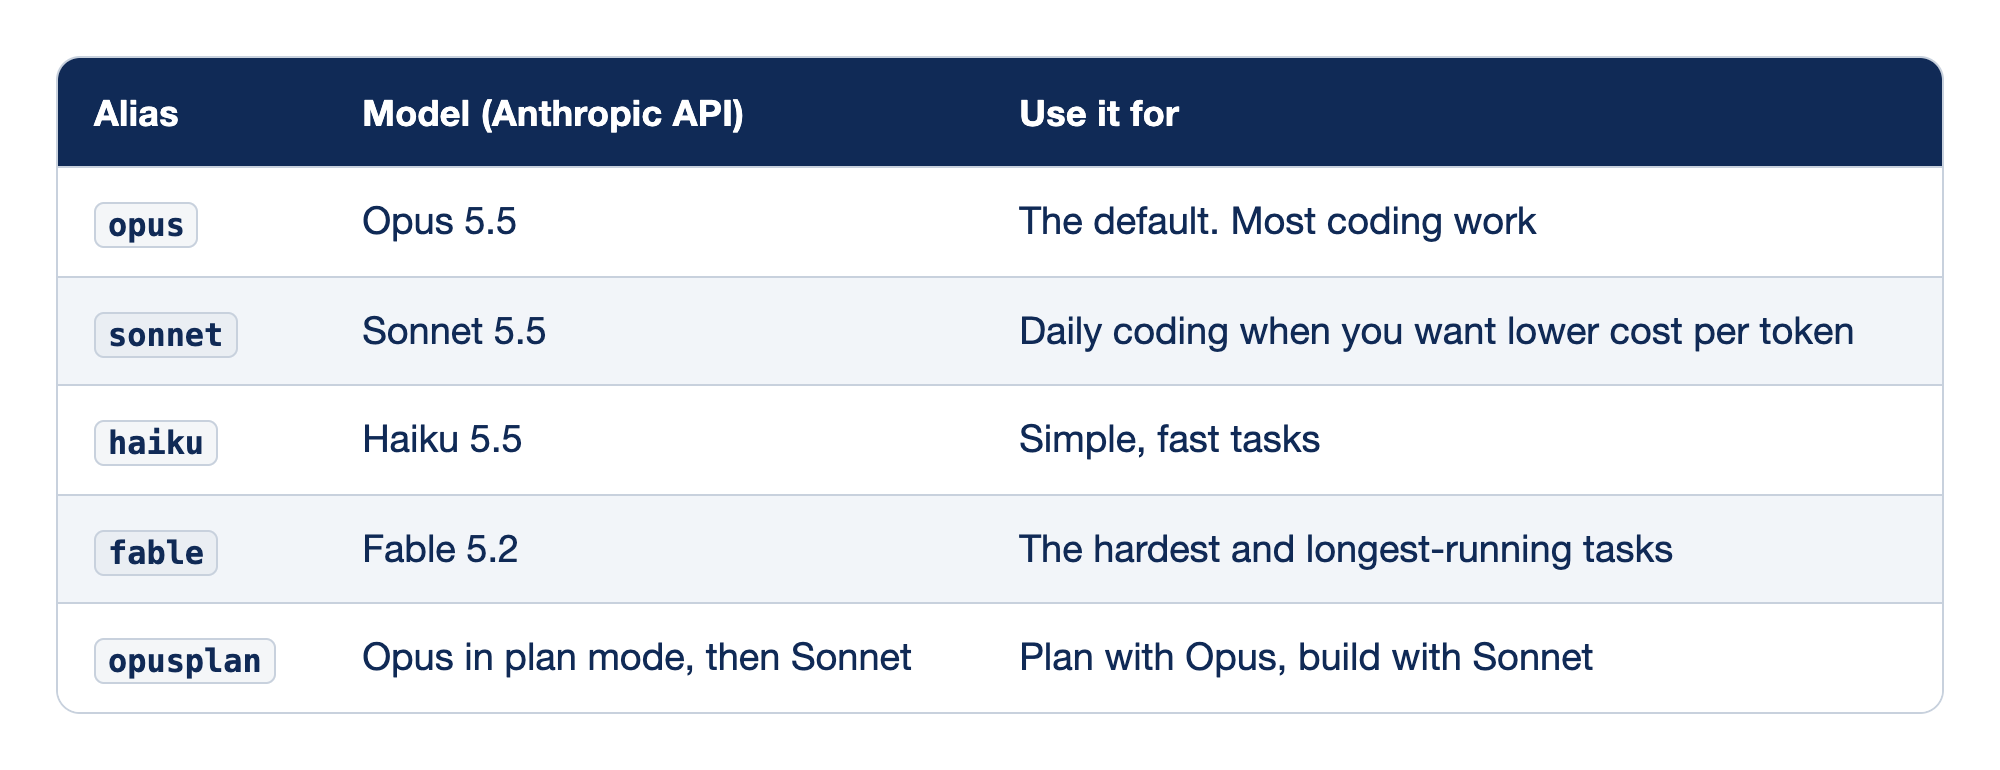
Each model alias points to one model and suits one kind of work.
- The
opusalias selects Opus 5.5, the default, for most coding work. - The
sonnetalias selects Sonnet 5.5 for daily coding when you want lower cost per token. - The
haikualias selects Haiku 5.5 for simple, fast tasks. - The
fablealias selects Fable 5.2 for the hardest and longest-running tasks. - The
opusplanalias uses Opus in plan mode and then Sonnet, so you plan with Opus and build with Sonnet.
/model sonnet switches at once. claude --model sonnet sets the model for one session at launch. The 5.5 models start at medium effort. On Bedrock, Vertex, and Foundry, the aliases can point to older models. See model configuration.
Three ways to start Claude Code
# Interactive: what you do most of the time
claude

# Interactive, seeded with a first prompt
claude "explain how classify() picks a category"

# Headless: one prompt, then exit
claude -p "what is the test command for this repo?"
The interactive form is the default. You type, Claude responds, and you keep going. The seeded form opens the same interactive session with your first prompt already sent. The headless form (-p or --print) runs one prompt and exits, with no follow-ups. Headless runs start in Manual mode, not auto mode. No one is there to approve a request, so Claude Code refuses an edit that needs approval unless you pass --permission-mode.
The headless form is what you put in shell scripts and CI. Claude Code can also run inside a GitHub Action, so the same prompt that you typed today can run on every pull request. Day 24 builds that.
Coming back to a session
Claude Code saves every session to disk under ~/.claude/projects/. To pick one up:
# Resume the most recent session in this folder
claude --continue
claude -c

# Open a picker of past sessions
claude --resume
claude -r

# Resume a named session
claude --resume "damaged-category"
--continue is the daily driver. --resume opens a picker, with keys to widen the search to other worktrees or projects.
Name your sessions. After a few sessions, the picker fills with titles that look alike. Run /rename in a session, or start with a name:
claude -n "damaged-category"
The name shows in the prompt bar and in the picker. It also works in scripts: claude -p --resume <name>.
First prompts for a codebase you do not know
Ticket Triage fits on one screen. Your real projects do not. Open-ended prompts such as "tell me about this project" make Claude read everything in sight and fill the context window, Claude's working memory for the session. Day 6 explains why that matters. These five patterns work on any codebase:
1. Overview, but bounded.
Give me a one-page overview of this codebase: what it does, the main entry points, the major directories, and the test command. Don't read every file. Use directory listings and the README if there is one.
The "don't read every file" instruction is the important part. Without it, Claude reads fifty files to give a thorough answer.
2. Find the files that handle X.
Find the files that handle session timeout in this codebase. List them with one-line descriptions. Don't read them yet.
3. Explain X, then point at the key files.
Explain how authentication works in this project at a high level, then point me at the two or three files I should read to understand it deeply.
4. What conventions does this project use?
Look at three or four recent commits and one or two source files in different directories. Tell me what conventions this codebase uses for naming, error handling, test structure, and async patterns. Don't generalize beyond what you can actually see in the files.
The last sentence keeps Claude honest. Without it, you get plausible conventions that may not be in the code.
5. Make a small, isolated change.
I want to add a logging statement when a session expires. Find the right spot, make the change, and show me the diff. Don't touch anything else.
Your first change on any codebase should be small, reversible, and clear, like today's damaged category.
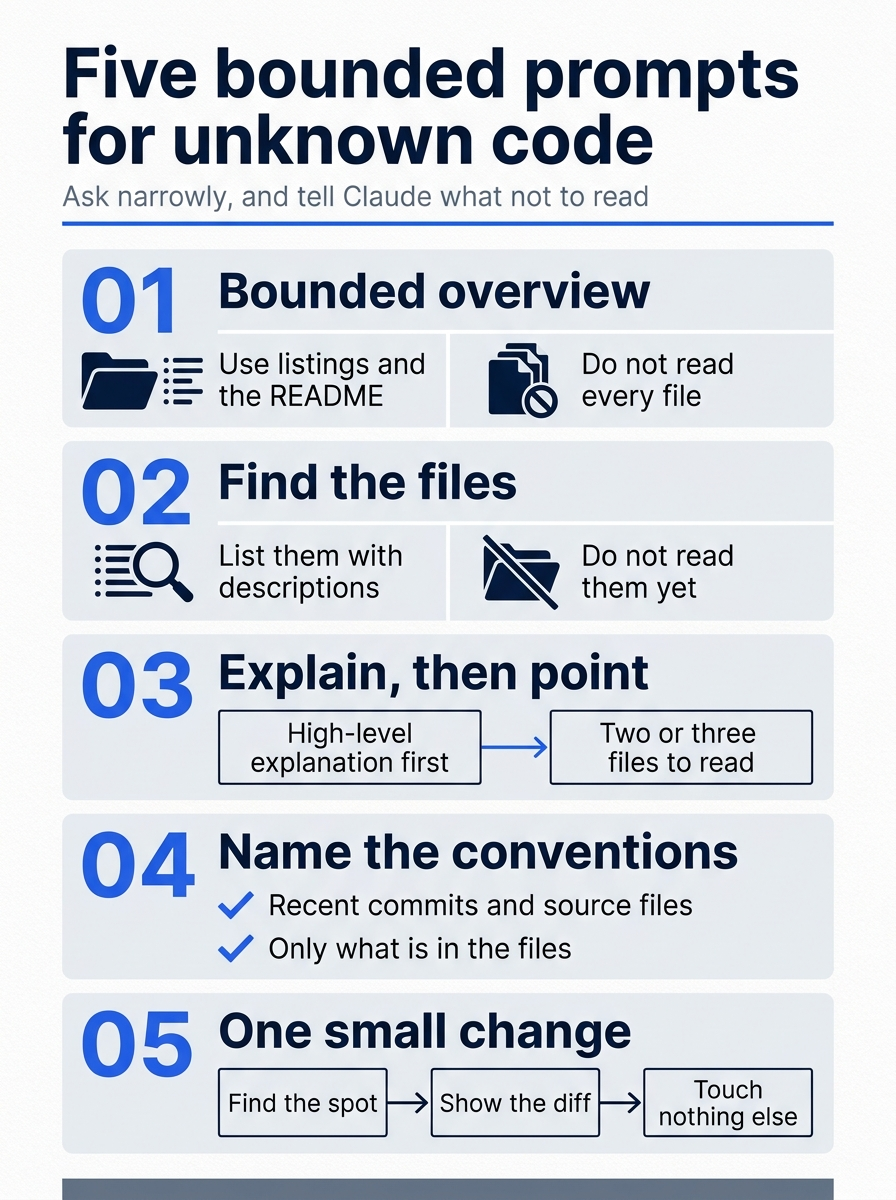
The five prompts share one move: each tells Claude what to leave alone as well as what to do, which keeps its working memory free for the task.
Five more prompts work well, each for a different kind of tool: ask Claude to run the test suite and name the slowest tests, suggest improvements to the README, summarize the recent commit history, find obvious dead code, and flag dependencies that look unmaintained.
Six commands to learn in the first week
/helplists every slash command in the session, including ones from plugins and skills. Learn/help, not the list./modelopens the model picker (see above)./clearstarts a fresh conversation in the same folder. CLAUDE.md and skills load again. Use it when you finish one task and start another./contextshows what fills Claude's working memory right now, by category, with token counts. Day 6 is about this command./memorylists every CLAUDE.md and rule file that loaded for this session. If Claude ignores an instruction, check here first./rewind(alias/undo, orEsctwice with an empty prompt box) restores code, the conversation, or both, to the point before any prompt. Claude Code saves a checkpoint at every prompt. One limit: a file that only a shell command changed is not tracked, so use git for that.
More that you will meet soon: /compact (summarize the conversation to free space), /btw (ask a side question without adding it to the conversation), /plan (plan mode for one prompt), /rename, and /resume.
The permission modes and Shift+Tab
Shift+Tab changes the permission mode. From auto mode, the first press goes to Manual, and the cycle then runs Manual, acceptEdits, plan:
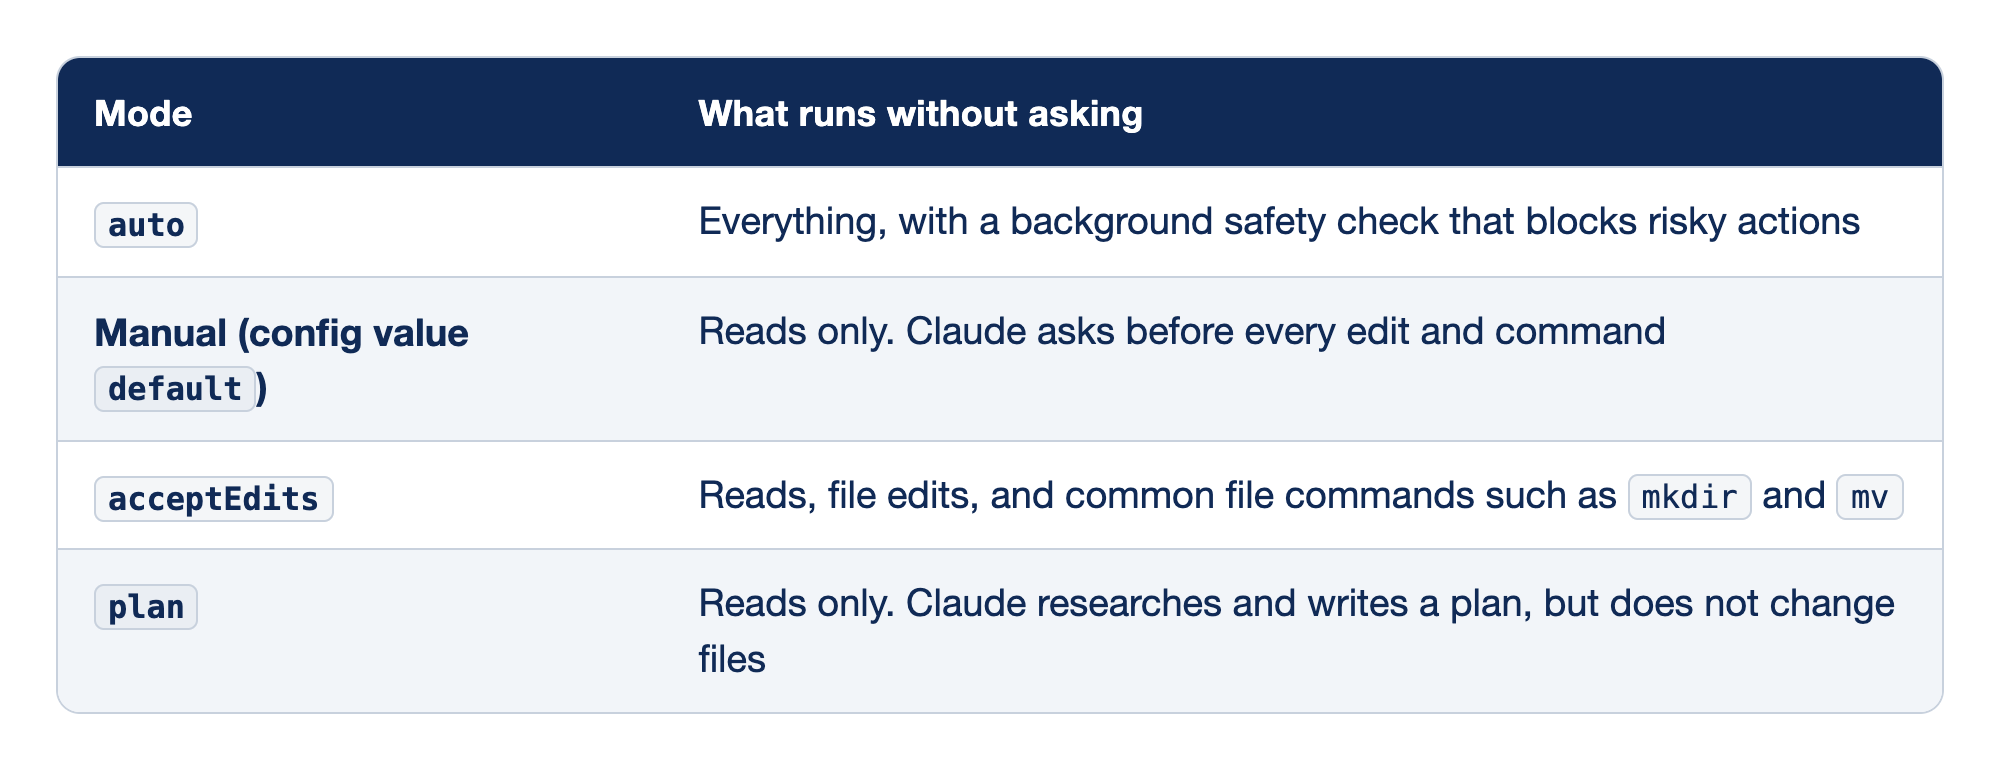
Each permission mode allows a different set of actions without a prompt.
- The
automode runs everything without asking, with a background safety check that blocks risky actions. - Manual mode, with the config value
default, runs reads only, and Claude asks before every edit and command. - The
acceptEditsmode runs reads, file edits, and common file commands such asmkdirandmv. - The
planmode runs reads only, and Claude researches and writes a plan but does not change files.
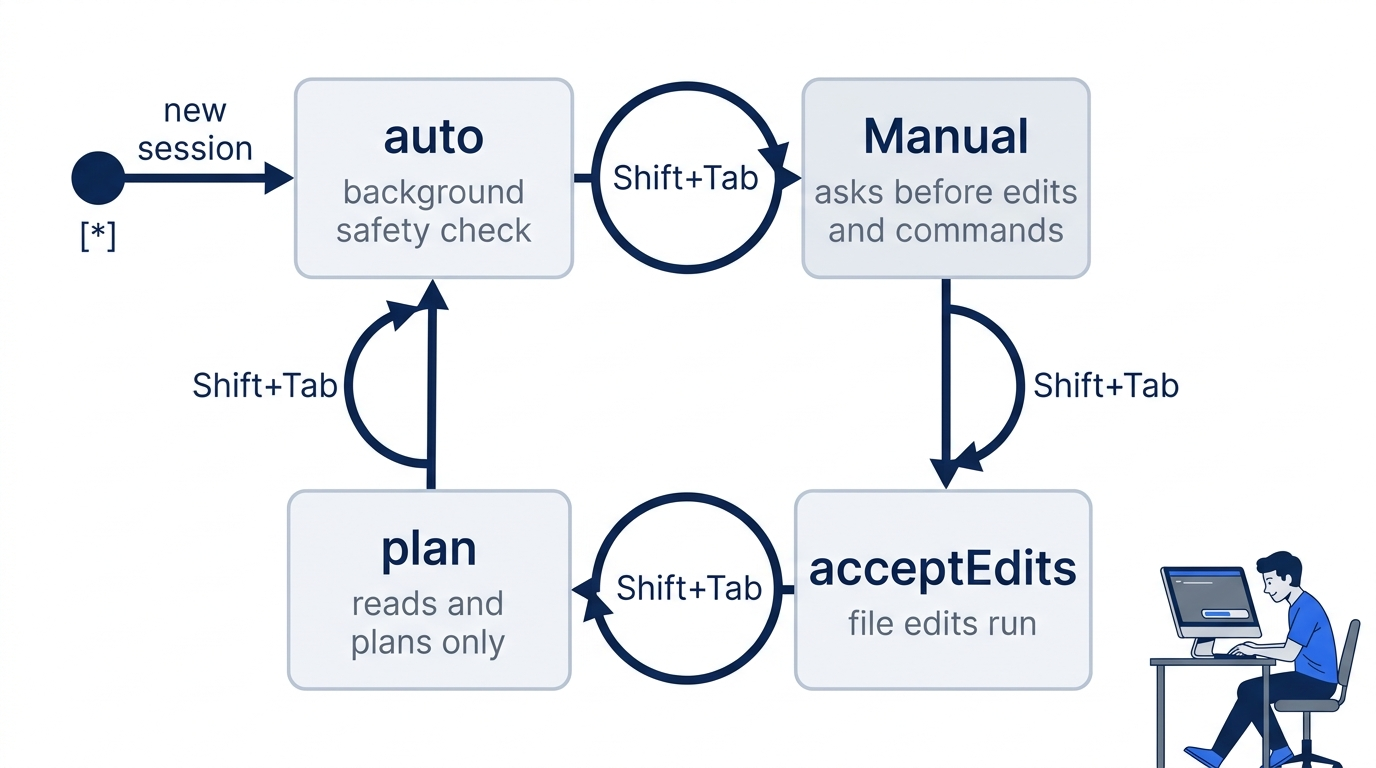
When the safety check blocks an action in auto mode, Claude Code shows a notice, and Claude gets the reason. If it blocks three actions in a row, or 20 in total, auto mode pauses and Claude Code asks you instead.
The habit to build now: glance at the status bar before a large prompt. Before you ask Claude to read forty files and explain the architecture, press Shift+Tab until the status bar says plan. Day 3 builds on that habit, and Day 4 covers the modes in full, including the rules that let you allow or block single commands. The permission modes page has the full table.
Other places to run Claude Code
You do not have to live in the terminal. The same engine, settings, and CLAUDE.md work in:
- VS Code, Cursor, and Windsurf. Install the extension from the marketplace.
Cmd+Escon macOS (Ctrl+Escelsewhere) switches between the editor and Claude. Claude sees your selected code. - JetBrains IDEs. The same model. With JetBrains Remote Development, install the plugin on the remote host, not your laptop.
- The Desktop app, with a Code tab that runs sessions on your machine, on a remote host over SSH, or in Anthropic's cloud.
The choice does not lock you in. Your sessions, CLAUDE.md, skills, and settings follow you. Day 15 covers each surface.
Go further: Why Your First Hour With Claude Code Decides Everything adds a first-hour routine built on one rule: verify before you trust. It was written before auto mode became the default, so skip its advice to start each session in default mode.
Do this today
Everyone
- Build Ticket Triage, install Claude Code, run
/init, and add thedamagedcategory. Check the win:npm testshows 4 passing tests, andgit logshows your three commits. - Habit: end every prompt that changes code with "Then run the tests and tell me if anything broke."
If you read Going deeper
- Run
claude doctor. Check that theAuto-updatesline saysenabledon a native install. Reset: nothing changed. - Run
/modeland read the picker. Confirm that the default is Opus 5.5. Reset: pressEscto close the picker without a change. - Press
Shift+Tabfour times and read each mode name in the status bar. Reset: stop on the mode your session started in,auto mode onormanual mode on. - On a real project of yours, run the five first prompts. Then run
/contextand note the total. Reset: the prompts only read files. Rungit statusin that project and check that it lists no change.
Proof beats confidence
The first session with an AI coding agent usually ends with a confident report and a shrug. Yours ends with three commits, a CLAUDE.md that tells every future session how to test the project, and a pass count of 4 that you read with your own eyes.
None of today's steps were hard. The native installer keeps you current, /init gives the project a memory, and auto mode lets Claude work without a prompt at every step. The part that changes how you work is the last sentence of the prompt. Ask for the change, then ask for the check, then run the check yourself.
Claude Code will tell you it is done. Your tests will tell you whether that is true.
This is Part 1 of "Claude Code, Day-to-Day (second edition)," a day-by-day guide to Claude Code in which each day takes 20 to 40 minutes. Part 1 is Day 1. All 28 days are out now.