Your First Claude Managed Agent: From Zero to a Finished Task in Four Calls
Building a real Claude Managed Agent is only four API calls, but the fourth one hides the single most common first-run mistake: the stream-first ordering rule.
Create an agent, stand up an environment, open a session, and stream back real work. Plus the one ordering rule that quietly breaks almost everyone's first run.
In this article: You will build a real Claude Managed Agent that reads a folder of invoices, totals them inside a real container, and streams its progress back to your terminal. It takes exactly four API calls. Three are nearly boilerplate. The fourth hides the most common first-run mistake in the whole product, and by the end you will know exactly why the order of two lines decides whether your agent works or hangs.
Most tutorials for autonomous AI agent infrastructure bury you in concepts before you see a single result. This one does the opposite. You are going to ship a working agent in four calls, watch it think out loud, and only then slow down to understand what happened.
Here is the shape of the work. Claude Managed Agents run server-side. You define an agent, give it an environment to run in, open a session for one task, and stream the results back. No tool loop to hand-roll, no orchestration code, no babysitting. The agent decides what to do and does it inside a container Anthropic provisions for you.
The catch is small and sharp. Three of the four calls are forgettable plumbing. The fourth, the one where you actually start the work, has an ordering rule that runs against every instinct you built from years of request-response APIs. Get it wrong and your first run hangs or comes back empty, and you will spend twenty minutes debugging a problem that is two lines in the wrong sequence. We will build up to it deliberately.
Code is shown in Python and TypeScript. Pick your stack and follow one column. The shapes are identical across both.
The shape of the work: create once, run many
Before any code, hold one idea steady, because it explains why this is four calls instead of one.
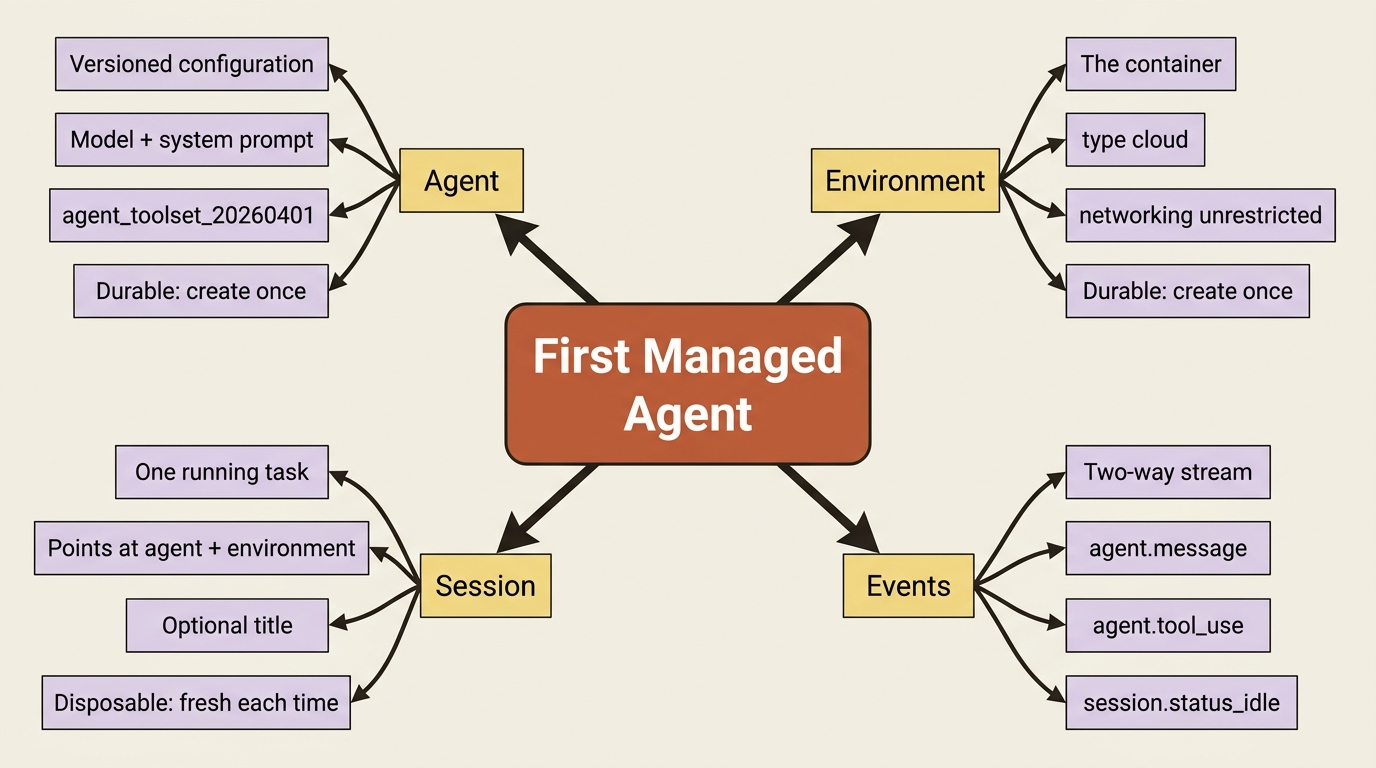
The agent and the environment are durable resources. They live on Anthropic's side. You create each one once, get back an ID, and reference that ID forever after. The session is the disposable part: one per task, created fresh each time, pointing at the durable agent and environment.

That split is the opposite of a single stateless API call, and it is the source of most of the power in this model. For now it just means you do a little setup once, and then starting new work is a one-liner. The invoice agent you define here is the kind of thing you reuse across many tasks. You define it, then you forget about redefining it.
Step 1: Create the agent
An agent is the model, a system prompt, and the tools it is allowed to use. For an invoice-reconciliation agent you give it a clear job in the system prompt and hand it the full pre-built toolset.
Here it is in Python:
from anthropic import Anthropic

client = Anthropic()

agent = client.beta.agents.create(
    name="Invoice Reconciler",
    model="claude-opus-4-7",
    system=(
        "You are an invoice-reconciliation agent. You read vendor invoices, "
        "cross-check them against a ledger, and report any discrepancies clearly. "
        "Show your work and verify results before reporting them done."
    ),
    tools=[
        {"type": "agent_toolset_20260401"},
    ],
)

print(f"Agent ID: {agent.id}, version: {agent.version}")
And in TypeScript:
import Anthropic from "@anthropic-ai/sdk";

const client = new Anthropic();

const agent = await client.beta.agents.create({
  name: "Invoice Reconciler",
  model: "claude-opus-4-7",
  system:
    "You are an invoice-reconciliation agent. You read vendor invoices, " +
    "cross-check them against a ledger, and report any discrepancies clearly. " +
    "Show your work and verify results before reporting them done.",
  tools: [{ type: "agent_toolset_20260401" }],
});

console.log(`Agent ID: ${agent.id}, version: ${agent.version}`);
Two things in that response are worth noticing. The agent.id is what every future session points at, so save it. The agent.version is the quieter half of the story. Agents are versioned, so when you change this configuration later and create it again, you get a new version rather than a duplicate. Sessions can pin to a specific version or float to the latest. That matters a great deal when you deploy. For now, just register that the version number exists and means something.
The agent_toolset_20260401 line is doing a lot of quiet lifting. That single entry enables the full pre-built toolset: bash, file read, write, edit, glob, grep, web fetch, and web search, all executed server-side inside the container. You are not wiring up tool execution. You are switching it on.
Step 2: Create the environment
The environment is the container the agent's commands actually run in. The minimal version is two fields: a name, and a config that says "cloud, with normal network access."
In Python:
environment = client.beta.environments.create(
    name="invoice-env",
    config={
        "type": "cloud",
        "networking": {"type": "unrestricted"},
    },
)

print(f"Environment ID: {environment.id}")
In TypeScript:
const environment = await client.beta.environments.create({
  name: "invoice-env",
  config: {
    type: "cloud",
    networking: { type: "unrestricted" },
  },
});

console.log(`Environment ID: ${environment.id}`);
type: "cloud" means Anthropic runs the container for you, which is what you want while learning. The other option is a self-hosted sandbox on your own infrastructure, for cases where data cannot leave your network. networking: { type: "unrestricted" } gives the container full outbound access minus a safety blocklist, which is the convenient default for development. In production you tighten this to an allowlist. Save the environment.id alongside the agent ID. The session needs both.
In production: you would also pre-install packages on the environment so the agent does not reinstall them every run, and you would switch networking from unrestricted to limited with an explicit allowlist. Both are environment-config changes, not code changes.
Step 3: Create the session
Now the disposable part. A session points at the agent and the environment, takes an optional human-readable title, and comes back with an ID you will stream against.
In Python:
session = client.beta.sessions.create(
    agent=agent.id,
    environment_id=environment.id,
    title="Reconcile March invoices",
)

print(f"Session ID: {session.id}")
In TypeScript:
const session = await client.beta.sessions.create({
  agent: agent.id,
  environment_id: environment.id,
  title: "Reconcile March invoices",
});

console.log(`Session ID: ${session.id}`);
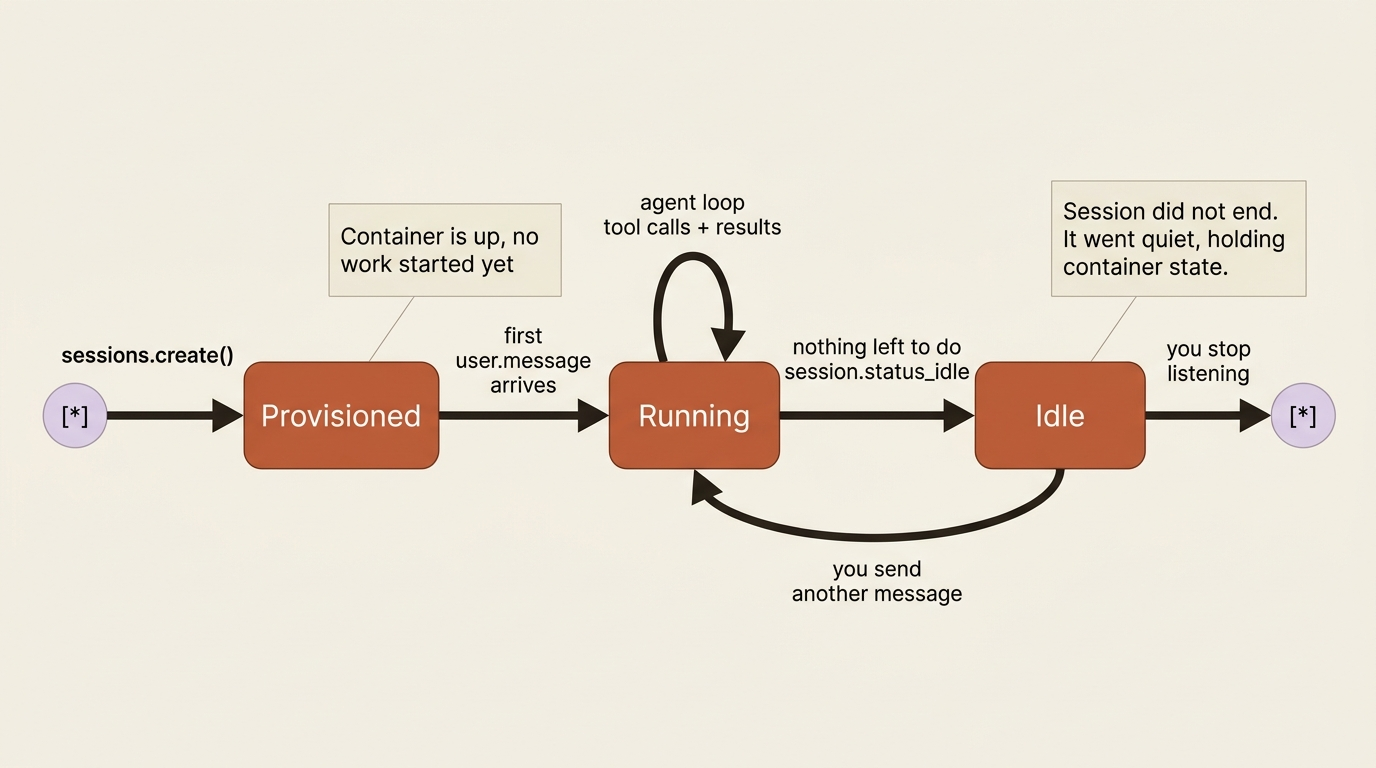
Passing agent.id as a plain string starts the session on the agent's latest version, which is what you want unless you are deliberately pinning. Creating the session provisions its container but does not start any work yet. The agent is sitting in a warm room waiting for something to do. Nothing happens until you send the first message, which is the next and final step, and also the one with the trap in it.
Step 4: Stream first, then send
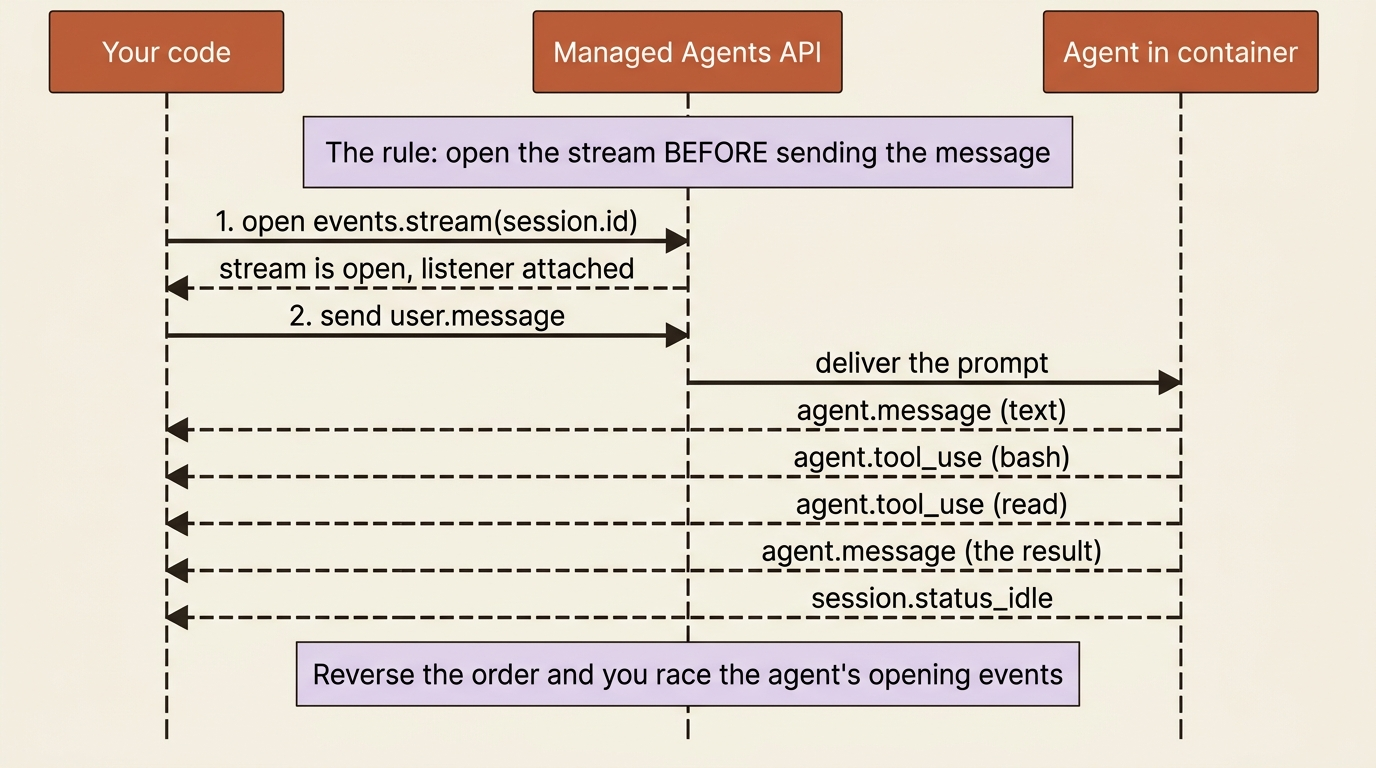
Here is the rule, stated plainly before the code, because reversing it is the first wall almost everyone hits: open the event stream first, and only then send the user message.
The instinct from every other API you have used is to send the request and then read the response. That instinct is wrong here. A session is a long-running, two-way stream, not a request with a reply. You attach a listener to the stream, and then you poke the agent into action. Get the order backward and, at best, you race the agent and risk missing the opening events of its run. Structuring your code stream-first removes the race entirely.
The SDK makes the correct order natural. You open the stream, send the message inside that open context, and then loop over events as they arrive. In Python:
with client.beta.sessions.events.stream(session.id) as stream:
    # The stream is open. Now kick off the work.
    client.beta.sessions.events.send(
        session.id,
        events=[
            {
                "type": "user.message",
                "content": [
                    {
                        "type": "text",
                        "text": (
                            "Read the invoices in /mnt/invoices, total them, "
                            "and tell me the combined amount."
                        ),
                    },
                ],
            },
        ],
    )

    for event in stream:
        match event.type:
            case "agent.message":
                for block in event.content:
                    print(block.text, end="")
            case "agent.tool_use":
                print(f"\n[Using tool: {event.name}]")
            case "session.status_idle":
                print("\n\nAgent finished.")
                break
The same flow in TypeScript:
const stream = await client.beta.sessions.events.stream(session.id);

// The stream is open. Now kick off the work.
await client.beta.sessions.events.send(session.id, {
  events: [
    {
      type: "user.message",
      content: [
        {
          type: "text",
          text:
            "Read the invoices in /mnt/invoices, total them, " +
            "and tell me the combined amount.",
        },
      ],
    },
  ],
});

for await (const event of stream) {
  if (event.type === "agent.message") {
    for (const block of event.content) {
      process.stdout.write(block.text);
    }
  } else if (event.type === "agent.tool_use") {
    console.log(`\n[Using tool: ${event.name}]`);
  } else if (event.type === "session.status_idle") {
    console.log("\n\nAgent finished.");
    break;
  }
}
That loop is the smallest useful event handler there is, and it already shows the three things you care about on a first run. agent.message is the agent talking, so you print its text. agent.tool_use is the agent reaching for a tool, so you print which one. Watching these scroll by is how you see the agent actually working rather than waiting on a black box. session.status_idle is the signal that the agent has nothing left to do, so you stop listening. Everything else streaming past, the thinking, the tool results, and the span markers, you are ignoring for now.
Gotcha: if your first run hangs or comes back empty, check the order before anything else. Stream first, send second. The events are buffered server-side, so they are not actually lost, but writing your code in the wrong order is the fastest way to confuse yourself into thinking the agent did nothing.
What you see when it runs
Send that message against a folder of invoices, and the terminal fills in with the agent narrating its own work. It announces a plan, reaches for tools, and reports back. The shape looks like this:
I'll read the invoices in /mnt/invoices and total them up.
[Using tool: bash]
[Using tool: read]
I found 3 invoices. Let me add up the amounts.
[Using tool: bash]
The three invoices total $14,820.00.

Agent finished.
Notice the tool names are lowercase and concrete: bash to list the folder, read to open each file, bash again to do the arithmetic. That is the agent loop running server-side. You sent one sentence. The agent decided, on its own, that the job needed several tool calls in sequence, ran each one inside the container, checked its result, and only then reported a number. You wrote none of that orchestration. That absence is the entire point of Claude Managed Agents.
What just happened under the hood
It is worth naming the five things the harness did between your message and Agent finished, because nearly everything you build later is a variation on one of these steps.
First, it provisioned the container from your environment config. Second, it ran the agent loop, letting Claude decide which tool to use next based on your request. Third, it executed those tools inside the container, where the file reads and shell commands actually happened. Fourth, it streamed events back to you in real time as each step occurred. Fifth, when Claude had nothing left to do, it emitted session.status_idle and waited.
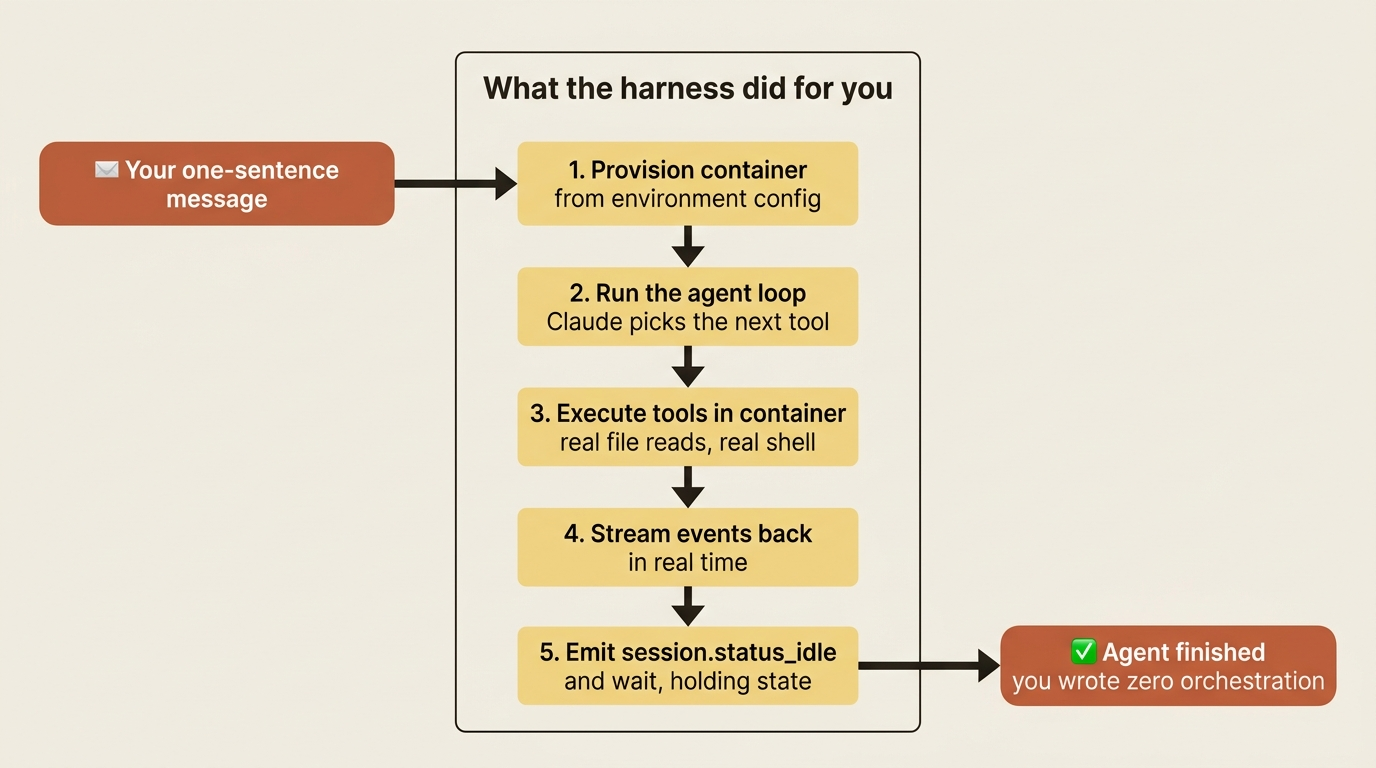
The session did not end. It went quiet, holding its container state, ready for your next message. That persistence is what makes a conversation continue naturally instead of starting cold every time.
A faster way to feel it: Console
Everything above is the code path, and it is the one you ship. But if you want to watch this loop happen before you write a line, Console gives you the same thing through a visual interface. You configure the agent's model, system prompt, tools, and skills by filling in fields, and as you do, Console shows you the equivalent API request, so the JSON shape stops being mysterious. Then its inline session runner lets you start a test session right there, send a message, and watch the event stream on the page. When the agent behaves the way you want, you copy the agent ID and environment ID into your code and pick up exactly where these four steps left off. Prototype by clicking, and promote to code when it works.
Do this today
- Run the four calls end to end. Create the agent, create the environment, create the session, then open the stream and send a message. Print every ID as you go.
- Save the agent ID and environment ID. They are durable. Treat them like configuration you reuse, not throwaway values.
- Write your streaming code stream-first, on purpose. Open the stream, then send the message inside that open context. Make the correct order a habit before it can ever bite you.
- Handle exactly three event types first:
agent.message,agent.tool_use, andsession.status_idle. Ignore everything else until the basic loop works. - Prototype in Console if the JSON feels abstract. Configure the agent by clicking, watch the event stream on the page, then copy the IDs into code.
Where this leaves you
You now have a running agent that takes a plain-language request, decides for itself how to accomplish it, executes real work in a real container, and streams its progress back, with you writing zero loop and zero tool plumbing. You also have the one ordering rule, stream first then send, that separates a smooth first run from a baffling one.
What you do not yet have is fluency in what is actually coming down that stream. You handled three event types and ignored a dozen others. One of those ignored events, session.status_idle, hides a detail that changes how you think about the whole system: idle does not always mean done. Sometimes it means the agent is blocked, waiting on you, and the reason is sitting in a field you did not read.
Build the four calls today. Get the order right. Watch your agent total a folder of invoices on its own. The plumbing is small. What you do with it is not.
This is Part 2 of "Building with Claude Managed Agents," a 13-part guide to building production-ready AI agents.